CBV - PasswordChangeDoneView
From Classy Class Based Views PasswordChangeDoneView
Render a template. Pass keyword arguments from the URLconf to the context.
Attributes
- template_name: Much like the
LogoutViewthe default view is the Django skin. Create your ownpassword_change_done.htmlfile to keep the user experience consistent across the site. - title: the default uses the function
gettext_lazy()and passes the string ‘Password change successful’. The functiongettext_lazy()will translate the text into the local language if a translation is available. I’d just keep the default on this.
Example
views.py
class myPasswordChangeDoneView(PasswordChangeDoneView):
    pass
urls.py
path('password_change_done_view/', views.myPasswordChangeDoneView.as_view(), name='password_change_done_view'),
password_change_done.html
{% extends "base.html" %}
{% load i18n %}

{% block content %}
    <h1>
    {% block title %}
        {{ title }}
    {% endblock %}
    </h1>
<p>{% trans "Password changed" %}</p>
{% endblock %}
settings.py
LOGIN_URL = '/<app_name>/login_view/'
The above assumes that have this set up in your urls.py
Special Notes
You need to set the URL_LOGIN value in your settings.py. It defaults to /accounts/login/. If that path isn’t valid you’ll get a 404 error.
Diagram
A visual representation of how PasswordChangeDoneView is derived can be seen here:

Conclusion
Again, not much to do here. Let Django do all of the heavy lifting, but be mindful of the needed work in settings.py and the new template you’ll need/want to create
CBV - PasswordChangeView
From Classy Class Based Views PasswordChangeView
A view for displaying a form and rendering a template response.
Attributes
- form_class: The form that will be used by the template created. Defaults to Django’s
PasswordChangeForm - success_url: If you’ve created your own custom PasswordChangeDoneView then you’ll need to update this. The default is to use Django’s but unless you have a top level
urls.pyhas the name ofpassword_change_doneyou’ll get an error. - title: defaults to ‘Password Change’ and is translated into local language
Example
views.py
class myPasswordChangeView(PasswordChangeView):
    success_url = reverse_lazy('rango:password_change_done_view')
urls.py
path('password_change_view/', views.myPasswordChangeView.as_view(), name='password_change_view'),
password_change_form.html
{% extends "base.html" %}
{% load i18n %}

{% block content %}
    <h1>
    {% block title %}
        {{ title }}
    {% endblock %}
    </h1>
<p>{% trans "Password changed" %}</p>
{% endblock %}
Diagram
A visual representation of how PasswordChangeView is derived can be seen here:

Conclusion
The only thing to keep in mind here is the success_url that will most likely need to be set based on the application you’ve written. If you get an error about not being able to use reverse to find your template, that’s the issue.
CBV - LoginView
From Classy Class Based Views LoginView
Display the login form and handle the login action.
Attributes
- authentication_form: Allows you to subclass
AuthenticationFormif needed. You would want to do this IF you need other fields besides username and password for login OR you want to implement other logic than just account creation, i.e. account verification must be done as well. For details see example by Vitor Freitas for more details - form_class: The form that will be used by the template created. Defaults to Django’s
AuthenticationForm - redirect_authenticated_user: If the user is logged in then when they attempt to go to your login page it will redirect them to the
LOGIN_REDIRECT_URLconfigured in yoursettings.py - redirect_field_name: similar idea to updating what the
nextfield will be from theDetailView. If this is specified then you’ll most likely need to create a custom login template. - template_name: The default value for this is
registration\login.html, i.e. a file calledlogin.htmlin theregistrationdirectory of thetemplatesdirectory.
There are no required attributes for this view, which is nice because you can just add pass to the view and you’re set (for the view anyway you still need an html file).
You’ll also need to update settings.py to include a value for the LOGIN_REDIRECT_URL.
Note on redirect_field_name
Per the Django Documentation:
If the user isn’t logged in, redirect to settings.LOGIN*URL, passing the current absolute path in the query string. Example: /accounts/login/?next=/polls/3/. *
If redirect_field_name is set then the URL would be:
/accounts/login/?<redirect_field_name>=/polls/3
Basically, you only use this if you have a pretty good reason.
Example
views.py
class myLoginView(LoginView):
    pass
urls.py
path('login_view/', views.myLoginView.as_view(), name='login_view'),
registration/login.html
{% extends "base.html" %}
{% load i18n %}

{% block content %}
<form method="post" action=".">
  {% csrf_token %}

  <div class="mui--text-danger">
    {% for error in form.non_field_errors %}
      {{error}}
    {% endfor %}
  </div>

  <div class="mui-textfield">
    {{ form.username.label }}
    {{ form.username }}
  </div>
  <div class="mui-textfield">
    {{ form.password.label }}
    {{ form.password }}
  </div>

  <input class="mui-btn mui-btn--primary" type="submit" value="{% trans 'Log in' %}" />
  <input type="hidden" name="next" value="{{ request.GET.next }}" />
</form>

<br><div class="mui-divider"></div><br>
{% endblock %}
settings.py
LOGIN_REDIRECT_URL = '/<app_name>/'
Diagram
A visual representation of how LoginView is derived can be seen here:

Conclusion
Really easy to implement right out of the box but allows some nice customization. That being said, make those customizations IF you need to, not just because you think you want to.
CBV - LogoutView
From Classy Class Based Views LogoutView
Log out the user and display the 'You are logged out' message.
Attributes
- next_page: redirects the user on logout.
- redirect_field_name: The name of a GET field containing the URL to redirect to after log out. Defaults to next. Overrides the next_page URL if the given GET parameter is passed. 1
- template_name: defaults to
registration\logged_out.html. Even if you don’t have a template the view does get rendered but it uses the default Django skin. You’ll want to create your own to allow the user to logout AND to keep the look and feel of the site.
Example
views.py
class myLogoutView(LogoutView):
    pass
urls.py
path('logout_view/', views.myLogoutView.as_view(), name='logout_view'),
registrationlogged_out.html
{% extends "base.html" %}
{% load i18n %}

{% block content %}
<p>{% trans "Logged out" %}</p>
{% endblock %}
Diagram
A visual representation of how LogoutView is derived can be seen here:
Image Link from CCBV YUML goes here
Conclusion
I’m not sure how it could be much easier to implement a logout page.
- Per Django Docs ↩︎
CBV - DeleteView
From Classy Class Based Views DeleteView
View for deleting an object retrieved with self.get*object(), with a *
response rendered by a template.
Attributes
There are no new attributes, but 2 that we’ve seen are required: (1) queryset or model; and (2) success_url
Example
views.py
class myDeleteView(DeleteView):
    queryset = Person.objects.all()
    success_url = reverse_lazy('rango:list_view')
urls.py
path('delete_view/<int:pk>', views.myDeleteView.as_view(), name='delete_view'),
\<template_name>.html
Below is just the form that would be needed to get the delete to work.
    <form method="post">
    {% csrf_token %}
    <table border="1">
        <tr>
        <th>First Name</th>
        <th>Last Name</th>
        </tr>
        <tr>
            <td>{{ person.first_name }}</td>
            <td>{{ person.last_name }}</td>
        </tr>
    </table>
    <div>
        <a href="{% url 'rango:list_view' %}">Back</a>
        <input type="submit" value="Delete">
    </div>
    </form>
Diagram
A visual representation of how DeleteView is derived can be seen here:

Conclusion
As far as implementations, the ability to add a form to delete data is about the easiest thing you can do in Django. It requires next to nothing in terms of implementing. We now have step 4 of a CRUD app!
CBV - UpdateView
From Classy Class Based Views UpdateView
View for updating an object, with a response rendered by a template.
Attributes
Two attributes are required to get the template to render. We’ve seen queryset before and in CreateView we saw fields. As a brief refresher
- fields: specifies what fields from the model or queryset will be displayed on the rendered template. You can you set
fieldsto__all__if you want to return all of the fields - success_url: you’ll want to specify this after the record has been updated so that you know the update was made.
Example
views.py
class myUpdateView(UpdateView):
    queryset = Person.objects.all()
    fields = '__all__'
    extra_context = {
        'type': 'Update'
    }
    success_url = reverse_lazy('rango:list_view')
urls.py
path('update_view/<int:pk>', views.myUpdateView.as_view(), name='update_view'),
\<template>.html
{% block content %}
    <h3>{{ type }} View</h3>
    {% if type == 'Create' %}
        <form action="." method="post">
    {% else %}
        <form action="{% url 'rango:update_view' object.id %}" method="post">
    {% endif %}
    {% csrf_token %}
    <table>
    {{ form.as_p }}
    </table>
    <button type="submit">SUBMIT</button>
    </form>
{% endblock %}
Diagram
A visual representation of how UpdateView is derived can be seen here:

Conclusion
A simple way to implement a form to update data in a model. Step 3 for a CRUD app is now complete!
CBV - FormView
From Classy Class Based Views FormView
A view for displaying a form and rendering a template response.
Attributes
The only new attribute to review this time is form_class. That being said, there are a few implementation details to cover
- form_class: takes a Form class and is used to render the form on the
htmltemplate later on.
Methods
Up to this point we haven’t really needed to override a method to get any of the views to work. This time though, we need someway for the view to verify that the data is valid and then save it somewhere.
- form_valid: used to verify that the data entered is valid and then saves to the database. Without this method your form doesn’t do anything
Example
This example is a bit more than previous examples. A new file called forms.py is used to define the form that will be used.
forms.py
from django.forms import ModelForm
from rango.models import Person


class PersonForm(ModelForm):
    class Meta:
        model = Person
        exclude = [
            'post_date',
        ]
views.py
class myFormView(FormView):
    form_class = PersonForm
    template_name = 'rango/person_form.html'
    extra_context = {
        'type': 'Form'
    }
    success_url = reverse_lazy('rango:list_view')

    def form_valid(self, form):
        person = Person.objects.create(
            first_name=form.cleaned_data['first_name'],
            last_name=form.cleaned_data['last_name'],
            post_date=datetime.now(),
        )
        return super(myFormView, self).form_valid(form)
urls.py
path('form_view/', views.myFormView.as_view(), name='form_view'),
\<template_name>.html
    <h3>{{ type }} View</h3>
    {% if type != 'Update' %}
        <form action="." method="post">
    {% else %}
        <form action="{% url 'rango:update_view' object.id %}" method="post">
    {% endif %}
    {% csrf_token %}
    <table>
    {{ form.as_p }}
    </table>
    <button type="submit">SUBMIT</button>
    </form>
Diagram
A visual representation of how FormView is derived can be seen here:

Conclusion
I really struggled with understanding why you would want to implement FormView. I found this explanation on Agiliq and it helped me grok the why:
FormView should be used when you need a form on the page and want to perform certain action when a valid form is submitted. eg: Having a contact us form and sending an email on form submission.
CreateView would probably be a better choice if you want to insert a model instance in database on form submission.
While my example above works, it’s not the intended use of FormView. Really, it’s just an implementation of CreateView using FormView
CBV - CreateView
From Classy Class Based Views CreateView
View for creating a new object, with a response rendered by a template.
Attributes
Three attributes are required to get the template to render. Two we’ve seen before (queryset and template_name). The new one we haven’t see before is the fields attribute.
- fields: specifies what fields from the model or queryset will be displayed on the rendered template. You can you set
fieldsto__all__if you want to return all of the fields
Example
views.py
queryset = Person.objects.all()
fields = '__all__'
template_name = 'rango/person_form.html'
urls.py
path('create_view/', views.myCreateView.as_view(), name='create_view'),
\<template>.html
{% extends 'base.html' %}

    <h1>
    {% block title %}
        {{ title }}
    {% endblock %}
    </h1>


{% block content %}
    <h3>{{ type }} View</h3>
    <form action="." method="post">
    {% csrf_token %}
    <table>
    {{ form.as_p }}
    </table>
    <button type="submit">SUBMIT</button>
    </form>
{% endblock %}
Diagram
A visual representation of how CreateView is derived can be seen here:

Conclusion
A simple way to implement a form to create items for a model. We’ve completed step 1 for a basic CRUD application.
CBV - DayArchiveView
From Classy Class Based Views DayArchiveView
List of objects published on a given day.
Attributes
There are six new attributes to review here … well really 3 new ones and then a formatting attribute for each of these 3:
- day: The day to be viewed
- day_format: The format of the day to be passed. Defaults to
%d - month: The month to be viewed
- month_format: The format of the month to be passed. Defaults to
%b - year: The year to be viewed
- year_format: The format of the year to be passed. Defaults to
%Y
Required Attributes
- day
- month
- year
- date_field: The field that holds the date that will drive every else. We saw this in ArchiveIndexView
Additionally you also need model or queryset
The day, month, and year can be passed via urls.py so that they do’t need to be specified in the view itself.
Example:
views.py
class myDayArchiveView(DayArchiveView):
    month_format = '%m'
    date_field = 'post_date'
    queryset = Person.objects.all()
    context_object_name = 'person'
    paginate_by = 10
    page_kwarg = 'name'
urls.py
path('day_archive_view/<int:year>/<int:month>/<int:day>/', views.myDayArchiveView.as_view(), name='day_archive_view'),
\<model_name>_archiveday.html
{% extends 'base.html' %}
<h1>
{% block title %}
{{ title }}
{% endblock %}
</h1>
{% block content %}
<div>
<ul>
{% for p in person %}
<li><a href="{% url 'rango:detail_view' p.first_name %}">{{ p.post_date }}: {{ p.first_name }} {{ p.last_name }}</a></li>
{% endfor %}
</ul>
</div>
<div class="">
{% if is_paginated %}
<ul class="mui-list--inline mui--text-body2">
{% if page_obj.has_previous %}
<li><a href="?name={{ page_obj.previous_page_number }}">«</a></li>
{% else %}
<li class="disabled"><span>«</span></li>
{% endif %}
{% for i in paginator.page_range %}
{% if page_obj.number == i %}
<li class="active"><span>{{ i }} <span class="sr-only">(current)</span></span></li>
{% else %}
<li><a href="?name={{ i }}">{{ i }}</a></li>
{% endif %}
{% endfor %}
{% if page_obj.has_next %}
<li><a href="?name={{ page_obj.next_page_number }}">»</a></li>
{% else %}
<li class="disabled"><span>»</span></li>
{% endif %}
</ul>
{% endif %}
</div>
{% endblock %}
Diagram
A visual representation of how DayArchiveView is derived can be seen here:

Conclusion
If you have date based content a great tool to use and again super easy to implement.
There are other time based CBV for Today, Date, Week, Month, and Year. They all do the same thing (generally) so I won’t review those.
CBV - ArchiveIndexView
From Classy Class Based Views ArchiveIndexView
Top-level archive of date-based items.
Attributes
There are 20 attributes that can be set for the ArchiveIndexView but most of them are based on ancestral Classes of the CBV so we won’t be going into them in Detail.
DateMixin Attributes
- allow_future: Defaults to False. If set to True you can show items that have dates that are in the future where the future is anything after the current date/time on the server.
- date_field: the field that the view will use to filter the date on. If this is not set an error will be generated
- uses_datetime_field: Convert a date into a datetime when the date field is a DateTimeField. When time zone support is enabled,
dateis assumed to be in the current time zone, so that displayed items are consistent with the URL.
BaseDateListView Attributes
-
allow_empty: Defaults to
False. This means that if there is no data a404error will be returned with the messageNo __str__ Availablewhere ‘__str__’ is the display of your model -
date_list_period: This attribute allows you to break down by a specific period of time (years, months, days, etc.) and group your date driven items by the period specified. See below for implementation
For year
views.py
date_list_period='year'
urls.py
Nothing special needs to be done
\<file_name_>.html
{% block content %}
    <div>
        {%  for date in date_list %}
        {{ date.year }}
        <ul>
        {% for p in person %}
            {% if date.year == p.post_date.year %}
                <li>{{ p.post_date }}: {{ p.first_name }} {{ p.last_name }}</li>
            {% endif %}
        {% endfor %}
        </ul>
        {% endfor %}
    </div>
{% endblock %}
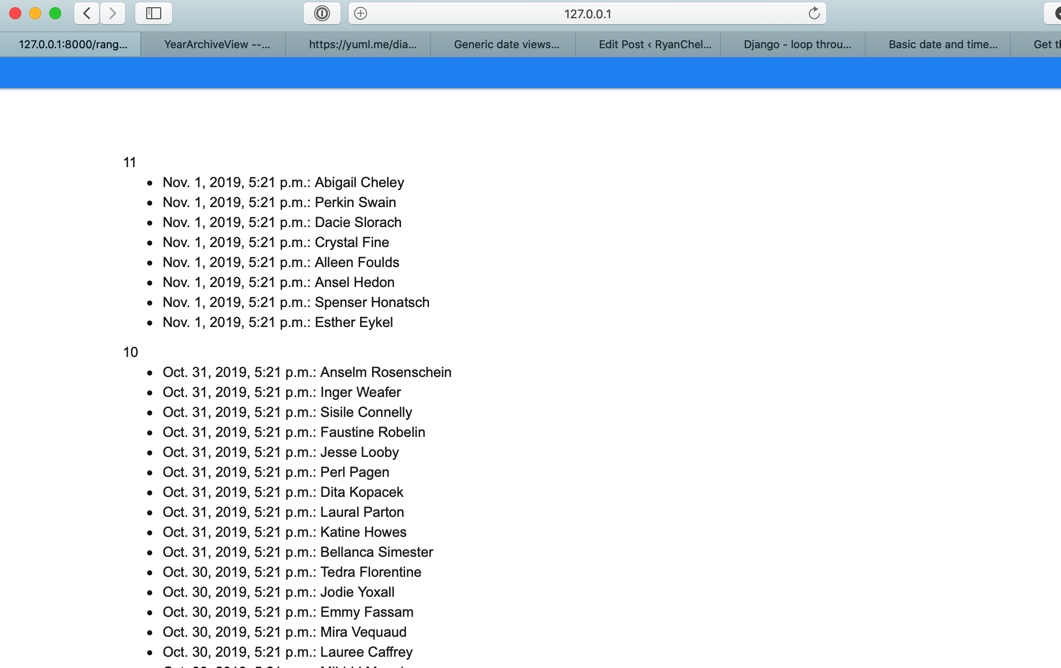
Will render:

For month
views.py
date_list_period='month'
urls.py
Nothing special needs to be done
\<file_name_>.html
{% block content %}
    <div>
        {%  for date in date_list %}
        {{ date.month }}
        <ul>
        {% for p in person %}
            {% if date.month == p.post_date.month %}
                <li>{{ p.post_date }}: {{ p.first_name }} {{ p.last_name }}</li>
            {% endif %}
        {% endfor %}
        </ul>
        {% endfor %}
    </div>
{% endblock %}
Will render:
BaseArchiveIndexView Attributes
- context_object_name: Name the object used in the template. As stated before, you’re going to want to do this so you don’t hate yourself (or have other developers hate you).
Other Attributes
MultipleObjectMixin Attributes
These attributes were all reviewed in the ListView post
- model = None
- ordering = None
- page_kwarg = 'page'
- paginate_by = None
- paginate_orphans = 0
- paginator_class = \<class 'django.core.paginator.Paginator'>
- queryset = None
TemplateResponseMixin Attributes
This attribute was reviewed in the ListView post
- content_type = None
ContextMixin Attributes
This attribute was reviewed in the ListView post
- extra_context = None
View Attributes
This attribute was reviewed in the View post
- http_method_names = ['get', 'post', 'put', 'patch', 'delete', 'head', 'options', 'trace']
TemplateResponseMixin Attributes
These attributes were all reviewed in the ListView post
- response_class = \<class 'django.template.response.TemplateResponse'>
- template_engine = None
- template_name = None
Diagram
A visual representation of how ArchiveIndexView is derived can be seen here:

Conclusion
With date driven data (articles, blogs, etc.) The ArchiveIndexView is a great CBV and super easy to implement.
Page 1 / 2