Getting your Domain to point to Digital Ocean Your Server
I use Hover for my domain purchases and management. Why? Because they have a clean, easy to use, not-slimy interface, and because I listed to enough Tech Podcasts that I’ve drank the Kool-Aid.
When I was trying to get my Hover Domain to point to my Digital Ocean server it seemed much harder to me than it needed to be. Specifically, I couldn’t find any guide on doing it! Many of the tutorials I did find were basically like, it’s all the same. We’ll show you with GoDaddy and then you can figure it out.
Yes, I can figure it out, but it wasn’t as easy as it could have been. That’s why I’m writing this up.
Digital Ocean
From Droplet screen click ‘Add a Domain’
<figure class="aligncenter">
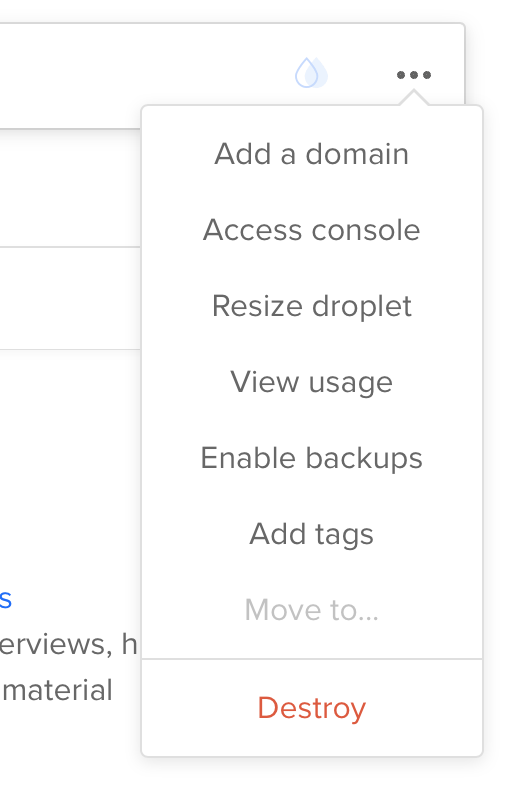
</p>
Add 2 ‘A’ records (one for www and one without the www)
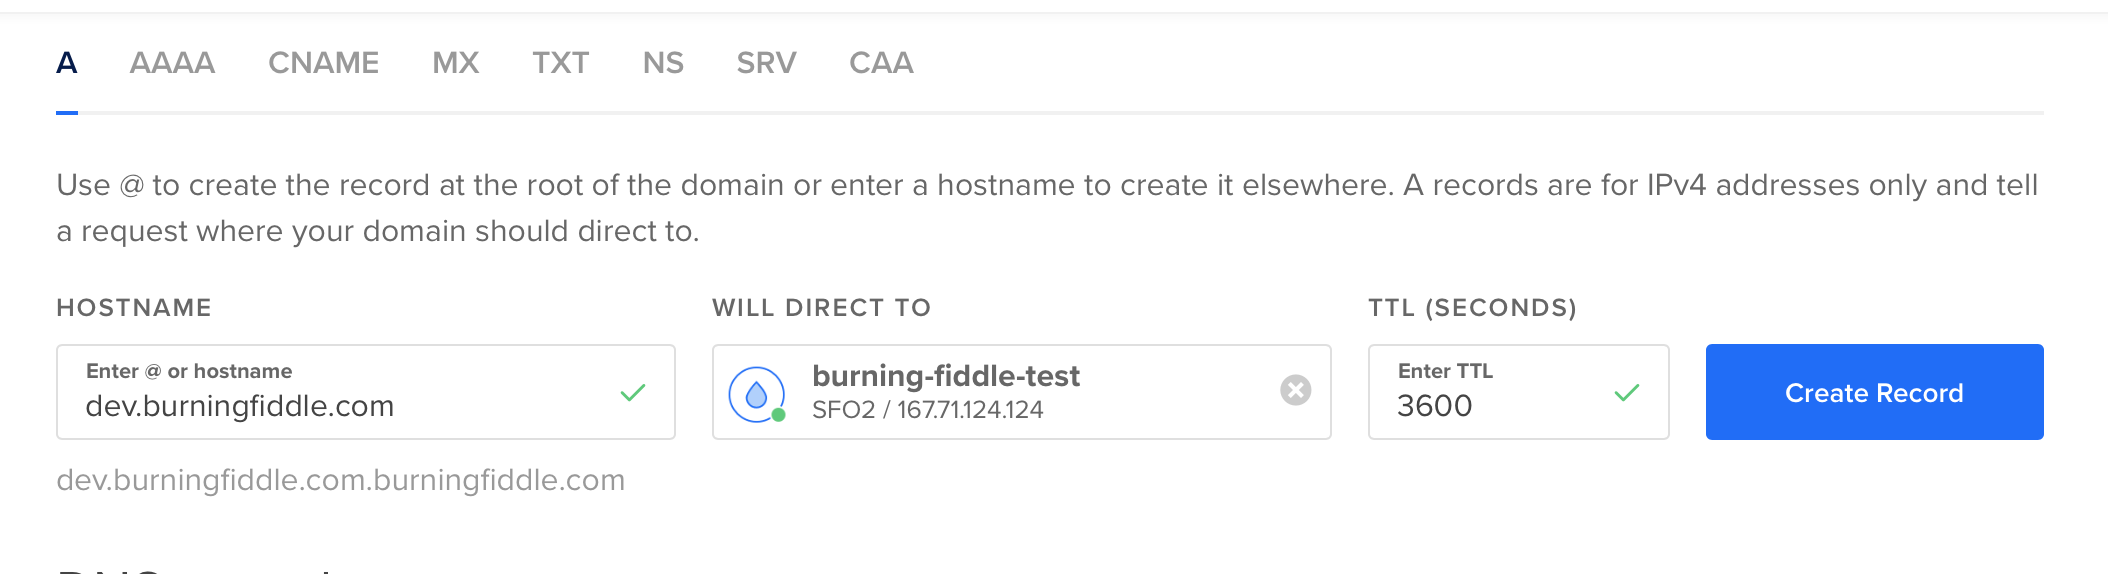
Make note of the name servers

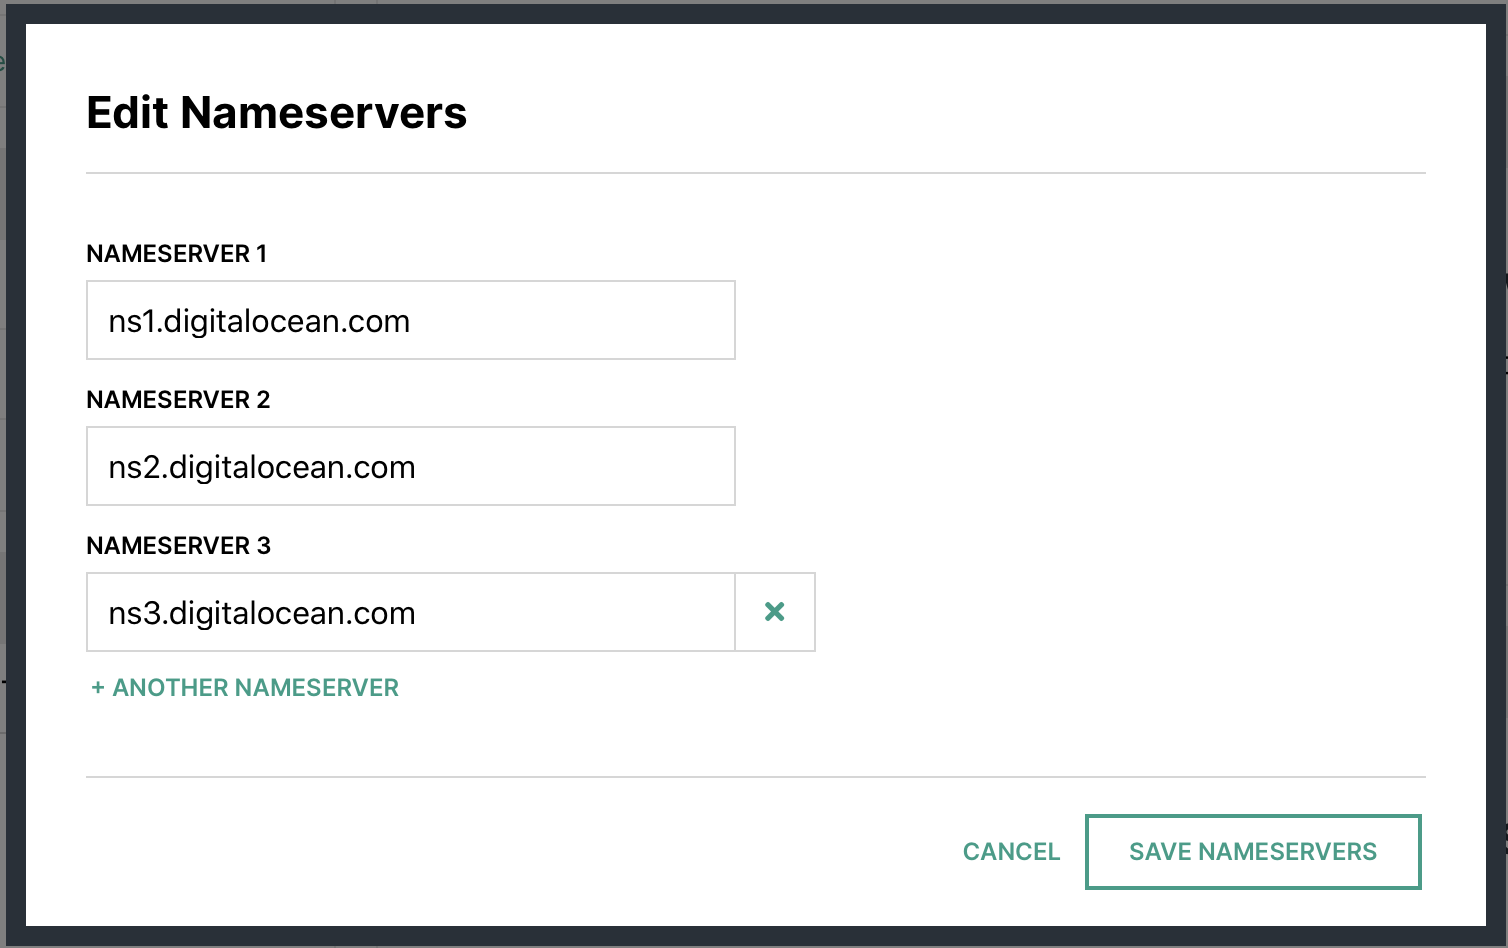
Hover
In your account at Hover.com change your Name Servers to Point to Digital Ocean ones from above.
Wait
DNS … does anyone really know how it works?1 I just know that sometimes when I make a change it’s out there almost immediately for me, and sometimes it takes hours or days.
At this point, you’re just going to potentially need to wait. Why? Because DNS that’s why. Ugh!
Setting up directory structure
While we’re waiting for the DNS to propagate, now would be a good time to set up some file structures for when we push our code to the server.
For my code deploy I’ll be using a user called burningfiddle. We have to do two things here, create the user, and add them to the www-data user group on our Linux server.
We can run these commands to take care of that:
adduser --disabled-password --gecos "" yoursite
The first line will add the user with no password and disable them to be able to log in until a password has been set. Since this user will NEVER log into the server, we’re done with the user creation piece!
Next, add the user to the proper group
adduser yoursite www-data
Now we have a user and they’ve been added to the group we need them to be added. In creating the user, we also created a directory for them in the home directory called yoursite. You should now be able to run this command without error
ls /home/yoursite/
If that returns an error indicating no such directory, then you may not have created the user properly.
Now we’re going to make a directory for our code to be run from.
mkdir /home/yoursite/yoursite
To run our Django app we’ll be using virtualenv. We can create our virtualenv directory by running this command
python3 -m venv /home/yoursite/venv
Configuring Gunicorn
There are two files needed for Gunicorn to run:
- gunicorn.socket
- gunicorn.service
For our setup, this is what they look like:
# gunicorn.socket

[Unit]
Description=gunicorn socket

[Socket]
ListenStream=/run/gunicorn.sock

[Install]
WantedBy=sockets.target
# gunicorn.service

[Unit]
Description=gunicorn daemon
Requires=gunicorn.socket
After=network.target

[Service]
User=yoursite
EnvironmentFile=/etc/environment
Group=www-data
WorkingDirectory=/home/yoursite/yoursite
ExecStart=/home/yoursite/venv/bin/gunicorn
         --access-logfile -
         --workers 3
         --bind unix:/run/gunicorn.sock
         yoursite.wsgi:application


[Install]
WantedBy=multi-user.target
For more on the details of the sections in both gunicorn.service and gunicorn.socket see this article.
Environment Variables
The only environment variables we have to worry about here (since we’re using SQLite) are the DJANGO_SECRET_KEY and DJANGO_DEBUG
We’ll want to edit /etc/environment with our favorite editor (I’m partial to vim but use whatever you like
vim /etc/environment
In this file you’ll add your DJANGO_SECRET_KEY and DJANGO_DEBUG. The file will look something like this once you’re done:
PATH="/usr/local/sbin:/usr/local/bin:/usr/sbin:/usr/bin:/sbin:/bin:/usr/games:/usr/local/games"
DJANGO_SECRET_KEY=my_super_secret_key_goes_here
DJANGO_DEBUG=False
Setting up Nginx
Now we need to create our .conf file for Nginx. The file needs to be placed in /etc/nginx/sites-available/$sitename where $sitename is the name of your site. fn
The final file will look (something) like this fn
server {
    listen 80;
    server_name www.yoursite.com yoursite.com;

    location = /favicon.ico { access_log off; log_not_found off; }
    location /static/ {
        root /home/yoursite/yoursite/;
    }

    location / {
        include proxy_params;
        proxy_pass http://unix:/run/gunicorn.sock;
    }
}
The .conf file above tells Nginx to listen for requests to either www.buringfiddle.com or buringfiddle.com and then route them to the location /home/yoursite/yoursite/ which is where our files are located for our Django project.
With that in place all that’s left to do is to make it enabled by running replacing $sitename with your file
ln -s /etc/nginx/sites-available/$sitename /etc/nginx/sites-enabled
You’ll want to run
nginx -t
to make sure there aren’t any errors. If no errors occur you’ll need to restart Nginx
systemctl restart nginx
The last thing to do is to allow full access to Nginx. You do this by running
ufw allow 'Nginx Full'
- Probably just [Julia Evans](https://jvns.ca/blog/how-updating-dns-works/ ↩︎
Taking Down the RPi Camera Over My Hummingbird Feeder
As the temperature heats up it’s time to take down my hummingbird feeder. While the winds have cooled down the valley for the last few days, 100+ days are slowly creeping in and I need to take it down before the CPU melts.
When I took it down last year I though, meh, how hard could it be to put back up. And then I put it back up in the Fall last year and had nothing but problems.
This year, I wanted to document the wires and what not so that I can just put it back up once the temps cool down outside.
Anyway, I could describe it or just take some pictures ... so here are some pictures for when I need to set it up again later this year.
Above the feeder:

Wires to the sensor:

Wires to the GPIO pins:
