CBV - ListView
From Classy Class Based Views ListView:
Render some list of objects, set by
self.modelorself.queryset.
self.querysetcan actually be any iterable of items, not just a queryset.
There are 16 attributes for the ListView but only 2 types are required to make the page return something other than a 500 error:
- Data
- Template Name
Data Attributes
You have a choice of either using Model or queryset to specify what data to return. Without it you get an error.
The Model attribute gives you less control but is easier to implement. If you want to see ALL of the records of your model, just set
model = ModelName
However, if you want to have a bit more control over what is going to be displayed you’ll want to use queryset which will allow you to add methods to the specified model, ie filter, order_by.
queryset = ModelName.objects.filter(field_name='filter')
If you specify both model and queryset then queryset takes precedence.
Template Name Attributes
You have a choice of using template_name or template_name_suffix. The template_name allows you to directly control what template will be used. For example, if you have a template called list_view.html you can specify it directly in template_name.
template_name_suffix will calculate what the template name should be by using the app name, model name, and appending the value set to the template_name_suffix.
In pseudo code:
templates/<app_name>/<model_name>_<template_name_suffix>.html
For an app named rango and a model named person setting template_name_suffix to _test would resolve to
templates/rango/person_test.html
Other Attributes
If you want to return something interesting you’ll also need to specify
- allow_empty: The default for this is true which allows the page to render if there are no records. If you set this to
falsethen returning no records will result in a 404 error - context_object_name: allows you to give a more memorable name to the object in the template. You’ll want to use this if you want to have future developers (i.e. you) not hate you
- ordering: allows you to specify the order that the data will be returned in. The field specified must exist in the
modelorquerysetthat you’ve used - page_kwarg: this indicates the name to use when going from page x to y; defaults to
namebut overriding it to something more sensible can be helpful for SEO. For example you can usenameinstead ofpageif you’ve got a page that has a bunch of names
![]()
- paginate_by: determines the maximum number of records to return on any page.
- paginate_orphans: number of items to add to the last page; this helps keep pages with singletons (or some other small number
- paginator_class: class that defines several of the attributes above. Don’t mess with this unless you have an actual reason to do so. Also … you’re not a special snowflake, there are literal dragons in down this road. Go back!
Diagram
A visual representation of how ListView is derived can be seen here:

Conclusion
The ListView CBV is a powerful and highly customizable tool that allows you to display the data from a single model quite easily.
Fixing a PyCharm issue when updating Python made via HomeBrew
I’ve written before about how easy it is to update your version of Python using homebrew. And it totally is easy.
The thing that isn’t super clear is that when you do update Python via Homebrew, it seems to break your virtual environments in PyCharm. 🤦♂️
I did a bit of searching to find this nice post on the JetBrains forum which indicated
unfortunately it's a known issue: https://youtrack.jetbrains.com/issue/PY-27251 . Please close Pycharm and remove jdk.table.xml file from \~/Library/Preferences/.PyCharm2018.1/options directory, then start Pycharm again.
OK. I removed the file, but then you have to rebuild the virtual environments because that file is what stores PyCharms knowledge of those virtual environments.
In order to get you back to where you need to be, do the following (after removing the jdk.table.xml file:
- pip-freeze > requirements.txt
- Remove old virtual environment
rm -r venv - Create a new Virtual Environemtn with PyCharm
- Go to Preferences
- Project > Project Interpreter
- Show All
- Click ‘+’ button
pip install -r requirements.txt- Restart PyCharm
- You're back
This is a giant PITA but thankfully it didn’t take too much to find the issue, nor to fix it. With that being said, I totally shouldn’t have to do this. But I’m writing it down so that once Python 3.8 is available I’ll be able to remember what I did to fix going from Python 3.7.1 to 3.7.5.
CBV - RedirectView
From Classy Class Based View the RedirectView will
Provide a redirect on any GET request.
It is an extension of View and has 5 attributes:
- http_method_names (from
View) - pattern_name: The name of the URL pattern to redirect to. 1 This will be used if no
urlis used. - permanent: a flag to determine if the redirect is permanent or not. If set to
True, then the HTTP Status Code 301 is returned. If set toFalsethe 302 is returned - query_string: If
Truethen it will pass along the query string from the RedirectView. If it’sFalseit won’t. If this is set toTrueand neitherpattern\_namenorurlare set then nothing will be passed to theRedirectView - url: Where the Redirect should point. It will take precedence over the patter_name so you should only
urlorpattern\_namebut not both. This will need to be an absolute url, not a relative one, otherwise you may get a 404 error
The example below will give a 301 status code:
class myRedirectView(RedirectView):
    pattern_name = 'rango:template_view'
    permanent = True
    query_string = True
While this would be a 302 status code:
class myRedirectView(RedirectView):
    pattern_name = 'rango:template_view'
    permanent = False
    query_string = True
Methods
The method get\_redirect\_url allows you to perform actions when the redirect is called. From the Django Docs the example given is increasing a counter on an Article Read value.
Diagram
A visual representation of how RedirectView derives from View 2

Conclusion
In general, given the power of the url mapping in Django I’m not sure why you would need to use a the Redirect View. From Real Python they concur, stating:
As you can see, the class-based approach does not provide any obvious benefit while adding some hidden complexity. That raises the question: when should you use RedirectView?
If you want to add a redirect directly in your urls.py, using RedirectView makes sense. But if you find yourself overwriting getredirecturl, a function-based view might be easier to understand and more flexible for future enhancements.
Updating the models for my Django Rest Framework API
I’ve been working on a Django project which would allow users to track games that they’ve seen and, therefore, see what stadia they have visited.
This is all being done at a site i set up called StadiaTracker.com. Initially when constructing my model I kept it relatively simple. I had one model that had two fields. The two fields tied the User from my CustomUser Model to a Game ID that I retrieve from an API that MLB provides.
I thought this simple approach would be the best approach. In addition to having a Django App I set up a Django Rest Framework (DRF) API. My initial plan was to have a DRF backend with a Vue (or React) front end. (I still want to do that, but I really wanted to try and finish a project before proceeding down that path).
After some development and testing I quickly realized that the page loads for the app were suffering because of the number of API calls to MLB that were being made.
I created a new model to tie the user id (still from the CustomUser model I’d created) to the game id, but in addition I’d get and store the following information:
- Home Team Name
- Home Team Score
- Home Team Hits
- Home Team Errors
- Away Team Name
- Away Team Score
- Away Team Hits
- Away Team Errors
- Game Recap Headline
- Game Recap Summary
- Game Date / Time
By storing all of this my views could render more quickly because they didn’t have to go to the MLB API to get the information.
Of course, once I did this I realized that the work I had done on the DRF API would also need to be updated.
Initially I kept putting off the refactoring that was going to have to be done. Finally, I just sat down and did it. And you know what, within 10 minutes I was done.
I only had to change 3 files:
- serializers.py
- urls.py
- views.py
For the searializers.py and views.py all I had to do was add the new model and then copy and paste what I had done for the previous model.
For the urls.py it was just a simple matter of updating the the DRF path and detail path to use the new views I had just created.
It was so amazingly simple I could barely believe it. This thing I had put off for a couple of weeks because I was afraid it was going to be really hard, just wasn't.
CBV - Template View
From Classy Class Based Views the TemplateView will
Render a template. Pass keyword arguments from the URLconf to the context.
It is an extended version of the View CBV with the the ContextMixin and the TemplateResponseMixin added to it.
It has several attributes that can be set
- content_type: will allow you to define the MIME type that the page will return. The default is
DEFAULT\_CONTENT\_TYPEbut can be overridden with this attribute. - extra_context: this can be used as a keyword argument in the
as\_view()but not in the class of the CBV. Adding it there will do nothing - http_method_name: derived from
Viewand has the same definition - response_classes: The response class to be returned by render_to_response method it defaults to a TemplateResponse. See below for further discussion
- template_engine: can be used to specify which template engine to use IF you have configured the use of multiple template engines in your
settings.pyfile. See the Usage section of the Django Documentation on Templates - template_name: this attribute is required IF the method
get\_template\_names()is not used.
More on response_class
This confuses the ever living crap out of me. The best (only) explanation I have found is by GitHub user spapas in his article Django non-HTML responses:
From the previous discussion we can conclude that if your non-HTML response needs a template then you just need to create a subclass of TemplateResponse and assign it to the responseclass attribute (and also change the contenttype attribute). On the other hand, if your non-HTML respond does not need a template to be rendered then you have to override rendertoresponse completely (since the template parameter does not need to be passed now) and either define a subclass of HttpResponse or do the rendering in the rendertoresponse.
Basically, if you ever want to use a non-HTML template you’d set this attribute, but it seems available mostly as a ‘just-in-case’ and not something that’s used every day.
My advise … just leave it as is.
When to use the get method
An answer which makes sense to me that I found on StackOverflow was (slightly modified to make it more understandable)
if you need to have data available every time, use get_context_data(). If you need the data only for a specific request method (eg. in get), then put it in get.
When to use the get_template_name method
This method allows you to easily change a template being used based on values passed through GET.
This can be helpful if you want to have one template for a super user and another template for a basic user. This helps to keep business logic out of the template and in the view where it belongs.
This can also be useful if you want to specify several possible templates to use. A list is passed and Django will work through that list from the first element to the last until it finds a template that exists and render it.
If you don’t specify template_name you have to use this method.
When to use the get_context_data method
See above in the section When to use the get method
Diagram
A visual representation of how TemplateView derives from View 1

Conclusion
If you want to roll your own CBV because you have a super specific use case, starting at the TemplateView is going to be a good place to start. However, you may find that there is already a view that is going to do what you need it to. Writing your own custom implementation of TemplateView may be a waste of time IF you haven’t already verified that what you need isn’t already there.
- Original Source from Classy Class Based Views ↩︎
CBV - View
View is the ancestor of ALL Django CBV. From the great site Classy Class Based Views, they are described as
Intentionally simple parent class for all views. Only implements dispatch-by-method and simple sanity checking.
This is no joke. The View class has almost nothing to it, but it’s a solid foundation for everything else that will be done.
Its implementation has just one attribute http_method_names which is a list that allows you to specify what http verbs are allowed.
Other than that, there’s really not much to it. You just write a simple method, something like this:
def get(self, _):
    return HttpResponse('My Content')
All that gets returned to the page is a simple HTML. You can specify the content_type if you just want to return JSON or plain text but defining the content_type like this:
def get(self, _):
    return HttpResponse('My Content', content_type='text plain')
You can also make the text that is displayed be based on a variable defined in the class.
First, you need to define the variable
content = 'This is a {View} template and is not used for much of anything but '
             'allowing extensions of it for other Views'
And then you can do something like this:
def get(self, _):
    return HttpResponse(self.content, content_type='text/plain')
Also, as mentioned above you can specify the allowable methods via the attribute http_method_names.
The following HTTP methods are allowed:
- get
- post
- put
- patch
- delete
- head
- options
- trace
By default all are allowed.
If we put all of the pieces together we can see that a really simple View CBV would look something like this:
class myView(View):
    content = 'This is a {View} template and is not used for much of anything but '
             'allowing extensions of it for other Views'
    http_method_names = ['get']

    def get(self, _):
        return HttpResponse(self.content, content_type='text/plain')
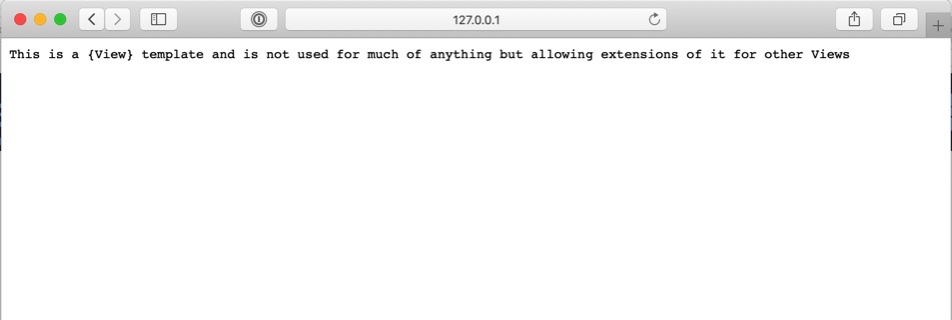
This View will return content to the page rendered as plain text. This CBV is also limited to only allowing get requests.
Here’s what it looks like in the browser:
Conclusion
View doesn’t do much, but it’s the case for everything else, so understanding it is going to be important.
Class Based Views
As I’ve written about previously I’m working on a Django app. It’s in a pretty good spot (you should totally check it out over at StadiaTracker.com) and I thought now would be a good time to learn a bit more about some of the ways that I’m rendering the pages.
I’m using Class Based Views (CBV) and I realized that I really didn’t grok how they worked. I wanted to change that.
I’ll be working on a series where I deep dive into the CBV and work them from several angles and try to get them to do all of the things that they are capable of.
The first place I’d suggest anyone start to get a good idea of CBV, and the idea of Mixins would be SpaPas’ GitHub Page where he does a really good job of covering many pieces of the CBV. It’s a great resource!
This is just the intro to this series and my hope is that I’ll publish one of these pieces each week for the next several months as I work my way through all of the various CBV that are available.
My first project after completing the 100 Days of Web in Python
As I mentioned in my last post, after completing the 100 Days of Web in Python I was moving forward with a Django app I wrote.
I pushed up my first version to Heroku on August 24. At that point it would allow users to add a game that they had seen, but when it disaplyed the games it would show a number (the game’s ID) instead of anything useful.
A few nights ago (Aug 28) I committed a version which allows the user to see which game they add, i.e. there are actual human readable details versus just a number!
The page can be found here. It feels really good to have it up in a place where people can actually see it. That being said I discovered a a couple of things on the publish that I’d like to fix.
I have a method that returns details about the game. One problem is that if any of the elements return None then the front page returns a Server 500 error ... this is not good.
It took a bit of googling to see what the issue was. The way I found the answer was to see an idea to turn Debug to True on my ‘prod’ server and see the output. That helped me identify the issue.
To ‘fix’ it in the short term I just deleted all of the data for the games seen in the database.
I’m glad that it happened because it taught me some stuff that I knew I needed to do, but maybe didn’t pay enough attention to ... like writing unit tests.
Based on that experience I wrote out a roadmap of sorts for the updates I want to get into the app:
- Tests for all classes and methods
- Ability to add minor league games
- Create a Stadium Listing View
- More robust search tool that allows a single team to be selected
- Logged in user view for only their games
- Create a List View of games logged per stadium
- Create a List View of attendees (i.e. users) at games logged
- Add more user features:
- Ability to add a picture
- Ability to add Twitter handle
- Ability to add Instagram handle
- Ability to add game notes
- Create a Heroku Pipeline to ensure that pushes to PROD are done through a UAT site
- Create a blog (as a pelican standalone sub domain)
It’s a lot of things but I’ve already done some things that I wanted to:
- Added SSL
- Set up to go to actual domain instead of Heroku subdomain
I’ll write up how I did the set up for the site so I can do it again. It’s not well documented when your registrar is Hover and you’ve got your site on Heroku. Man ... it was an tough.
My Experience with the 100 Days of Web in Python
As soon as I discovered the Talk Python to me Podcast, I discovered the Talk Python to me courses. Through my job I have a basically free subscription to PluralSight so I wasn’t sure that I needed to pay for the courses when I was effectively getting courses in Python for free.
After taking a couple ( well, truth be told, all ) of the Python courses at PluralSight, I decided, what the heck, the courses at Talk Python looked interesting, Michael Kennedy has a good instructor’s voice and is genuinely excited about Python, and if it didn’t work out, it didn’t work out.
I’m so glad I did, and I’m so glad I went through the 100 Days of Web in Python course.
On May 2, 2019 I saw that the course had been released and I tweeted
This x 1000000! Thank you so much \@TalkPython. I can’t wait to get started!
I started on the course on May 4, 2019 and completed it August 11, 2019. Full details on the course are here.
Of the 28 concepts that were reviewed over the course, my favorites things were learning Django and Django Rest Framework and Pelican. Holy crap, those parts were just so much fun for me. Part of my interest in Django and DRF comes from William S Vincent’s books and Podcast Django Chat, but having actual videos to watch to get me through some of the things that have been conceptually tougher for me was a godsend.
The other part that I really liked was actual deployment to a server. I had tried (about 16 months ago) to deploy a Django app to Digital Ocean and it was an unmitigated disaster. No static files no matter what I did. I eventually gave up.
In this course I really learned how to deploy to both Heroku and a Linux box on Digital Ocean, and so now I feel much more confident that the app I’m working on (more on that below) will actually see the light of day on something other than a dev machine!
The one thing that I started to build (and am continuing to work on) is an app with a DRF backend and a Vue.js front end that allows a user to track which Baseball stadia they’ve been to. So far I have an API set up via DRF (hosted at Heroku) and sketches of what to do in Vue.js. There's also a Django front end (but it’s not the solution I really want to use).
Writing code for 100 days is hard. Like really hard. For nearly 20 of those days I was on a family vacation in the Mid Western part of the US, but I made time for both the coding, and my family. My family was super supportive of my goal which was helpful, but the content in the course was really interesting and challenging and made me want to do it every day, which was also super helpful.
On day 85 I got a video from Bob that helped get me through the last 2 weeks. It was encouraging, and helpful which is just what I needed. So thank you Bob.
At the end I also got a nice congratulatory video from Julian, which was surprising to say the least, especially because he called out some of the things that I tweeted that I enjoyed about the class, addressed me by name, and just genuinely made me feel good about my accomplishment!
OK. I just wrapped up the 100 Days of Code with Python and the web. Now what?
I took a week off to recuperate and am now ready to ‘get back to it’.
After all, I’ve got baseball stadia to track in my app!
Talk Python to me Podcast
Why I like the Talk Python Podcast
When I started listening to it
Listening to the back catalog (nearly all of it)
Epic Family Road trip - 2019 edition
My daughter Abby was in the Robotics class at school this year. This gave her (and us as a family) the opportunity to go to the Global Conference on Educational and Robotics which was held in Norman, Oklahoma.
Being in Oklahoma we had a golden opportunity to road trip from Oklahoma back to home in California, so we did.
The trip went like this:
Fly from San Diego to Oklahoma City via Phoenix. Once we landed we were in the Oklahoma City / Norman area for a week as Abby competed in GCER.
While there, Emily and I were able explore quite a bit visiting Down Town Norman very nearly every day we were there. The neatest part of the Oklahoma segment was our drive down to Washington, OK where Emily’s grand father was born (or spent time as a child ... I’m not really sure).
Once we left Oklahoma we started the road trip in earnest. I’ve tried to create a Google Maps version of the trip, but the number of places we stopped is more than you can enter into a trip in Google maps.
Here are the vital statistics:
- miles driven: 3730
- cities visited: 17
- national parks visited: 7
- Baseball games seen: 3
And here are the details:
- Norman, OK
- Joplin, MO
- St. Louis, MO
- Hermann, MO
- Jefferson City, MO
- Kansas City, MO
- Omaha, NE
- Sioux Falls, SD
- De Smet, SD
- Pierre, SD
- Black Hills, SD
- Box Elder, SD
- Rapid City, SD
- Jewel Cave
- Wind Cave
- Hot Springs, SD
- Cheyenne, WY
- Greely, CO
- Denver, CO
- Grand Junction, CO
- Arches National Park, UT
- Cedar City, UT
We got to watch the OKC Dodgers, St. Louis Cardinals, and Kansas City Royals all play and in each case the home team won. This was good because none of the MLB teams we saw were playing the LA Dodgers, and it’s always fun to see the home team win.
Finally, I also learned some things on the trip:
- There's a ton of stuff to do in Norman
- Missouri is really into World War I and its kind of weird
- Omaha is the Silicon Valley of the midwest ... so much so that they call it the Silicon Prairie
- Denver isn't actually in the mountains. It's just really high in the Great Plains on the way to the Rockies
- Grand Junction In NOT a mountain town
- Cedar City is more than just the little Main Street that I've seen before ... we stayed at a farm while we were there
The family is all glad to be home, and tomorrow it’s back to normal life. I have to say, I’m really looking forward to it.
Page 14 / 24