Getting your Domain to point to Digital Ocean Your Server
I use Hover for my domain purchases and management. Why? Because they have a clean, easy to use, not-slimy interface, and because I listed to enough Tech Podcasts that I’ve drank the Kool-Aid.
When I was trying to get my Hover Domain to point to my Digital Ocean server it seemed much harder to me than it needed to be. Specifically, I couldn’t find any guide on doing it! Many of the tutorials I did find were basically like, it’s all the same. We’ll show you with GoDaddy and then you can figure it out.
Yes, I can figure it out, but it wasn’t as easy as it could have been. That’s why I’m writing this up.
Digital Ocean
From Droplet screen click ‘Add a Domain’
<figure class="aligncenter">
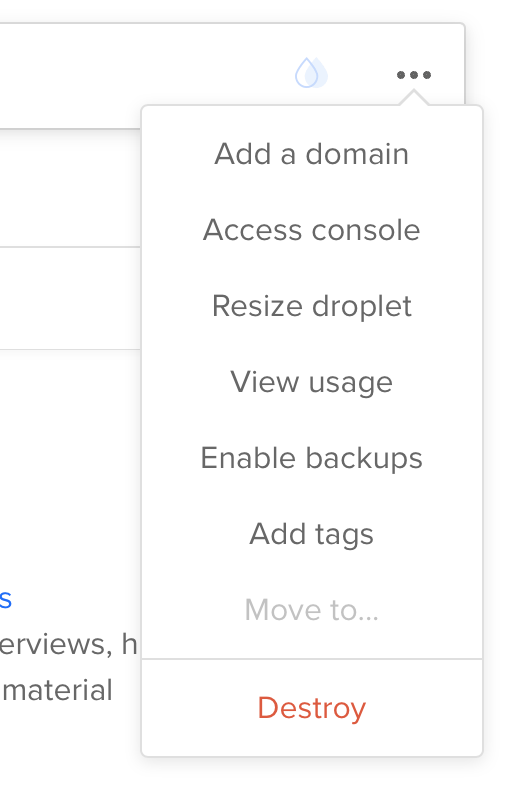
</p>
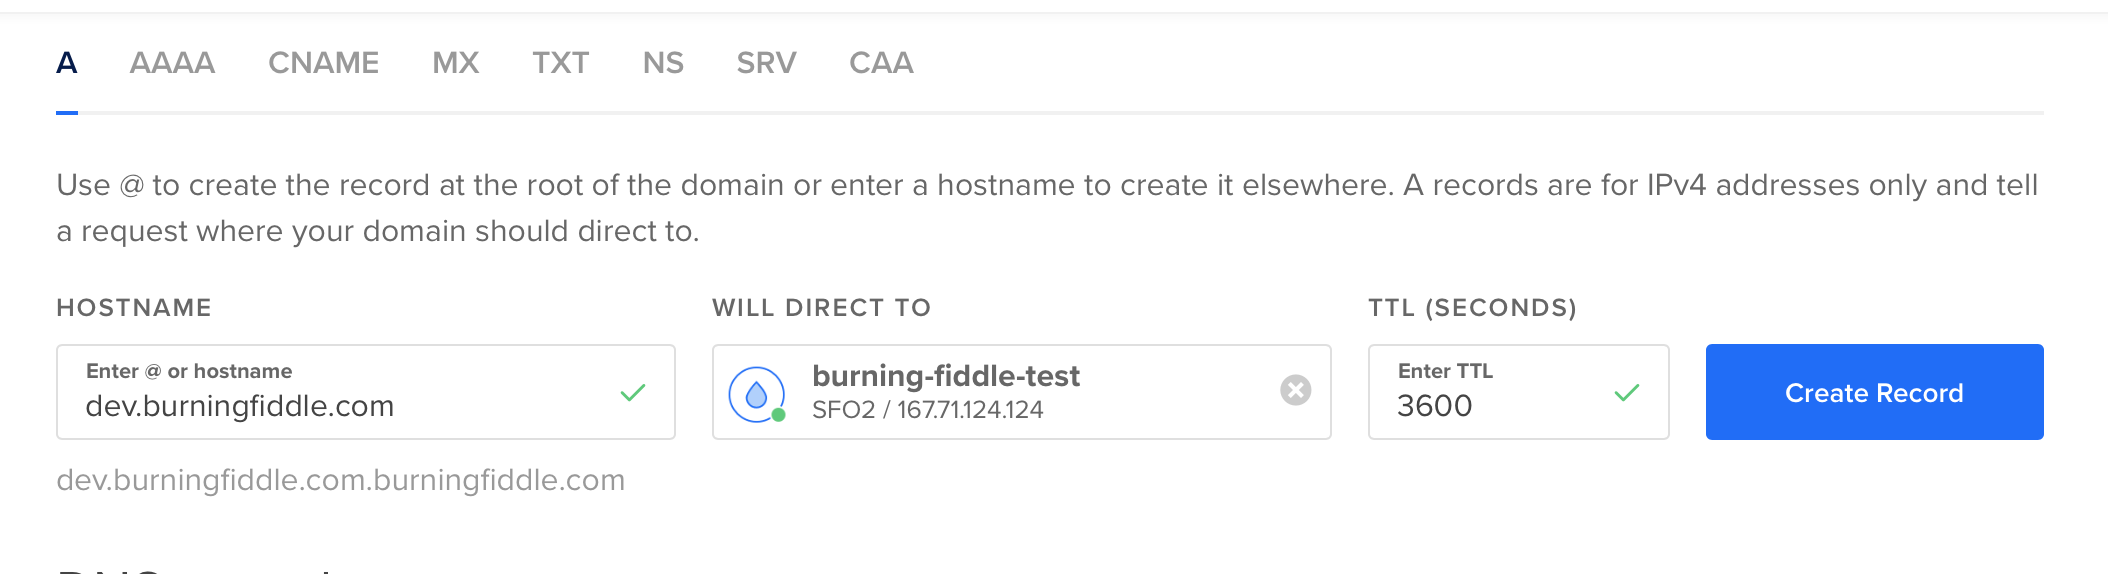
Add 2 ‘A’ records (one for www and one without the www)
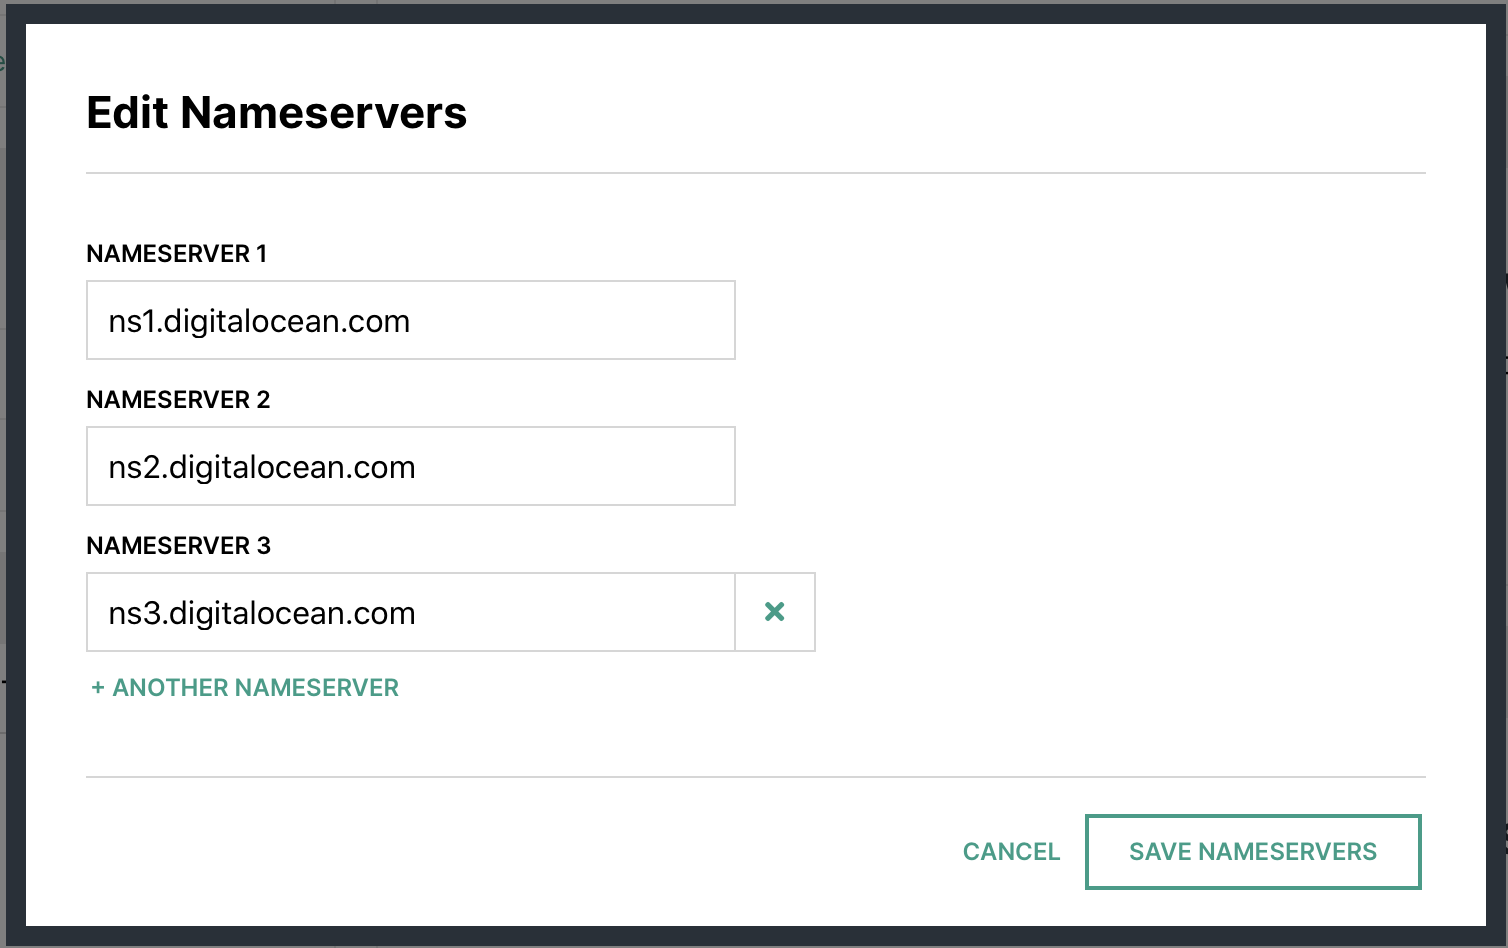
Make note of the name servers

Hover
In your account at Hover.com change your Name Servers to Point to Digital Ocean ones from above.
Wait
DNS … does anyone really know how it works?1 I just know that sometimes when I make a change it’s out there almost immediately for me, and sometimes it takes hours or days.
At this point, you’re just going to potentially need to wait. Why? Because DNS that’s why. Ugh!
Setting up directory structure
While we’re waiting for the DNS to propagate, now would be a good time to set up some file structures for when we push our code to the server.
For my code deploy I’ll be using a user called burningfiddle. We have to do two things here, create the user, and add them to the www-data user group on our Linux server.
We can run these commands to take care of that:
adduser --disabled-password --gecos "" yoursite
The first line will add the user with no password and disable them to be able to log in until a password has been set. Since this user will NEVER log into the server, we’re done with the user creation piece!
Next, add the user to the proper group
adduser yoursite www-data
Now we have a user and they’ve been added to the group we need them to be added. In creating the user, we also created a directory for them in the home directory called yoursite. You should now be able to run this command without error
ls /home/yoursite/
If that returns an error indicating no such directory, then you may not have created the user properly.
Now we’re going to make a directory for our code to be run from.
mkdir /home/yoursite/yoursite
To run our Django app we’ll be using virtualenv. We can create our virtualenv directory by running this command
python3 -m venv /home/yoursite/venv
Configuring Gunicorn
There are two files needed for Gunicorn to run:
- gunicorn.socket
- gunicorn.service
For our setup, this is what they look like:
# gunicorn.socket

[Unit]
Description=gunicorn socket

[Socket]
ListenStream=/run/gunicorn.sock

[Install]
WantedBy=sockets.target
# gunicorn.service

[Unit]
Description=gunicorn daemon
Requires=gunicorn.socket
After=network.target

[Service]
User=yoursite
EnvironmentFile=/etc/environment
Group=www-data
WorkingDirectory=/home/yoursite/yoursite
ExecStart=/home/yoursite/venv/bin/gunicorn
         --access-logfile -
         --workers 3
         --bind unix:/run/gunicorn.sock
         yoursite.wsgi:application


[Install]
WantedBy=multi-user.target
For more on the details of the sections in both gunicorn.service and gunicorn.socket see this article.
Environment Variables
The only environment variables we have to worry about here (since we’re using SQLite) are the DJANGO_SECRET_KEY and DJANGO_DEBUG
We’ll want to edit /etc/environment with our favorite editor (I’m partial to vim but use whatever you like
vim /etc/environment
In this file you’ll add your DJANGO_SECRET_KEY and DJANGO_DEBUG. The file will look something like this once you’re done:
PATH="/usr/local/sbin:/usr/local/bin:/usr/sbin:/usr/bin:/sbin:/bin:/usr/games:/usr/local/games"
DJANGO_SECRET_KEY=my_super_secret_key_goes_here
DJANGO_DEBUG=False
Setting up Nginx
Now we need to create our .conf file for Nginx. The file needs to be placed in /etc/nginx/sites-available/$sitename where $sitename is the name of your site. fn
The final file will look (something) like this fn
server {
    listen 80;
    server_name www.yoursite.com yoursite.com;

    location = /favicon.ico { access_log off; log_not_found off; }
    location /static/ {
        root /home/yoursite/yoursite/;
    }

    location / {
        include proxy_params;
        proxy_pass http://unix:/run/gunicorn.sock;
    }
}
The .conf file above tells Nginx to listen for requests to either www.buringfiddle.com or buringfiddle.com and then route them to the location /home/yoursite/yoursite/ which is where our files are located for our Django project.
With that in place all that’s left to do is to make it enabled by running replacing $sitename with your file
ln -s /etc/nginx/sites-available/$sitename /etc/nginx/sites-enabled
You’ll want to run
nginx -t
to make sure there aren’t any errors. If no errors occur you’ll need to restart Nginx
systemctl restart nginx
The last thing to do is to allow full access to Nginx. You do this by running
ufw allow 'Nginx Full'
- Probably just [Julia Evans](https://jvns.ca/blog/how-updating-dns-works/ ↩︎
Setting up the Server (on Digital Ocean)
The initial setup
Digital Ocean has a pretty nice API which makes it easy to automate the creation of their servers (which they call Droplets. This is nice when you’re trying to work towards automation of the entire process (like I was).
I won’t jump into the automation piece just yet, but once you have your DO account setup (sign up here if you don’t have one), it’s a simple interface to Setup Your Droplet.
I chose the Ubuntu 18.04 LTS image with a \$5 server (1GB Ram, 1CPU, 25GB SSD Space, 1000GB Transfer) hosted in their San Francisco data center (SFO21).
We’ve got a server … now what?
We’re going to want to update, upgrade, and install all of the (non-Python) packages for the server. For my case, that meant running the following:
apt-get update
apt-get upgrade
apt-get install python3 python3-pip python3-venv tree postgresql postgresql-contrib nginx
That’s it! We’ve now got a server that is ready to be setup for our Django Project.
In the next post, I’ll walk through how to get your Domain Name to point to the Digital Ocean Server.
- SFO2 is disabled for new customers and you will now need to use SFO3 unless you already have resources on SFO2, but if you’re following along you probably don’t. What’s the difference between the two? Nothing 😁 ↩︎
Writing tests for Django Admin Custom Functionality
I’ve been working on a Django app side project for a while and came across the need to write a custom filter for the Django Admin section.
This was a first for me, and it was pretty straight forward to accomplish the task. I wanted to add a filter on the drop down list so that only certain records would appear.
To do this, I sub-classed the Django Admin SimpleListFilter with the following code:
class EmployeeListFilter(admin.SimpleListFilter):
    title = "Employee"
    parameter_name = "employee"

    def lookups(self, request, model_admin):
        employees = []
        qs = Employee.objects.filter(status__status="Active").order_by("first_name", "last_name")
        for employee in qs:
            employees.append((employee.pk, f"{employee.first_name} {employee.last_name}"))
        return employees

    def queryset(self, request, queryset):
        if self.value():
            qs = queryset.filter(employee__id=self.value())
        else:
            qs = queryset
        return qs
And implemented it like this:
@admin.register(EmployeeO3Note)
class EmployeeO3NoteAdmin(admin.ModelAdmin):
    list_filter = (EmployeeListFilter, "o3_date")
This was, as I said, relatively straight forward to do, but what was less clear to me was how to write tests for this functionality. My project has 100% test coverage, and therefore testing isn’t something I’m unfamiliar with, but in this context, I wasn’t sure where to start.
There are two parts that need to be tested:
lookupsqueryset
Additionally, the querysethas two states that need to be tested
- With
self.value() - Without
self.value()
This gives a total of 3 tests to write
The thing that helps me out the most when trying to determine how to write tests is to use the Django Shell in PyCharm. To do this I:
- Import necessary parts of Django App
- Instantiate the
EmployeeListFilter - See what errors I get
- Google how to fix the errors
- Repeat
This is what the test ended up looking like:
import pytest

from employees.models import EmployeeO3Note
from employees.tests.factories import EmployeeFactory, EmployeeO3NoteFactory, EmployeeStatusFactory
from employees.admin import EmployeeListFilter


ACTIVE_EMPLOYEES = 3
TERMED_EMPLOYEES = 1


@pytest.fixture
def active_employees():
    return EmployeeFactory.create_batch(ACTIVE_EMPLOYEES)


@pytest.fixture
def termed_employees():
    termed_employees = TERMED_EMPLOYEES
    termed = EmployeeStatusFactory(status="Termed")
    return EmployeeFactory.create_batch(termed_employees, status=termed)


@pytest.fixture
def o3_notes_for_all_employees(active_employees, termed_employees):
    all_employees = active_employees + termed_employees
    o3_notes = []
    for i in range(len(all_employees)):
        o3_notes.append(EmployeeO3NoteFactory.create_batch(1, employee=all_employees[i]))
    return o3_notes


@pytest.mark.django_db
def test_admin_filter_active_employee_o3_notes(active_employees):
    employee_list_filter = EmployeeListFilter(request=None, params={}, model=None, model_admin=None)
    assert len(employee_list_filter.lookup_choices) == ACTIVE_EMPLOYEES


@pytest.mark.django_db
def test_admin_query_set_unfiltered_results_o3_notes(o3_notes_for_all_employees):
    total_employees = ACTIVE_EMPLOYEES + TERMED_EMPLOYEES
    employee_list_filter = EmployeeListFilter(request=None, params={}, model=None, model_admin=None)
    assert len(employee_list_filter.queryset(request=None, queryset=EmployeeO3Note.objects.all())) == total_employees


@pytest.mark.django_db
def test_admin_query_set_filtered_results_o3_notes(active_employees, o3_notes_for_all_employees):
    employee_to_test = active_employees[0]
    employee_list_filter = EmployeeListFilter(
        request=None, params={"employee": employee_to_test.pk}, model=None, model_admin=None
    )
    queryset_to_test = employee_list_filter.queryset(request=None, queryset=EmployeeO3Note.objects.all())
    assert len(queryset_to_test.filter(employee__id=employee_to_test.pk)) == 1
Deploying a Django Site to Digital Ocean - A Series
Previous Efforts
When I first heard of Django I thought it looks like a really interesting, and Pythonic way, to get a website up and running. I spent a whole weekend putting together a site locally and then, using Digital Ocean, decided to push my idea up onto a live site.
One problem that I ran into, which EVERY new Django Developer will run into was static files. I couldn’t get static files to work. No matter what I did, they were just … missing. I proceeded to spend the next few weekends trying to figure out why, but alas, I was not very good (or patient) with reading documentation and gave up.
Fast forward a few years, and while taking the 100 Days of Code on the Web Python course from Talk Python to Me I was able to follow along on a part of the course that pushed up a Django App to Heroku.
I wrote about that effort here. Needless to say, I was pretty pumped. But, I was wondering, is there a way I can actually get a Django site to work on a non-Heroku (PaaS) type infrastructure.
Inspiration
While going through my Twitter timeline I cam across a retweet from TestDrive.io of Matt Segal. He has an amazing walk through of deploying a Django site on the hard level (i.e. using Windows). It’s a mix of Blog posts and YouTube Videos and I highly recommend it. There is some NSFW language, BUT if you can get past that (and I can) it’s a great resource.
This series is meant to be a written record of what I did to implement these recommendations and suggestions, and then to push myself a bit further to expand the complexity of the app.
Articles
A list of the Articles will go here. For now, here’s a rough outline of the planned posts:
- Setting up the Server (on Digital Ocean)
- Getting your Domain to point to Digital Ocean Your Server
- Preparing the code for deployment to Digital Ocean
- Automating the deployment
- Enhancements
The ‘Enhancements’ will be multiple follow up posts (hopefully) as I catalog improvements make to the site. My currently planned enhancements are:
- Creating the App
- Migrating from SQLite to Postgres
- Integrating Git
- Having Multiple Sites on a single Server
- Adding Caching
- Integrating S3 on AWS to store Static Files and Media Files
- Migrate to Docker / Kubernetes
Django form filters
I’ve been working on a Django Project for a while and one of the apps I have tracks candidates. These candidates have dates of a specific type.
The models look like this:
Candidate
class Candidate(models.Model):
    first_name = models.CharField(max_length=128)
    last_name = models.CharField(max_length=128)
    resume = models.FileField(storage=PrivateMediaStorage(), blank=True, null=True)
    cover_leter = models.FileField(storage=PrivateMediaStorage(), blank=True, null=True)
    email_address = models.EmailField(blank=True, null=True)
    linkedin = models.URLField(blank=True, null=True)
    github = models.URLField(blank=True, null=True)
    rejected = models.BooleanField()
    position = models.ForeignKey(
        "positions.Position",
        on_delete=models.CASCADE,
    )
    hired = models.BooleanField(default=False)
CandidateDate
class CandidateDate(models.Model):
    candidate = models.ForeignKey(
        "Candidate",
        on_delete=models.CASCADE,
    )
    date_type = models.ForeignKey(
        "CandidateDateType",
        on_delete=models.CASCADE,
    )
    candidate_date = models.DateField(blank=True, null=True)
    candidate_date_note = models.TextField(blank=True, null=True)
    meeting_link = models.URLField(blank=True, null=True)

    class Meta:
        ordering = ["candidate", "-candidate_date"]
        unique_together = (
            "candidate",
            "date_type",
        )
CandidateDateType
class CandidateDateType(models.Model):
    date_type = models.CharField(max_length=24)
    description = models.CharField(max_length=255, null=True, blank=True)
You’ll see from the CandidateDate model that the fields candidate and date_type are unique. One problem that I’ve been running into is how to help make that an easier thing to see in the form where the dates are entered.
The Django built in validation will display an error message if a user were to try and select a candidate and date_type that already existed, but it felt like this could be done better.
I did a fair amount of Googling and had a couple of different bright ideas, but ultimately it came down to a pretty simple implementation of the exclude keyword in the ORM
The initial Form looked like this:
class CandidateDateForm(ModelForm):
   class Meta:
        model = CandidateDate
        fields = [
            "candidate",
            "date_type",
            "candidate_date",
            "meeting_link",
            "candidate_date_note",
        ]
        widgets = {
            "candidate": HiddenInput,
        }
I updated it to include a __init__ method which overrode the options in the drop down.
def __init__(self, *args, **kwargs):
    super(CandidateDateForm, self).__init__(*args, **kwargs)
    try:
        candidate = kwargs["initial"]["candidate"]
        candidate_date_set = CandidateDate.objects.filter(candidate=candidate).values_list("date_type", flat=True)
        qs = CandidateDateType.objects.exclude(id__in=candidate_date_set)
        self.fields["date_type"].queryset = qs
    except KeyError:
        pass
Now, with this method the drop down will only show items which can be selected, not all CandidateDateType options.
Seems like a better user experience AND I got to learn a bit about the Django ORM
Using different .env files
In a Django project I’m working on I use a library called Django-environ which
allows you to utilize 12factor inspired environment variables to configure your Django application.
It’s a pretty sweet library as well. You create a .env file to store your variable that you don’t want in a public repo for your settings.py.
The big issue I have is that my .env file for my local development isn’t what I want on my production server (obviously ... never set DEBIG=True in production!)
I had tried to use a different .env file using an assortment of methods, but to no avail. And the documentation wasn’t much of a help for using Multiple env file
It is possible to have multiple env files and select one using environment variables.
Now
ENV_PATH=other-env ./manage.py runserverusesother-envwhile./manage.py runserveruses.env.
But there’s no example about how to actually set that up 🤦🏻♂️1.
In fact, this bit in the documentation reminded me of thisvideo on YouTube.
Instead of trying to figure out the use of multiple .env files I instead used a just recipe in my justfile to get the job done.
# checks the deployment for prod settings; will return error if the check doesn't pass
check:
    cp core/.env core/.env_staging
    cp core/.env_prod core/.env
    -python manage.py check --deploy
    cp core/.env_staging core/.env
OK. What does this recipe do?
First, we copy the development .env file to a .env_staging file to keep the original development settings ‘somewhere’
cp core/.env core/.env_staging
Next, we copy the .env_prod to the .env so that we can use it when we run -python manage.py check --deploy.
cp core/.env_prod core/.env
-python manage.py check --deploy
Why do we use the -? That allows the justfile to keep going if it runs into an error. Since we’re updating our main .env file I want to make sure it gets restored to its original state … just in case!
Finally, we copy the original contents of the .env file from the .env_staging back to the .env to restore it to its development settings.
Now, I can simply run
just check
And I’ll know if I have passed the 12 factor checking for my Django project or somehow introduced something that makes the check not pass.
I’d like to figure out how to set up multiple .env files, create an example and contribute to the docs ... but honestly I have no freaking clue how to do it. If I am able to figure it out, you can bet I’m going to write up a PR for the docs!
- I’d like to figure out how to set up multiple
.envfiles, create an example and contribute to the docs ... but honestly I have no freaking clue how to do it. If I am able to figure it out, you can bet I’m going to write up a PR for the docs! ↩︎
Logging in a Django App
Per the Django Documentation you can set up
A list of all the people who get code error notifications. When DEBUG=False and AdminEmailHandler is configured in LOGGING (done by default), Django emails these people the details of exceptions raised in the request/response cycle.
In order to set this up you need to include in your settings.py file something like:
ADMINS = [
    ('John', 'john@example.com'),
    ('Mary', 'mary@example.com')
]
The difficulties I always ran into were:
- How to set up the AdminEmailHandler
- How to set up a way to actually email from the Django Server
Again, per the Django Documentation:
Django provides one log handler in addition to those provided by the Python logging module
Reading through the documentation didn’t really help me all that much. The docs show the following example:
'handlers': {
    'mail_admins': {
        'level': 'ERROR',
        'class': 'django.utils.log.AdminEmailHandler',
        'include_html': True,
    }
},
That’s great, but there’s not a direct link (that I could find) to the example of how to configure the logging in that section. It is instead at the VERY bottom of the documentation page in the Contents section in the Configured logging > Examples section ... and you really need to know that you have to look for it!
The important thing to do is to include the above in the appropriate LOGGING setting, like this:
LOGGING = {
    'version': 1,
    'disable_existing_loggers': False,
    'handlers': {
        'mail_admins': {
            'level': 'ERROR',
            'class': 'django.utils.log.AdminEmailHandler',
            'include_html': True,
        }
       },
    },
}
Sending an email with Logging information
We’ve got the logging and it will be sent via email, but there’s no way for the email to get sent out yet!
In order to accomplish this I use SendGrid. No real reason other than that’s what I’ve used in the past.
There are great tutorials online for how to get SendGrid integrated with Django, so I won’t rehash that here. I’ll just drop my the settings I used in my settings.py
SENDGRID_API_KEY = env("SENDGRID_API_KEY")

EMAIL_HOST = "smtp.sendgrid.net"
EMAIL_HOST_USER = "apikey"
EMAIL_HOST_PASSWORD = SENDGRID_API_KEY
EMAIL_PORT = 587
EMAIL_USE_TLS = True
One final thing I needed to do was to update the email address that was being used to send the email. By default it uses root@localhost which isn’t ideal.
You can override this by setting
SERVER_EMAIL = myemail@mydomain.tld
With those three settings, everything should just work.
Writing a Raffle Script
Due to the COVID Pandemic, many things are ... different. One thing that needed to be different this year was the way that students at my daughters middle school got to spend their ‘Hero Points’.
Hero Points are points earned for good behavior. In a typical year the students would get to spend them at the student store, but with all of the closures, this wasn’t possible. For the students in my daughter’s 8th grade this was a big deal as they’re going on to High School next year, so we can just roll them over to next year!
Instead of having the kids ‘spend’ their Hero Points the PTO offered up the solution of a raffle based on the number of Hero Points they had. But they weren’t sure how to do it.
I jumped at the chance to write something like this up (especially after all of my works on the PyBites CodeChalleng.es platform) and so my wife volunteered me 😁
In order to really get my head wrapped around the problem, I wanted to treat my solution like a real world analog. For example, in a real work raffle, when you get your tickets, there are two tickets with the same number. One that you get to hold onto, and one that goes into a bowl (or other vessel) that is randomly drawn from.
How many tickets?
Each student had some number of Hero Points. The PTO decided that 10 Hero Points would equal 1 Raffle ticket. Further, it was decided that we would ALWAYS round up. This means that 1 Hero Point would equal 1 Raffle Ticket, but that 9 Hero Points would also equal 1 Raffle Ticket.
Create tickets
I decided to use a namedtuple to store the Raffle Tickets. Specifically, I store the student name, ticket numbers they drew, and the number of tickets they have
Raffle_Tickets = namedtuple('Raffle_Tickets', ['name', 'ticket_numbers', 'tickets'])
The list of student names and total Hero Points was stored in an Excel File (.xlsx) so I decided to use the Pandas Package to import it and manipulate it into a dataframe. The structure of the excel file is: Student Name, Grade, Available Points.
df = pd.read_excel (r'/Users/ryan/Documents/python-files/8th Hero Points.xlsx')
After a bit of review it turned out that there were a couple of students with NEGATIVE Hero Points. I’m not really sure how that happened, but I was not properly accounting for that originally, so I had to update my dataframe.
The code below filters the dataframe to only return students with positive ‘Available Points’ and then reindex. Finally, it calculates the number of Raffle tickets by dividing by 10 and rounding up using Python’s ceil function. It puts all of this into a list called tickets. We append our tickets list to the original dataframe.
df = df[df['Available Points'] >0]
df.reset_index(inplace=True, drop=True)
tickets = []
for i in df['Available Points'] / 10:
    tickets.append(ceil(i))
df['Tickets'] = tickets
Our dataframe now looks like this: Student Name, Grade, Available Points, Tickets.
Next, we need to figure out the Raffle ticket numbers. To do that I count the total number of Tickets available. I’m also using some extra features of the range function which allows me to set the start number of the Raffle.1
total_number_of_tickets = sum(df['Tickets'])
ticket_number_start = 1000000
ticket_number_list = []
for i in range(ticket_number_start, ticket_number_start+total_number_of_tickets):
    ticket_number_list.append(i)
Once we have the list of ticket numbers I want to make a copy of it … remember there are two tickets, one that goes in the bowl and one that the student ‘gets’. Extending the metaphor of having two different, but related, tickets, I decided to use the deepcopy function on the ticket_number_list to create a list called assigned_ticket_number_list.
For more on deepcopy versus (shallow) copy see the documentation
assigned_ticket_number_list = deepcopy(ticket_number_list)
Finally, I reindex the dataframe just to add a bit more randomness to the list
df = df.reindex(np.random.permutation(df.index))
Assign Tickets
Next we’ll assign the tickets randomly to the students.
raffle_list = []
for student in range(df.shape[0]):
    student_ticket_list = []
    for i in range(df.loc[student].Tickets):
        assigned_ticket_number = randint(0, len(assigned_ticket_number_list)-1)
        student_ticket_list.append(assigned_ticket_number_list[assigned_ticket_number])
        assigned_ticket_number_list.pop(assigned_ticket_number)
    raffle_list.append(Raffle_Tickets(df.loc[student].Name, student_ticket_list, len(student_ticket_list)))
OK … the code above looks pretty dense, but basically all we’re doing is looping through the students to determine the number of tickets they each have. Once we have that we loop through the available ticket numbers and randomly assign it to the student. At the end we add a namedtuple object called Raffle_Tickets that we defined above to the raffle_list to store the student’s name, their ticket numbers, and the number of tickets that they received.
Draw Tickets
Now we want to ‘draw’ the tickets from the ‘bowl’. We want to select 25 winners, but we also don’t want to have any student win more than once. Honestly, the ’25 winning tickets with 25 distinct winners’ was the hardest part to get through.
selected_tickets = []
for i in range(25):
    selected_ticket_number_index = randint(0, len(ticket_number_list) - 1)
    selected_ticket_number = ticket_number_list[selected_ticket_number_index]
    for r in raffle_list:
        if selected_ticket_number in r.ticket_numbers:
            ticket_number_list = [x for x in ticket_number_list if x not in r.ticket_numbers]
    selected_tickets.append(selected_ticket_number)
We see above that we’ll select 25 items from the ‘bowl’ of tickets. We select the tickets one at a time. For each ticket we determine what set of tickets that selected ticket is in. Once we know that, we then remove all tickets associated with that winning ticket so that we can guarantee 25 unique winners.
Find the Winners
We now have 25 tickets with 25 winners. Now we just need to get their names!
winners_list=[]
for r in raffle_list:
    for t in r.ticket_numbers:
        student_winning_list = []
        if t in selected_tickets:
            student_winning_list.append(t)
            winners_list.append((Raffle_Tickets(r.name, student_winning_list, len(student_winning_list))))
Again, we construct a list of namedtuple Raffle\_Tickets only this time it’s just the winners.
Output winners
Whew! Now that we have the results we want to write them to a file.
with open('/Users/ryan/PyBites/Raffle/winners_new.txt', 'w+') as f:
    for winner in winners_list:
        tickets = ticket_count(winner.name)
        percent_chance_of_winning = tickets / total_number_of_tickets * 100
        percent_chance_of_winning_string = "{:.2f}".format(percent_chance_of_winning)
        f.write(f'{winner.name} with winning ticket {winner.ticket_numbers[0]}. They had {tickets} tickets and a {percent_chance_of_winning_string}% chance of winning.\n')
One of the reasons that I stored the number of tickets above was so that we could see what the chance was of a student winning given the number of tickets they started with.
For each student we output to a line to a file with the student’s name, the winning tickets number, the number of tickets they started with and their chance of winning (the ratio of tickets the student had to the total number of starting tickets)
Conclusion
This was a fun project for me because it was needed for a real world application, allowed me to use MANY of the concepts I learned at PyBites CodeChalleng.es AND helped my daughter’s school.
- Why am I doing this, versus just stating a
0? Mostly because I wanted the Raffle Ticket numbers to look like real Raffle Ticket Numbers. How many times have you seen a raffle ticket with number 0 on it? ↩︎
Issues with psycopg2 … again
In a previous post I had written about an issue I’d had with upgrading, installing, or just generally maintaining the python package psycopg2 (link).
I ran into that issue again today, and thought to myself, “Hey, I’ve had this problem before AND wrote something up about it. Let me go see what I did last time.”
I searched my site for psycopg2 and tried the solution, but I got the same forking error.
OK … let’s turn to the experts on the internet.
After a while I came across this article on StackOverflow but this specific answer helped get me up and running.
A side effect of all of this is that I upgraded from Python 3.7.5 to Python 3.8.1. I also updated all of my brew packages, and basically did a lot of cleaning up that I had neglected.
Not how I expected to spend my morning, but productive nonetheless.
My First Django Project
I've been writing code for about 15 years (on and off) and Python for about 4 or 5 years. With Python it's mostly small scripts and such. I’ve never considered myself a ‘real programmer’ (Python or otherwise).
About a year ago, I decided to change that (for Python at the very least) when I set out to do 100 Days Of Web in Python from Talk Python To Me. Part of that course were two sections taught by Bob regarding Django. I had tried learn Flask before and found it ... overwhelming to say the least.
Sure, you could get a ‘hello world’ app in 5 lines of code, but then what? If you wanted to do just about anything it required ‘something’ else.
I had tried Django before, but wasn't able to get over the 'hump' of deploying. Watching the Django section in the course made it just click for me. Finally, a tool to help me make AND deploy something! But what?
The Django App I wanted to create
A small project I had done previously was to write a short script for my Raspberry Pi to tell me when LA Dodger (Baseball) games were on (it also has beloved Dodger Announcer Vin Scully say his catch phrase, “It’s time for Dodger baseball!!!”).
I love the Dodgers. But I also love baseball. I love baseball so much I have on my bucket list a trip to visit all 30 MLB stadia. Given my love of baseball, and my new found fondness of Django, I thought I could write something to keep track of visited stadia. I mean, how hard could it really be?
What does it do?
My Django Site uses the MLB API to search for games and allows a user to indicate a game seen in person. This allows them to track which stadia you've been to. My site is composed of 4 apps:
- Users
- Content
- API
- Stadium Tracker
The API is written using Django Rest Framework (DRF) and is super simple to implement. It’s also really easy to changes to your models if you need to.
The Users app was inspired by Will S Vincent ( a member of the Django Software Foundation, author, and podcaster). He (and others) recommend creating a custom user model to more easily extend the User model later on. Almost all of what’s in my Users App is directly taken from his recommendations.
The Content App was created to allow me to update the home page, and about page (and any other content based page) using the database instead of updating html in a template.
The last App, and the reason for the site itself, is the Stadium Tracker! I created a search tool that allows a user to find a game on a specific day between two teams. Once found, the user can add that game to ‘Games Seen’. This will then update the list of games seen for that user AND mark the location of the game as a stadium visited. The best part is that because the game is from the MLB API I can do some interesting things:
- I can get the actual stadium from visited which allows the user to indicate historic (i.e. retired) stadia
- I can get details of the game (final score, hits, runs, errors, stories from MLB, etc) and display them on a details page.
That's great and all, but what does it look like?
The Search Tool

Stadia Listing
National League West

American League West

What’s next?
I had created a roadmap at one point and was able to get through some (but not all) of those items. Items left to do:
- Get Test coverage to at least 80% across the app (currently sits at 70%)
- Allow users to be based on social networks (right now I’m looking at Twitter, and Instagram) probably with the Django Allauth Package
- Add ability to for minor league team search and stadium tracking (this is already part of the MLB API, I just never implemented it)
- Allow user to search for range of dates for teams
- Update the theme ... it’s the default MUI CSS which is nice, but I’d rather it was something a little bit different
- Convert Swagger implementation from
django-rest-swaggertodrf-yasg
Final Thoughts
Writing this app did several things for me.
First, it removed some of the tutorial paralysis that I felt. Until I wrote this I didn’t think I was a web programmer (and I still don’t really), and therefore had no business writing a web app.
Second, it taught me how to use git more effectively. This directly lead to me contributing to Django itself (in a very small way via updates to documentation). It also allowed me to feel comfortable enough to write my first post on this very blog.
Finally, it introduced me to the wonderful ecosystem around Django. There is so much to learn, but the great thing is that EVERYONE is learning something. There isn’t anyone that knows it all which makes it easier to ask questions! And helps me in feeling more confident to answer questions when asked.
The site is deployed on Heroku and can be seen here. The code for the site can be seen here.
This article was also posted on the PyBit.es Blog
Page 5 / 13