Rules and Actions in Outlook or How I stayed sane after coming back to 1000+ emails
One of the best things about the holidays is getting to take some time off and visit family and friends.
One of the worst things about the holidays is coming back to work and an inbox with more than 1200 emails. Granted, I was out of the office for 4 business days so it’s only about 300 emails per day, but still … it’s a lot1.
I have two strategies for dealing with the many emails I get:
- Outlook Rules (Rules)
- Outlook Custom Actions (Actions)
Rules
Rules allow you to apply actions automatically as they are received in your inbox. This is useful if you work (or manage) one or more tech support desks and you need to segregate the email received into folders to review later.
This is exactly the kind of thing that I do. I currently have more than 50 rules set up in Outlook and they help process about 50%-60% of the emails that I receive.
The other 40% - 50% can’t be ‘Rule’ drive.
For these types of emails I use Actions.
Actions
Actions are amazing because they can have keyboard shortcuts assigned to them.2
I have 3 Actions that I use consistently to help manage my email that isn’t automatically routed with Rules:
- Archive (Ctrl + Shift + 9)
- Review (Ctrl + Shift + 5)
- Review with Boss (Ctrl + Shift + 1)
I archive all internal emails I receive, and probably about 90% of the external emails I receive so that I can refer back to them when needed. I have to archive them into a .pst file because my IS department only allocates a finite (some might say small finite) amount of space.
Using the Keyboard Shortcut Ctrl + Shift + 9 will automatically move an email to the archive. This is really helpful for emails that were sent to me for informational purposes OR that have a long email chain and a resolution was reached without me.
The Review Action will mark the email with a Flag and move it to a @Review folder. I do this with emails that will take more than 2 minutes to process. This works well for longer emails, or emails that need me to make a decision and I am not ready to make that decision yet.
The Review with Boss action is the one action that is used the least of these three. It is useful when I receive an email and need guidance from my boss. If I just need to send her an email about it then I’ll usually mark it as Review and follow up with it during my review process or if it will take less than 2 minutes to write up an email I’ll take care of it right then and there.
Usually emails to her take longer than 2 minutes to compose because they need to be short 3
In my next post I’ll go over my review process. This is where I go through the 25 - 100 emails that have been marked as Review and answer the emails that need attention.
- I used to get even more. When my company upgraded to Exchange Server 2016 we got the ability for Out of Office Notifications to appear in a message BEFORE a person sent it. This has cut down on the amount of email I receive when I’m out of the office by about 30% - 50% ↩︎
- If you’re not using keyboard shortcuts, you’re really missing out on some power user productivity hacks that will help you out. ↩︎
- This idea is cribbed from Blaise Pascal’s statement, “Je n’ai fait celle-ci plus longue que parce que je n’ai pas eu le loisir de la faire plus courte” … in English, “I have made this longer than usual because I have not had time to make it shorter.” Hat tip to Quote Investigator ↩︎
My Mac session with Apple
For Christmas I bought myself a 2017 13-inch MacBook Pro with Touch Bar. Several bonuses were associated with the purchase:
- A \$150 Apple Gift Card because I bought the MacBook Pro on Black Friday and Apple had a special going (w00t!)
- The Credit Card I use to make ALL of my purchases at Apple has a 3% cash back (in the form of iTunes cards)
- A free 30 minute online / phone session with an ‘Apple Specialist’
Now I didn’t know about item number 3 when I made the purchase, but was greeted with an email informing me of my great luck.
This is my fifth Mac1 and I don’t remember ever getting this kind of service before. So I figured, what the hell and decided to snooze the email until the day after Christmas to remind myself to sign up for the session.
When I entered the session I was asked to optionally provide some information about myself. I indicated that I had been using a Mac for several years and considered myself an intermediate user.
My Apple ‘Specialist’ was Jaime. She confirmed the optional notes that I entered and we were off to the races.
Now a lot of what she told me about Safari (blocking creepy tracking behavior, ability to mute sound from auto play videos, default site to display in reader view) I knew from the WWDC Keynote that I watched back in June, but I listened just in case I had missed something from that session (or the 10s / 100s of hours of podcasts I listened to about the Keynote).
One thing that I had heard about was the ability to pin tabs in Safari. I never really knew what that meant and figured it wasn’t anything that I needed.
I was wrong. Holy crap is pinning tabs in Safari a useful feature! I can keep all of my most used sites pinned and get to them really quickly and they get auto refreshed! Sweet!
The other super useful thing I found out about was the Split Screen feature that allows you to split apps on your screen (in a very iOS-y way!).
Finally, Jaime reviewed how to customize the touch bar! This one was super useful as I think there are 2 discoverability issues with it:
- The option to
Customize Touch Baris hidden in theViewmenu which isn’t somewhere I’d look for it - To Customize the Touch Bar you drag down from the Main Screen onto the Touch Bar.
After the call I received a nice follow up email from Apple / Jaime
Now that you're more familiar with your new Mac, here are some additional resources that can help you go further.
Apple Support Find answers to common questions, watch video tutorials, download user guides, and share solutions with the Apple community. Visit Support
Today at Apple Discover inspiring programs happening near you. Visit Today at Apple
Accessories From the Apple accessories page, you can learn about all kinds of new and innovative products that work with iPhone, iPad, Mac and more. Visit Accessories
How to use the Touch Bar on your MacBook Pro - https://support.apple.com/en- us/HT207055
Use Mission Control on your Mac - https://support.apple.com/en- us/HT204100
Use two Mac apps side by side in Split View - https://support.apple.com/en- us/HT204948
Websites preferences - https://support.apple.com/ guide/safari/websites- preferences-ibrwe2159f50
I’m glad that I had the Mac session and I will encourage anyone that buys a Mac in the future to schedule one.
- They are in order of purchase: 2012 15-inch MacBook Pro, 2014 27-inch 5K iMac, 2015 MacBook, 2016 13-inch 2 Thunderbolt MacBook Pro; 2017 13-inch MacBook Pro with Touch Bar ↩︎
Why Ulysses is Awesome
I started writing my last post on my iMac but because Apple Photos is a bit ... finicky with the iCloud syncing a screenshot I had taken on my iPad wasn’t there.
No fear, just keep writing in Ulysses, then move from the iMac to the iPad and drop the image in. It worked, no problems no fuss. It just works.
Now, if only iCloud would just work ...
Setting the Timezone on my server
When I scheduled my last post on December 14th to be published at 6pm that night I noticed that the schedule time was a bit … off:
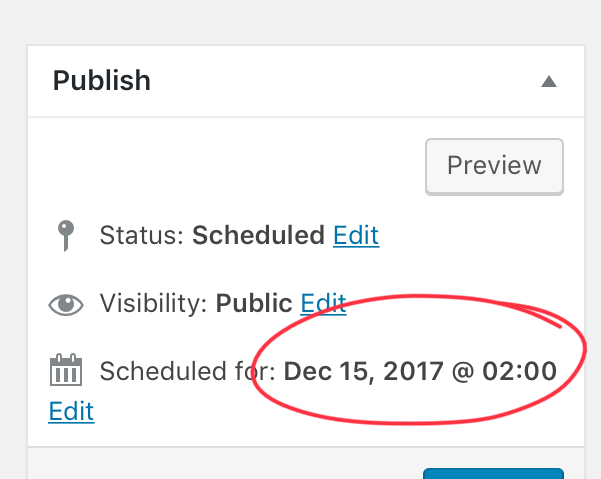
I realized that the server times as still set to GMT and that I had missed the step in the Linode Getting Started guide to Set the Timezone.
No problem, just found the Guide, went to this section and ran the following command:
sudo dpkg-reconfigure tzdata
I then selected my country (US) and my time zone (Pacific-Ocean) and now the server has the right timezone.
Setting up the site with SSL
I’ve written about my migration from Squarespace to Wordpress earlier this year. One thing I lost with that migration when I went to Wordpress in AWS was having SSL available. While I’m sure Van Hoet will “well actually” me on this, I never could figure out how to set it up ( not that I tried particularly hard ).
The thing is now that I’m hosting on Linode I’m finding some really useful tutorials. This one showed me exactly what I needed to do to get it set up.
Like any good planner I read the how to several times and convinced myself that it was actually relatively straight forward to do and so I started.
Step 1 Creating the cert files
Using this tutorialI was able to create the required certificates to set up SSL. Of course, I ran into an issue when trying to run this command
chmod 400 /etc/ssl/private/example.com.key
I did not have persmision to chmod on that file. After a bit of Googling I found that I can switch to interactive root mode by running the command
sudo -i
It feels a bit dangerous to be able to just do that (I didn’t have to enter a password) but it worked.
Step 2
OK, so the tutorial above got me most(ish) of the way there, but I needed to sign my own certificate. For that I used this tutorial. I followed the directions but kept coming up with an error:
Problem binding to port 443: Could not bind to the IPv4 or IPv6
I rebooted my Linode server. I restarted apache. I googled and I couldn’t find the answer I was looking for.
I wanted to give up, but tried Googling one more time. Finally! An answer so simple it couldn’t work. But then it did.
Stop Apache, run the command to start Apache back up and boom. The error went away and I had a certificate.
However, when I tested the site using SSL LabsI was still getting an error / warning for an untrusted site.
🤦🏻♂️
—
OK ... take 2
I nuked my linode host to start over again.
First things first ... we need to needed to secure my server. Next, we need to set up the server as a LAMP and Linode has this tutorial to walk me through the steps of setting it up.
I ran into an issue when I restarted the Apache service and realized that I had set my host name but hadn’t update the hosts file. No problem though. Just fire up vim and make the additional line:
127.0.0.1 milo
Next, I used this tutorial to create a self signed certificate and this to get the SSL to be set up.
One thing that I expected was that it would just work. After doing some more reading what I realized was that a self signed certificate is useful for internal applications. Once I realized this I decided to not redirect to SSL (i.e. part 443) for my site but instead to just use the ssl certificate it post from Ulysses securely.
Why go to all this trouble just too use a third party application to post to a WordPress site? Because Ulysses is an awesome writing app and I love it. If you’re writing and not using it, I’d give it a try. It really is a nice app.
So really, no good reason. Just that. And, I like to figure stuff out.
OK, so Ulysses is great. But why the need for an SSL certificate? Mostly because when I tried to post to Wordpress from Ulysses without any certificates ( self signed or not ) I would get a warning that my traffic was unencrypted and could be snooped. I figured, better safe than sorry.
Now with the ssl cert all I had to do was trust my self signed certificate and I was set1
- Mostly. I still needed to specify the domain with www otherwise it didn’t work. ↩︎
Installing fonts in Ulysses
One of the people I follow online, Federico Viticci, is an iOS power user, although I would argue that phrase doesn’t really do him justice. He can make the iPad do things that many people can’t get Macs to do.
Recently he posted an article on a new font he is using in Ulysses and I wanted to give it a try. The article says:
Installing custsom fonts in Ulysses for iOS is easy: go to the GitHub page, download each one, and open them in Ulysses (with the share sheet) to install them.
Simple enough, but it wasn’t clicking for me. I kept thinking I had done something wrong. So I thought I’d write up the steps I used so I wouldn’t forget the next time I need to add a new font.
Downloading the Font
- Download the font to somewhere you can get it. I chose to save it to iCloud and use the
Filesapp - Hit Select in the
Filesapp - Click
Share - Select
Open in Ulysses - The custom font is now installed and being used.
Checking the Font:
- Click the ‘A’ in the writing screen (this is the font selector) located in the upper right hand corner of Ulysses

- Notice that the Current font indicates it’s a custom font (in This case iA Writer Duospace:

Not that hard, but there’s no feedback telling you that you have been successful so I wasn’t sure if I had done it or not.
Switching to Linode
Switching to Linode
I’ve been listening to a lot of Talk Python to me lately ... I mean a lot. Recently there was a coupon code for Linode that basically got you four months free with a purchase of a single month, so I thought, ‘what the hell’?
Anyway, I have finally been able to move everything from AWS to Linode for my site and I’m able to publish from my beloved Ulysses.
Initially there was an issue with xmlrpc which I still haven’t fully figured out.
I tried every combination of everything and finally I’m able to publish.
I’m not one to look a gift horse in the mouth so I’ll go ahead and take what I can get. I had meant to document a bit more / better what I had done, but since it basically went from not working to working, I wouldn’t know what to write at this point.
The strangest part is that from the terminal the code I was using to test the issue still returns and xmlrpc faultCode error of -32700 but I’m able to connect now.
I really wish i understood this better, but I’m just happy that I’m able to get it all set and ready to go.
Next task ... set up SSL!
Migrating from Square Space to Word Press
This weekend I migrated my site from Square Space to WordPress. I had been planning to do this for a while (ever since a Hover ad read on ATP earlier this summer). This weekend was the last weekend before my Square Spacesubscription was set to expire so I finally made the switch.
Why I did it
Square Space offers a beautiful interface and great templates to get you started. They make everything about setting up a blog, portfolio or online store as easy as it can get. But ... that’s kind of where it ends for me. While the set up is amazingly easy, the actually content posting (for me this means my writing) was more difficult than I would have liked.
In order to get something posted to my Square Space site I would write something in anyone of a number of Plain Text Editors (BBEdit, Drafts, Editorial, Ulysses). Then I would preview the generated HTML to verify it looked the way I wanted it to. Finally, I would post my MarkDown to the Square Space Blog App on iOS and do it All. Over. Again.
To say that it was frustrating is a bit of an understatement. I looked really hard to see what APIs existed and found that there used to be an API but that Square Space removed them for some reason. So no direct posting to my blog by my favorite text editors.
So, with Hover having a discount on domains, and me getting an AWSaccount where I could host WordPress and a rich set of WordPress APIs to post directly from some of my favorite text editors, it seemed like a no brainer to make the switch.
How I set up my Wordpress Install
The AWS ecosystem has some amazing documentation on how to do just about anything that you want. So, instead of laboriously taking screenshots and writing up what I did, I’ll just link to Amazon’s Launch a WordPress Website tutorial
Exporting from Square Space to Wordpress
For all the pain it was to get content into SquareSpace, it was a breeze to get it out. Again, no need to get screenshots or write it up if I can just link to it instead!
What I hope to gain from it
As I wrote earlier my main reason for leaving Square Space was the difficulty I had getting content in. So, now that I’m on a WordPress site, what am I hoping to gain from it?
- Easier to post my writing
- See Item 1
Writing is already really hard for me. I struggle with it and making it difficult to get my stuff out into the world makes it that much harder. My hope is that not only will I write more, but that my writing will get better because I’m writing more.
Ulysses integration
With all of that, what has my experience been with writing my first post to my WordPress site?
This entire post was written and edited in Ulysses. I was able to preview my post in Ulysses. I was able topost my content to the site with Ulysses. Basically, Ulysses is a kick ass app and on day one of the conversion, I’m about as happy with a decision that I can be given the short amount of time since I’ve made it.
Podcasts I like
Podcasts I like:
Making Background Images
I'm a big fan of podcasts. I've been listening to them for 4 or 5 years now. One of my favorite Podcast Networks, Relay just had their second anniversary. They offer memberships and after listening to hours and hours of All The Great Shows I decided that I needed to become a member.
One of the awesome perks of Relay membership is a set of Amazing background images.
This is fortuitous as I've been looking for some good backgrounds for my iMac, and so it seemed like a perfect fit.
On my iMac I have several spaces configured. One for Writing, one for Podcast and one for everything else. I wanted to take the backgrounds from Relay and have them on the Writing space and the Podcasting space, but I also wanted to be able to distinguish between them. One thing I could try to do would be to open up an image editor (Like Photoshop, Pixelmater or Acorn) and add text to them one at a time (although I'm sure there is a way to script them) but I decided to see if I could do it using Python.
Turns out, I can.
This code will take the background images from my /Users/Ryan/Relay 5K Backgrounds/ directory and spit them out into a subdirectory called Podcasting
from PIL import Image, ImageStat, ImageFont, ImageDraw
from os import listdir
from os.path import isfile, join

# Declare Text Attributes
TextFontSize = 400
TextFontColor = (128,128,128)
font = ImageFont.truetype("~/Library/Fonts/Inconsolata.otf", TextFontSize)

mypath = '/Users/Ryan/Relay 5K Backgrounds/'
onlyfiles = [f for f in listdir(mypath) if isfile(join(mypath, f))]
onlyfiles.remove('.DS_Store')

rows = len(onlyfiles)

for i in range(rows):
    img = Image.open(mypath+onlyfiles[i])
    width, height = img.size
    draw = ImageDraw.Draw(img)
    TextXPos = 0.6 * width
    TextYPos = 0.85 * height
    draw.text((TextXPos, TextYPos),'Podcasting',TextFontColor,font=font)
    draw.text
    img.save('/Users/Ryan/Relay 5K Backgrounds/Podcasting/'+onlyfiles[i])
    print('/Users/Ryan/Relay 5K Backgrounds/Podcasting/'+onlyfiles[i]+' successfully saved!')
This was great, but it included all of the images, and some of them are really bright. I mean, like really bright.
So I decided to use something I learned while helping my daughter with her Science Project last year and determine the brightness of the images and use only the dark ones.
This lead me to update the code to this:
from PIL import Image, ImageStat, ImageFont, ImageDraw
from os import listdir
from os.path import isfile, join

def brightness01( im_file ):
   im = Image.open(im_file).convert('L')
   stat = ImageStat.Stat(im)
   return stat.mean[0]

# Declare Text Attributes
TextFontSize = 400
TextFontColor = (128,128,128)
font = ImageFont.truetype("~/Library/Fonts/Inconsolata.otf", TextFontSize)

mypath = '/Users/Ryan/Relay 5K Backgrounds/'
onlyfiles = [f for f in listdir(mypath) if isfile(join(mypath, f))]
onlyfiles.remove('.DS_Store')

darkimages = []

rows = len(onlyfiles)

for i in range(rows):
    if brightness01(mypath+onlyfiles[i]) <= 65:
        darkimages.append(onlyfiles[i])

darkimagesrows = len(darkimages)

for i in range(darkimagesrows):
    img = Image.open(mypath+darkimages[i])
    width, height = img.size
    draw = ImageDraw.Draw(img)
    TextXPos = 0.6 * width
    TextYPos = 0.85 * height
    draw.text((TextXPos, TextYPos),'Podcasting',TextFontColor,font=font)
    draw.text
    img.save('/Users/Ryan/Relay 5K Backgrounds/Podcasting/'+darkimages[i])
    print('/Users/Ryan/Relay 5K Backgrounds/Podcasting/'+darkimages[i]+' successfully saved!')
I also wanted to have backgrounds generated for my Writing space, so I tacked on this code:
for i in range(darkimagesrows):
    img = Image.open(mypath+darkimages[i])
    width, height = img.size
    draw = ImageDraw.Draw(img)
    TextXPos = 0.72 * width
    TextYPos = 0.85 * height
    draw.text((TextXPos, TextYPos),'Writing',TextFontColor,font=font)
    draw.text
    img.save('/Users/Ryan/Relay 5K Backgrounds/Writing/'+darkimages[i])
    print('/Users/Ryan/Relay 5K Backgrounds/Writing/'+darkimages[i]+' successfully saved!')
The print statements at the end of the for loops were so that I could tell that something was actually happening. The images were VERY large (close to 10MB for each one) so the PIL library was taking some time to process the data and I was concerned that something had frozen / stopped working
This was a pretty straightforward project, but it was pretty fun. It allowed me to go from this:

To this:

For the text attributes I had to play around with them for a while until I found the color, font and font size that I liked and looked good (to me).
The Positioning of the text also took a bit of experimentation, but a little trial and error and I was all set.
Also, for the brightness level of 65 I just looked at the images that seemed to work and found a threshold to use. The actual value may vary depending on the look you're doing for.
Page 20 / 24