Using Drafts 5 at Work
I have many meetings that I go to in any given day. One of the things that I’d been struggling with was being able to keep track of what I needed to do after a meeting and/or documenting certain types of meetings more effectively.
I have been using a Workflow I created a couple of years ago to get the pertinent details of a meeting into Drafts. I spoke about updating that workflow to incorporate drafts 5 here.
Once I was able to get the information into Drafts 5 a new opportunity arose. I was able to run a Workflow in Drafts!
I decided that getting the information into Drafts was great, but I needed a good way to get it out.
There were two sections in the Draft that I decided I could leverage to help:
- Actions
- Notes
Broadly speaking there are 3 types of meetings I go to:
- Daily Standup aka Scrum
- One-on-One with direct reports or my manager
- General Meetings
Categorizing the meetings helped me to create Draft Actions that run Workflows for each meeting type.
Scrum
This workflow runs through the Actions of the Draft and adds each one to OmniFocus in a Project called Scrum with a Tag of Work. The due date set for these tasks is noon of the same day. My goal is to have the items that come from Scrum totally processed by noon of that day and for 80% of them I can. Some actions are more involved, but having them in OmniFocus helps me to make sure that they get taken care of.
It also creates a calendar meeting for the next business day with my Scrum template and lets me know which team member will start that next day.
One-on-One
This workflow runs similarly to the Scrum workflow. It adds the Action items to OmniFocus with a due date of noon the same day, tagged with Work and in the One-on-One Project.
Instead of creating a calendar meeting for the next business day at 8:30 it appends items from the Notes section to a Dropbox file. The Dropbox path is predefined, but the name of the file matches the name of the person I met with (luckily I don’t have 2 Tom’s reporting to me).
General Meetings
This is the simplest workflow. It adds all of the items under actions to OmniFocus with a due date of noon, project of Meeting Follow Up and Tag of Work.
After the Actions are run from Drafts the notes are archived in Drafts.
I’m toying with the idea of archiving the notes from these meetings into Dropbox, but I’m not sure that it gets me anything ... so I haven’t really looked at it too deeply.
Workflow links
The links for each of the workflows can be found here:
Setting up Jupyter Notebook on my Linode
A Jupyter Notebook is an open-source web application that allows you to create and share documents that contain live code, equations, visualizations and narrative text.
Uses include:
- data cleaning and transformation
- numerical simulation
- statistical modeling
- data visualization
- machine learning
- and other stuff
I’ve been interested in how to set up a Jupyter Notebook on my Linode server for a while, but kept running into a roadblock (either mental or technical I’m not really sure).
Then I came across this ‘sweet’ solution to get them set up athttp://blog.lerner.co.il/five-minute-guide-setting-jupyter-notebook-server/
My main issue was what I needed to to do keep the Jupyter Notebook running once I disconnected from command line. The solution above gave me what I needed to solve that problem
nohup jupyter notebook
nohup allows you to disconnect from the terminal but keeps the command running in the background (which is exactly what I wanted).
The next thing I wanted to do was to have the jupyter notebook server run from a directory that wasn’t my home directory.
To do this was way easier than I thought. You just run nohup jupyter notebook from the directory you want to run it from.
The last thing to do was to make sure that the notebook would start up with a server reboot. For that I wrote a shell script
# change to correct directory
cd /home/ryan/jupyter

nohup jupyter notebook &> /home/ryan/output.log
The last command is a slight modification of the line from above. I really wanted the output to get directed to a file that wasn’t in the directory that the Jupyter notebook would be running from. Not any reason (that I know of anyway) … I just didn’t like the nohup.out file in the working directory.
Anyway, I now have a running Jupyter Notebook at http://python.ryancheley.com:88881
- I’d like to update this to be running from a port other than 8888 AND I’d like to have it on SSL, but one thing at a time! ↩︎
Updating my meeting Workflow for Drafts 5
Drafts is a productivity app created by Greg Pierce (\@AgileTortoise).
I’ve loved and used Drafts 4 every day for the last several years. I loved it so much I even contributed to the Tip Jar Greg had in the app. Seriously, it’s an amazing app. If you haven’t downloaded it already you totally should.
Recently, Greg released Drafts 5. With this new version comes a new Business Model as well. Instead of a single pay (and hope people ‘tip’ you) he’s converted to a subscription model.
I signed up for the free week and didn’t have a real opportunity to use it before my free week was converted into a pay week but I’ve no regrets. I like what Greg does and want him to keep updating his app so that I can get the benefits of it once I have a real chance to dive in.
Part of the reason I wasn’t able to really use the new version is the way that I primarily use Drafts. I have a WorkFlow that takes a meeting on my work calendar and allows me to take notes about that meetings.
It’s one of the most useful productivity tools I have during my morning standup meetings with my team, and it’s useful for the other (sometimes endless) meetings that I go to.
With the release of Drafts 5 I was not longer able to use both Drafts 5 AND my workflow, so I needed to update my workflow.
With Drafts 4 it was just one of the built in Apps. Because Drafts 5 limits some of the functionality unless you have the PRO version I don’t think that Workflow will be updated to include Drafts 5 like it did Drafts 4.
Once I realized that AND since I’m paying for the app I figured I’d need to update my Workflow instead of waiting and hoping that Workflow would be updated to include Drafts 5.
In order to make the update I had to look for URL Scheme for Drafts 5 ... but I couldn’t really find one. I assumed that Drafts 5 URL Scheme would be the same as Drafts 4 (I was right) and made various attempts at getting a copy of the Workflow to work with Drafts 5.
This is the section of the workflow that needs to be updated:

Since Drafts 5 isn’t included in the Built in Apps I was going to need to pass a URL and open the app.
This would require 3 separate steps in Workflow
- Convert Text into URL Encoded string
- Prepend the URL Scheme for creating a new draft to the URL Encoded String
- Open the URL

This basically means that 1 step is now replaced with 3 ... but hey, that’s the price of progress must be paid!
Both the Drafts 4 and Drafts 5 versions of these workflows are available.
If you enjoy them, hit me up in the comments or let me know on Twitter \@ryancheley!
Making it easy to ssh into a remote server
Logging into a remote server is a drag. Needing to remember the password (or get it from 1Password); needing to remember the IP address of the remote server. Ugh.
It’d be so much easier if I could just
ssh username@servername
and get into the server.
And it turns out, you can. You just need to do two simple things.
Simple thing the first: Update the hosts file on your local computer to map the IP address to a memorable name.
The hosts file is located at /etc/hosts (at least on *nix based systems).
Go to the hosts file in your favorite editor … my current favorite editor for simple stuff like this is vim.
Once there, add the IP address you don’t want to have to remember, and then a name that you will remember. For example:
67.176.220.115 easytoremembername
One thing to keep in mind, you’ll already have some entries in this file. Don’t mess with them. Leave them there. Seriously … it’ll be better for everyone if you do.
Simple thing the second: Generate a public-private key and share the public key with the remote server
From the terminal run the command ssh-keygen -t rsa. This will generate a public and private key. You will be asked for a location to save the keys to. The default (on MacOS) is /Users/username/.ssh/id_rsa. I tend to accept the default (no reason not to) and leave the passphrase blank (this means you won’t have to enter a password which is what we’re looking for in the first place!)
Next, we copy the public key to the host(s) you want to access using the command
ssh-copy-id <username>@<hostname>
for example:
ssh-copy-id pi@rpicamera
The first time you do this you will get a message asking you if you’re sure you want to do this. Type in yes and you’re good to go.
One thing to note, doing this updates the file known_hosts. If, for some reason, the server you are ssh-ing to needs to be rebuilt (i.e. you have to keep destroying your Digital Ocean Ubuntu server because you can’t get the static files to be served properly for your Django project) then you need to go to the known_hosts file and remove the entry for that known host.
When you do that you’ll be asked about the identity of the server (again). Just say yes and you’re good to go.
If you forget that step then when you try to ssh into the server you get a nasty looking error message saying that the server identities don’t match and you can’t proceed.
Automating the Hummingbird Video Upload to YouTube or How I finally got Cron to do what I needed it to do but in the ugliest way possible
Several weeks ago in Cronjob Redux I wrote that I had finally gotten Cron to automate the entire process of compiling the h264 files into an mp4 and uploading it to YouTube.
I hadn’t. And it took the better part of the last 2 weeks to figure out what the heck was going on.
Part of what I wrote before was correct. I wasn’t able to read the client_secrets.json file and that was leading to an error.
I was not correct on the creation of the create_mp4.sh though.
The reason I got it to run automatically that night was because I had, in my testing, created the create_mp4.sh and when cron ran my run_script.sh it was able to use what was already there.
The next night when it ran, the create_mp4.sh was already there, but the h264 files that were referenced in it weren’t. This lead to no video being uploaded and me being confused.
The issue was that cron was unable to run the part of the script that generates the script to create the mp4 file.
I’m close to having a fix for that, but for now I did the most inelegant thing possible. I broke up the script in cron so it looks like this:
00 06 * * * /home/pi/Documents/python_projects/cleanup.sh
10 19 * * * /home/pi/Documents/python_projects/create_script_01.sh
11 19 * * * /home/pi/Documents/python_projects/create_script_02.sh >> $HOME/Documents/python_projects/create_mp4.sh 2>&1
12 19 * * * /home/pi/Documents/python_projects/create_script_03.sh
13 19 * * * /home/pi/Documents/python_projects/run_script.sh
At 6am every morning the cleanup.sh runs and removes the h264 files, the mp4 file and the create_mp4.sh script
At 7:10pm the ‘header’ for the create_mp4.sh runs. At 7:11pm the ‘body’ for create_mp4.sh runs. At 7:12pm the ‘footer’ for create_mp4.sh runs.
Finally at 7:13pm the run_script.sh compiles the h264 files into an mp4 and uploads it to YouTube.
Last night while I was at a School Board meeting the whole process ran on it’s own. I was super pumped when I checked my YouTube channel and saw that the May 1 hummingbird video was there and I didn’t have to do anything.
Cronjob Redux
After days of trying to figure this out, I finally got the video to upload via a cronjob.
There were 2 issues.
Issue the first
Finally found the issue. Original script from YouTube developers guidehad this:
CLIENT_SECRETS_FILE = "client_secrets.json"
And then a couple of lines later, this:
% os.path.abspath(os.path.join(os.path.dirname(__file__), CLIENT_SECRETS_FILE))
When crontab would run the script it would run from a path that wasn’t where the CLIENT_SECRETS_FILE file was and so a message would be displayed:
WARNING: Please configure OAuth 2.0

To make this sample run you will need to populate the client_secrets.json file
found at:

  %s

with information from the Developers Console
https://console.developers.google.com/

For more information about the client_secrets.json file format, please visit:
https://developers.google.com/api-client-library/python/guide/aaa_client_secrets
What I needed to do was to update the CLIENT_SECRETS_FILE to be the whole path so that it could always find the file.
A simple change:
CLIENT_SECRETS_FILE = os.path.abspath(os.path.join(os.path.dirname(__file__), CLIENT_SECRETS_FILE))
Issue the second
When the create_mp4.sh script would run it was reading all of the h264 files from the directory where they lived BUT they were attempting to output the mp4 file to / which it didn’t have permission to write to.
This was failing silently (I’m still not sure how I could have caught the error). Since there was no mp4 file to upload that script was failing (though it was true that the location of the CLIENT_SECRETS_FILE was an issue).
What I needed to do was change the create_mp4.sh file so that when the MP4Box command output the mp4 file to the proper directory. The script went from this:
(echo '#!/bin/sh'; echo -n "MP4Box"; array=($(ls ~/Documents/python_projects/*.h264)); for index in ${!array[@]}; do if [ "$index" -eq 0 ]; then echo -n " -add ${array[index]}"; else echo -n " -cat ${array[index]}"; fi; done; echo -n " hummingbird.mp4") > create_mp4.sh
To this:
(echo '#!/bin/sh'; echo -n "MP4Box"; array=($(ls ~/Documents/python_projects/*.h264)); for index in ${!array[@]}; do if [ "$index" -eq 0 ]; then echo -n " -add ${array[index]}"; else echo -n " -cat ${array[index]}"; fi; done; echo -n " /home/pi/Documents/python_projects/hummingbird.mp4") > /home/pi/Documents/python_projects/create_mp4.sh
The last bit /home/pi/Documents/python_projects/create_mp4.sh may not be necessary but I’m not taking any chances.
The video posted tonight is the first one that was completely automatic!
Now … if I could just figure out how to automatically fill up my hummingbird feeder.
Cronjob ... Finally
I’ve mentioned before that I have been working on getting the hummingbird video upload automated.
Each time I thought I had it, and each time I was wrong.
For some reason I could run it from the command line without issue, but when the cronjob would try and run it ... nothing.
Turns out, it was running, it just wasn’t doing anything. And that was my fault.
The file I had setup in cronjob was called run_scrip.sh
At first I was confused because the script was suppose to be writing out to a log file all of it’s activities. But it didn’t appear to.
Then I noticed that the log.txt file it was writing was in the main \` directory. That should have been my first clue.
I kept trying to get the script to run, but suddenly, in a blaze of glory, realized that it was running, it just wasn’t doing anything.
And it wasn’t doing anything for the same reason that the log file was being written to the \` directory.
All of the paths were relative instead of absolute, so when the script ran the command ./create_mp4.sh it looks for that script in the home directory, didn’t find it, and moved on.
The fix was simple enough, just add absolute paths and we’re golden.
That means my run_script.sh goes from this:
# Create the script that will be run
./create_script.sh
echo "Create Shell Script: $(date)" >> log.txt

# make the script that was just created executable
chmod +x /home/pi/Documents/python_projects/create_mp4.sh

# Create the script to create the mp4 file
/home/pi/Documents/python_projects/create_mp4.sh
echo "Create MP4 Shell Script: $(date)" >> /home/pi/Documents/python_projects/log.txt

# upload video to YouTube.com
/home/pi/Documents/python_projects/upload.sh
echo "Uploaded Video to YouTube.com: $(date)" >> /home/pi/Documents/python_projects/log.txt

# Next we remove the video files locally
rm /home/pi/Documents/python_projects/*.h264
echo "removed h264 files: $(date)" >> /home/pi/Documents/python_projects/log.txt

rm /home/pi/Documents/python_projects/*.mp4
echo "removed mp4 file: $(date)" >> /home/pi/Documents/python_projects/log.txt
To this:
# change to the directory with all of the files
cd /home/pi/Documents/python_projects/

# Create the script that will be run
/home/pi/Documents/python_projects/create_script.sh
echo "Create Shell Script: $(date)" >> /home/pi/Documents/python_projects/log.txt

# make the script that was just created executable
chmod +x /home/pi/Documents/python_projects/create_mp4.sh

# Create the script to create the mp4 file
/home/pi/Documents/python_projects/create_mp4.sh
echo "Create MP4 Shell Script: $(date)" >> /home/pi/Documents/python_projects/log.txt

# upload video to YouTube.com
/home/pi/Documents/python_projects/upload.sh
echo "Uploaded Video to YouTube.com: $(date)" >> /home/pi/Documents/python_projects/log.txt

# Next we remove the video files locally
rm /home/pi/Documents/python_projects/*.h264
echo "removed h264 files: $(date)" >> /home/pi/Documents/python_projects/log.txt

rm /home/pi/Documents/python_projects/*.mp4
echo "removed mp4 file: $(date)" >> /home/pi/Documents/python_projects/log.txt
I made this change and then started getting an error about not being able to access a json file necessary for the upload to YouTube. Sigh.
Then while searching for what directory the cronjob was running from I found this very simple idea. The response was, why not just change it to the directory you want. 🤦♂️
I added the cd to the top of the file:
# change to the directory with all of the files
cd /home/pi/Documents/python_projects/
Anyway, now it works. Finally!
Tomorrow will be the first time (unless of course something else goes wrong) that The entire process will be automated. Super pumped!
SSL ... Finally!
I’ve been futzing around with SSL on this site since last December. I’ve had about 4 attempts and it just never seemed to work.
Earlier this evening I was thinking about getting a second Linode just to get a fresh start. I was this close to getting it when I thought, what the hell, let me try to work it out one more time.
And this time it actually worked.
I’m not really sure what I did differently, but using this site seemed to make all of the difference.
The only other thing I had to do was make a change in the word press settings (from http to https) and enable a plugin Really Simple SSL and it finally worked.
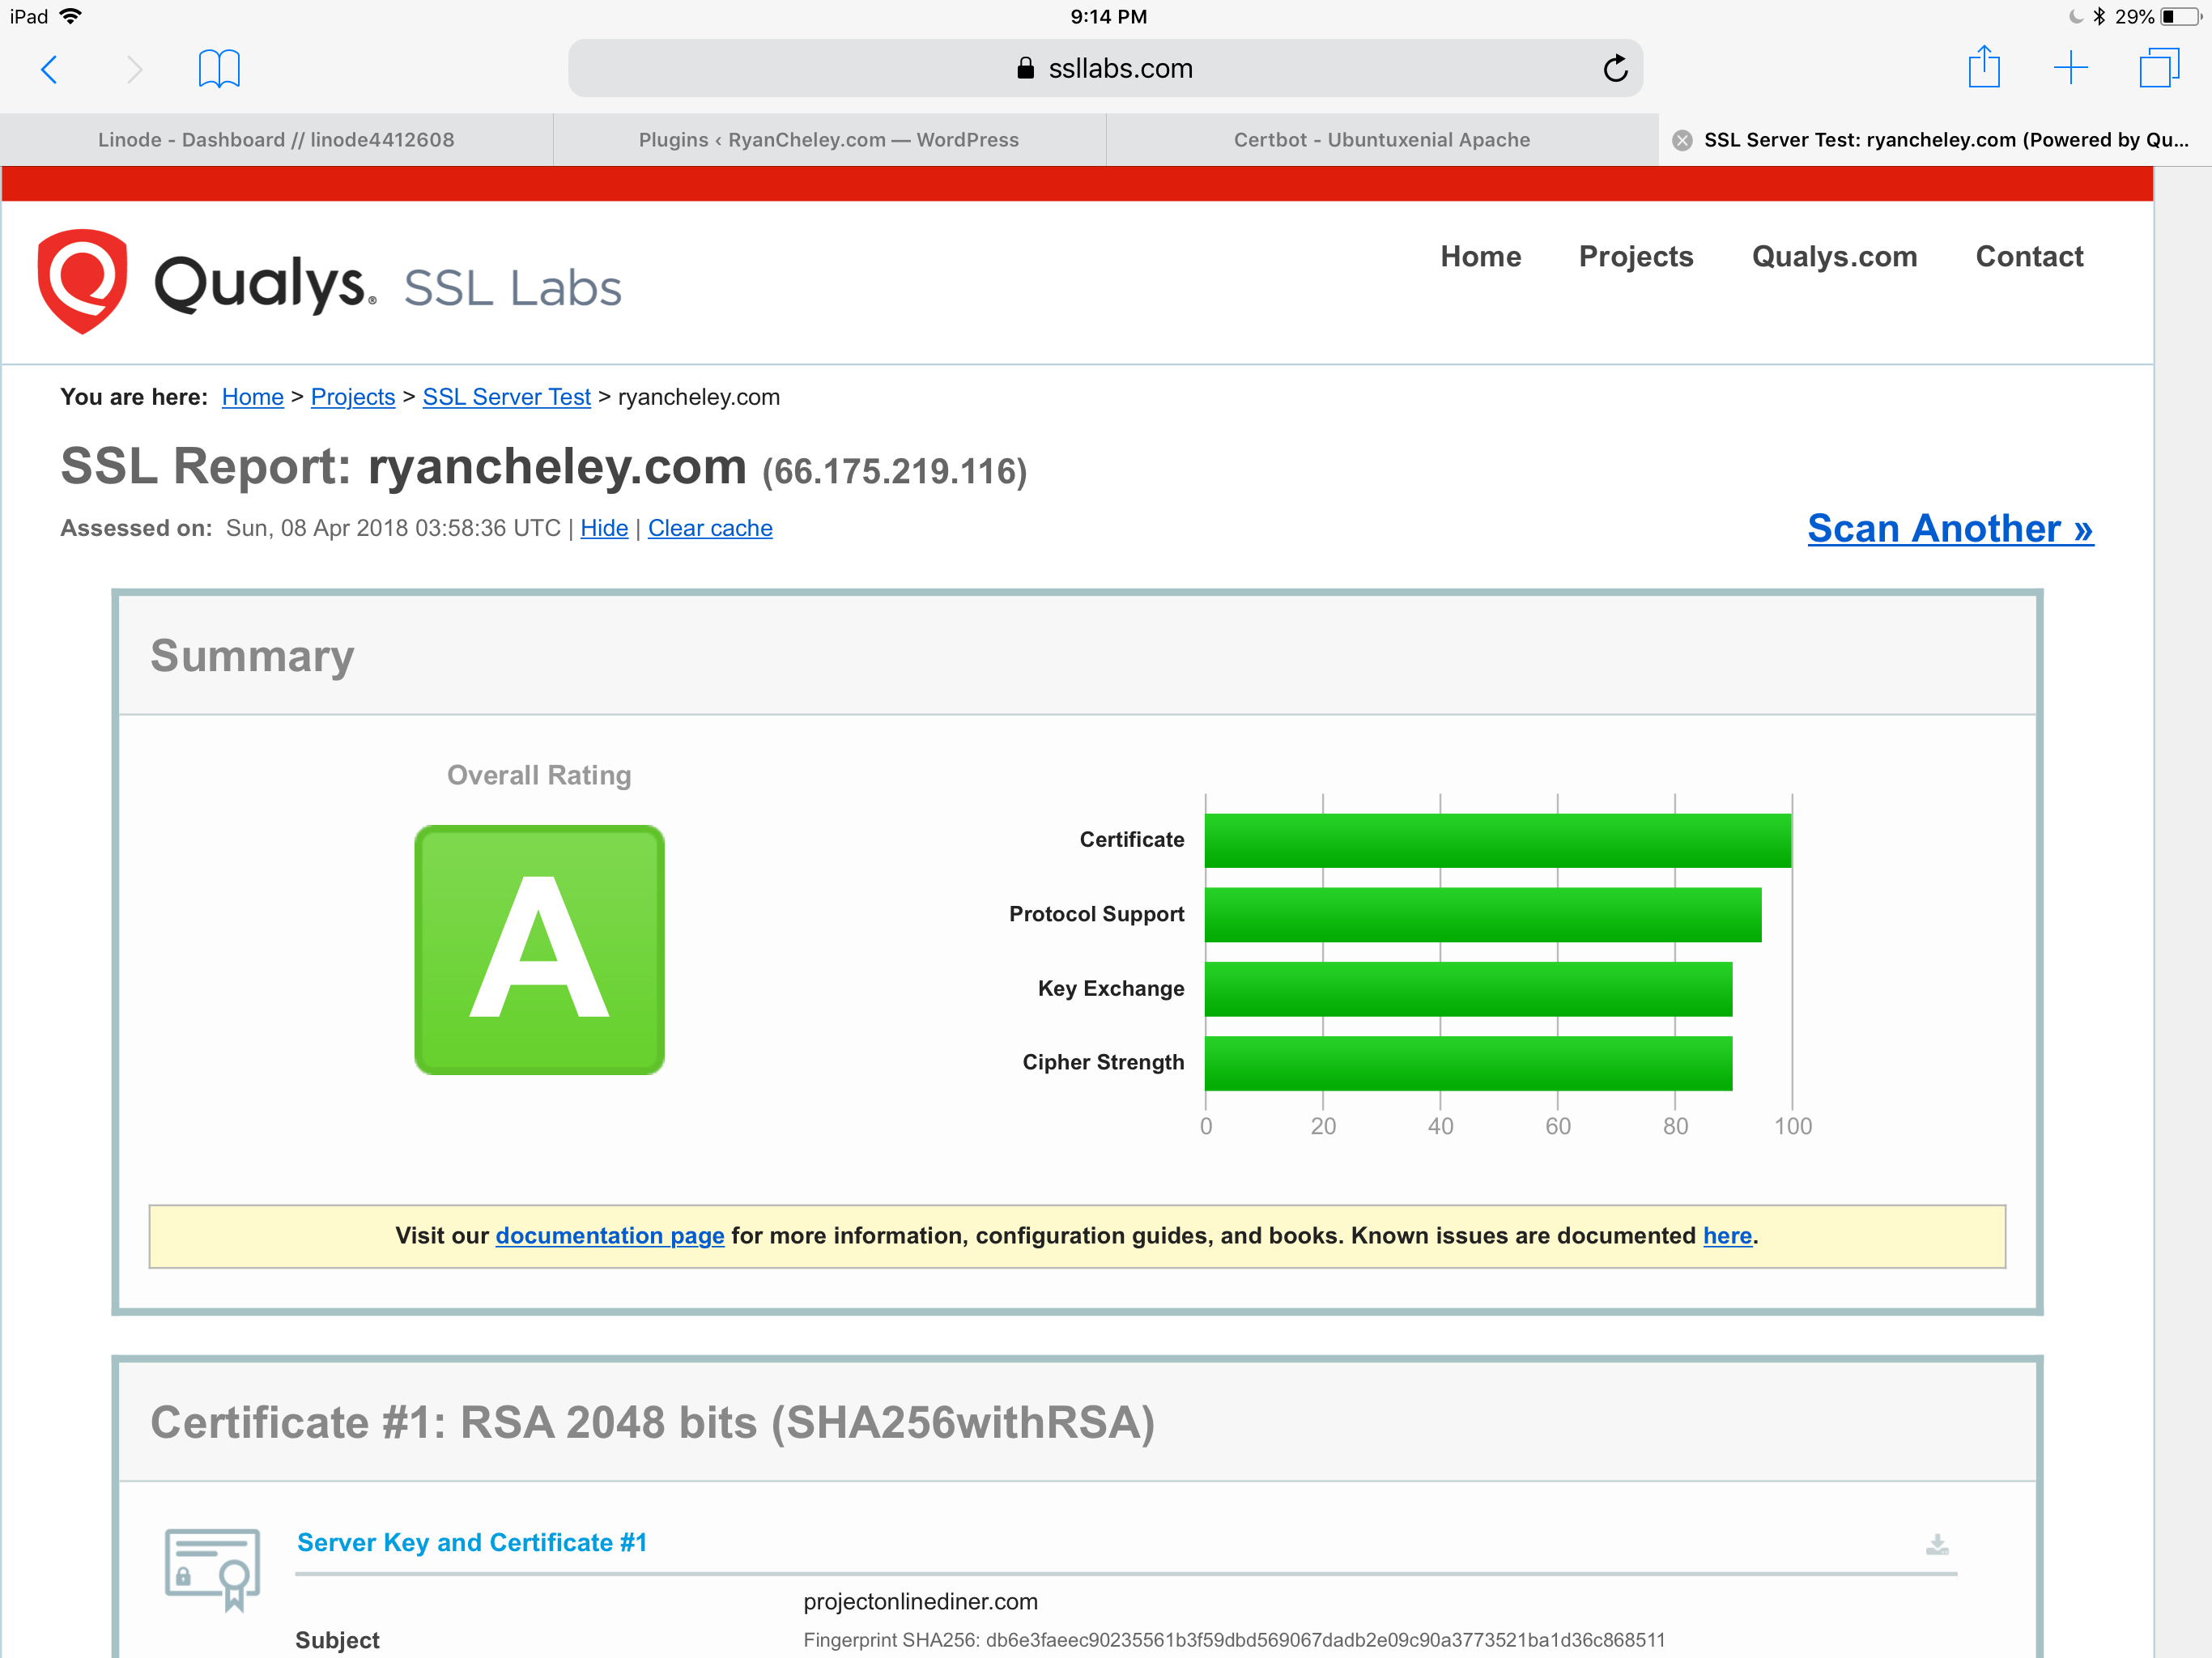
I even got an ‘A’ from SSL Labs!
Again, not really sure why this seemed so hard and took so long.
I guess sometimes you just have to try over and over and over again
Hummingbird Video Capture
I previously wrote about how I placed my Raspberry Pi above my hummingbird feeder and added a camera to it to capture video.
Well, the day has finally come where I’ve been able to put my video of it up on YouTube! It’s totally silly, but it was satisfying getting it out there for everyone to watch and see.
Hummingbird Video Capture: Addendum
The code used to generate the the mp4 file haven’t changed (really). I did do a couple of things to make it a little easier though.
I have 2 scripts that generate the file and then copy it from the pi to my MacBook Pro and the clean up:
Script 1 is called create_script.sh and looks like this:
(echo '#!/bin/sh'; echo -n "MP4Box"; array=($(ls *.h264)); for index in ${!array[@]}; do if [ "$index" -eq 0 ]; then echo -n " -add ${array[index]}"; else echo -n " -cat ${array[index]}"; fi; done; echo -n " hummingbird.mp4") > create_mp4.sh | chmod +x create_mp4.sh
This creates a script called create_mp4.sh and makes it executable.
This script is called by another script called run_script.sh and looks like this:
./create_script.sh
./create_mp4.sh

scp hummingbird.mp4 ryan@192.168.1.209:/Users/ryan/Desktop/

# Next we remove the video files locally

rm *.h264
rm *.mp4
It runs the create_script.sh which creates create_mpr.sh and then runs it.
Then I use the scp command to copy the mp4 file that was just created over to my Mac Book Pro.
As a last bit of housekeeping I clean up the video files.
I’ve added this run_script.sh to a cron job that is scheduled to run every night at midnight.
We’ll see how well it runs tomorrow night!
ITFDB Demo
Last Wednesday if you would have asked what I had planned for Easter I would have said something like, “Going to hide some eggs for my daughter even though she knows the Easter bunny isn’t real.”
Then suddenly my wife and I were planning on entertaining for 11 family members. My how things change!
Since I was going to have family over, some of whom are Giants fans, I wanted to show them the ITFDB program I have set up with my Pi.
The only problem is that they would be over at 10am and leave by 2pm while the game doesn’t start until 5:37pm (Thanks ESPN).
To help demonstrate the script I wrote a demo script to display a message on the Pi and play the Vin Scully mp3.
The Code was simple enough:
from sense_hat import SenseHat
import os


def main():
    sense = SenseHat()
    message = '#ITFDB!!! The Dodgers will be playing San Francisco at 5:37pm tonight!'
    sense.show_message(message, scroll_speed=0.05)
    os.system("omxplayer -b /home/pi/Documents/python_projects/itfdb/dodger_baseball.mp3")


if __name__ == '__main__':
    main()
But then the question becomes, how can I easily launch the script without futzing with my laptop?
I knew that I could run a shell script for the Workflow app on my iPhone with a single action, so I wrote a simple shell script
python3 ~/Documents/python_projects/itfdb/demo.py
Which was called itfdb_demo.sh
And made it executable
chmod u+x itfdb_demo.sh
Finally, I created a WorkFlow which has only one action Run Script over SSH and added it to my home screen so that with a simple tap I could demo the results.
The WorkFlow looks like this:

Nothing too fancy, but I was able to reliably and easily demonstrate what I had done. And it was pretty freaking cool!
Page 10 / 13