Receipts
Every month I set up a budget for my family so that we can track our spending and save money in the ways that we need to while still being able to enjoy life.
I have a couple of Siri Shortcuts that will take a picture and then put that picture into a folder in Dropbox. The reason that I have a couple of them is that one is for physical receipts that we got at a store and the other is for online purchases. I’m sure that these couple be combined into one, but I haven’t done that yet.
One of the great things about these shortcuts is that they will create the folder that the image will go into if it’s not there. For example, the first receipt of March 2019 will create a folder called March in the 2019 folder. If the 2019 folder wasn’t there, it would have created it too.
What it doesn’t do is create the sub folder that all of my processed receipts will go into. Each month I need to create a folder called month_name Processed. And each month I think, there must be a way I can automate this, but because it doesn’t really take that long I’ve never really done it.
Over the weekend I finally had the time to try and write it up and test it out. Nothing too fancy, but it does what I want it to do, and a little more.
# create the variables I'm going to need later

y=$( date +"%Y" )
m=$( date +"%B" )
p=$( date +"%B_Processed" )

# check to see if the Year folder exists and if it doesn't, create it
if [ ! -d /Users/ryan/Dropbox/Family/Financials/$y ]; then
    mkdir /Users/ryan/Dropbox/Family/Financials/$y
fi

# check to see if the Month folder exists and if it doesn't, create it
if [ ! -d /Users/ryan/Dropbox/Family/Financials/$y/$m ]; then
    mkdir /Users/ryan/Dropbox/Family/Financials/$y/$m
fi

#check to see if the Month_Processed folder exists and if it doesn't, create it
if [ ! -d "/Users/ryan/Dropbox/Family/Financials/$y/$m/$p" ]; then
    mkdir "/Users/ryan/Dropbox/Family/Financials/$y/$m/$p"
fi
The last section I use the double quotes “” around the directory name so that I can have a space in the name of the processed folder. Initially I had used an underscore but that’s not how I do it in real life when creating the sub directors, so I had to do a bit of googling and found a helpful resource.
The only thing left to do at this point is get it set up to run automatically so I don’t have to do anything.
In order to do that I needed to add the following to my cronjob:
0 5 1 * * /Users/ryan/Documents/scripts/create_monthly_expense_folders.sh
And now I will have my folder structure created for me automatically on the first of the month at 5am!
Keeping Python up to date on macOS
Sometimes the internet is a horrible, awful, ugly thing. And then other times, it’s exactly what you need.
I have 2 Raspberry Pi each with different versions of Python. One running python 3.4.2 and the other running Python 3.5.3. I have previously tried to upgrade the version of the Pi running 3.5.3 to a more recent version (in this case 3.6.1) and read 10s of articles on how to do it. It did not go well. Parts seemed to have worked, while others didn’t. I have 3.6.1 installed, but in order to run it I have to issue the command python3.6 which is fine but not really what I was looking for.
For whatever reason, although I do nearly all of my Python development on my Mac, it hadn’t occurred to me to upgrade Python there until last night.
With a simple Google search the first result came to Stackoverflow (what else?) and this answer.
brew update
brew upgrade python3
Sometimes things on a Mac do ‘just work’. This was one of those times.
I’m now running Python 3.7.1 and I’ll I needed to do was a simple command in the terminal.
God bless the internet.
Monitoring the temperature of my Raspberry Pi Camera
In late April of this year I wrote a script that would capture the temperature of the Raspberry Pi that sits above my Hummingbird feeder and log it to a file.
It’s a straight forward enough script that captures the date, time and temperature as given by the internal measure_temp function. In code it looks like this:
MyDate="`date +'%m/%d/%Y, %H:%M, '`"
MyTemp="`/opt/vc/bin/vcgencmd measure_temp |tr -d "=temp'C"`"
echo "$MyDate$MyTemp" >> /home/pi/Documents/python_projects/temperature/temp.log
I haven’t ever really done anything with the file, but one thing I wanted to do was to get alerted if (when) the temperature exceeded the recommended level of 70 C.
To do this I installed ssmtp onto my Pi using apt-get
sudo apt-get install ssmtp
With that installed I am able to send an email using the following command:
echo "This is the email body" | mail -s "This is the subject" user@domain.tld
With this tool in place I was able to attempt to send an alert if (when) the Pi’s temperature got above 70 C (the maximum recommended running temp).
At first, I tried adding this code:
if [ "$MyTemp" -gt "70" ]; then
   echo "Camera Pi Running Hot" | mail -s "Warning! The Camera Pi is Running Hot!!!" user@domain.tld
fi
Where the $MyTemp came from the above code that gets logged to the temp.log file.
It didn’t work. The problem is that the temperature I’m capturing for logging purposes is a float, while the item it was being compared to was an integer. No problem, I’ll just make the “70” into a “70.0” and that will fix the ... oh wait. That didn’t work either.
OK. I tried various combinations, trying to see what would work and finally determined that there is a way to get the temperature as an integer, but it meant using a different method to capture it. This is done by adding this line:
ComparisonTemp=$(($(cat /sys/class/thermal/thermal_zone0/temp)/1000))
The code above gets the temperature as an integer. I then use that in my if statement for checking the temperature:
if [ "$ComparisonTemp" -gt "70" ]; then
   echo "Camera Pi Running Hot" | mail -s "Warning! The Camera Pi is Running Hot!!!" user@domain.tld
fi
Giving a final script that looks like this:
MyDate="`date +'%m/%d/%Y, %H:%M, '`"
MyTemp="`/opt/vc/bin/vcgencmd measure_temp |tr -d "=temp'C"`"
echo "$MyDate$MyTemp" >> /home/pi/Documents/python_projects/temperature/temp.log
ComparisonTemp=$(($(cat /sys/class/thermal/thermal_zone0/temp)/1000))

if [ "$ComparisonTemp" -gt "70" ]; then
   echo "Camera Pi Running Hot" | mail -s "Warning! The Camera Pi is Running Hot!!!" user@domain.tld
fi
iPad versus MacBook Pro
May people ask the question ... iPad Pro or MacBook Pro. I decided to really think about this question and see, what is it that I do with each device.
Initially I thought of each device as being its own ‘thing’. I did these things on my iPad Pro and those things on my MacBook Pro. But when I really sat down and thought about it, it turns out that there are things I do exclusively on my iPad Pro, and other things that I do exclusively on my MacBook Pro ... but there are also many things that I do on both.
iPad Pro
There are apps which only run on iOS. Drafts is a perfect example. It’s my note taking app of choice. Using my iPhone in conjunction with my iPad makes Drafts one of the most powerful apps I use in the iOS ecosystem.
During meetings I can quickly jot down things that I need to know using my iPhone and no one notices or cares. Later, I can use my iPad Pro to process these notes and make sure that everything gets taken care of.
I can also use Drafts as a powerful automation tool to get ideas into OmniFocus (my To Do App of Choice) easily and without any fuss.
I also use my iPad Pro to process the expenses my family incurs. We use Siri Shortcuts to take a picture of a receipt which is then saved in a folder in Dropbox.
I monitor these images and match them up against expenses (or income) in Mint and categorize the expenses.
This workflow helps to keep me (and my family) in the know about how (and more importantly where) we’re spending our money.
Mint is available as a web page, and I’ve tried to use macOS and this workflow, but it simply didn’t work for me.
Using OmniFocus on the iPad is a dream. I am easily able to process my inbox, perform my weekly review and quickly add new items to do inbox. The ability to drag and drop with with either Apple Pencil or my finger makes it so easy to move tasks around.
The other (obvious) use case for my iPad Pro over my MacBook Pro is media consumption. Everyone says you can’t get real work done on an iPad and they point to how easy it is to consume media on the iPad, but I think that shows the opposite.
When you’re ready to take a break from doing real work, the best media consumption device is the one you have with you 😀
MacBook Pro
When I really thought about what I use my MacBook Pro for I was ... surprised. Quite honestly, it’s used mostly to write code (in Python) using my favorite editor (PyCharm) but other than that ... I don’t do much on it that I can’t do on my iPad.
When I record podcast (OK, really, just that one and just that one time) I use my MBP, and if I have a ton of stuff I need to clean up in OmniFocus then I’m over at the MacBook, but really, it’s doesn’t do anything I can’t do on the iPad Pro.
Maybe I don’t do real work in the macOS ecosystem?
What I do on both MacBook Pro and iPad Pro
Honestly, they both do a great job of getting me to where I want to go on the internet. Some people think that mobile safari isn’t up to it’s macOS counterpart (and they’re right) but for my (non-coding) needs, it doesn’t really matter to me. They both work really well for me.
I also tend to use OmniFocus on both when I want to mark things as done, add new items, or make bulk edits (OF3 on iOS finally made this one a possibility).
I also use the terminal to access servers via ssh on both platforms. The great thing about the command line is that it’s mostly the same where ever you’re coming from.
Terminus on iOS is a a great terminal app and I can just as easily navigate the server there as I can using the terminal app in macOS.
I’m also just as likely to plan my family’s budget on iOS as I am macOS. It just kind of depends which device is easier to get to, not what I’m planning on doing. Excel on both platforms works really well for me (I work in a Windows environment professionally so Excel is what I use and know for that kind of thing).
Finally, writing. I use Ulysses on both macOS and iOS and really, I love them both. Each app has parity with the other so I never feel like I’m losing something when I write on my MacBook Pro (or on my iPad Pro). Sometimes, it’s hard to really tell which platform I’m on because they do such a good job (for me) to make them basically the same.
All in all, I don’t think it’s a question of which to choose, iPad Pro or MacBook Pro, iOS or macOS ... it’s a matter of what device is closest to me right now? What device will bring me the most joy to use, right now? What device do I want to use right now?
iOS or macOS? iPad Pro or MacBook Pro? These aren’t the right questions to be asking. It should be ... what device do I want to use right now? And don’t care what anyone else thinks.
Fizz Buzz
I was listening to the most recent episode of ATP and John Siracusa mentioned a programmer test called fizz buzz that I hadn’t heard of before.
I decided that I’d give it a shot when I got home using Python and Bash, just to see if I could (I was sure I could, but you know, wanted to make sure).
Sure enough, with a bit of googling to remember some syntax of Python, and learn some syntax for bash, I had two stupid little programs for fizz buzz.
Python
def main():

    my_number = input("Enter a number: ")

    if not my_number.isdigit():
        return
    else:
        my_number = int(my_number)
        if my_number%3 == 0 and my_number%15!=0:
            print("fizz")
        elif my_number%5 == 0 and my_number%15!=0:
            print("buzz")
        elif my_number%15 == 0:
            print("fizz buzz")
        else:
            print(my_number)


if __name__ == '__main__':
    main()
Bash
1 2 3 4 5 6 7 8 9 10 11 12 13 14 15 16 17 18 19 20 | |
And because if it isn’t in GitHub it didn’t happen, I committed it to my fizz-buzz repo.
I figure it might be kind of neat to write it in as many languages as I can, you know … for when I’m bored.
Adding my Raspberry Pi Project code to GitHub
Over the long holiday weekend I had the opportunity to play around a bit with some of my Raspberry Pi scripts and try to do some fine tuning.
I mostly failed in getting anything to run better, but I did discover that not having my code in version control was a bad idea. (Duh)
I spent the better part of an hour trying to find a script that I had accidentally deleted somewhere in my blog. Turns out it was (mostly) there, but it didn’t ‘feel’ right … though I’m not sure why.
I was able to restore the file from my blog archive, but I decided that was a dumb way to live and given that
- I use version control at work (and have for the last 15 years)
- I’ve used it for other personal projects
However, I’ve only ever used a GUI version of either subversion (at work) or GitHub (for personal projects via PyCharm). I’ve never used it from the command line.
And so, with a bit of time on my hands I dove in to see what needed to be done.
Turns out, not much. I used this GitHub resource to get me what I needed. Only a couple of commands and I was in business.
The problem is that I have a terrible memory and this isn’t something I’m going to do very often. So, I decided to write a bash script to encapsulate all of the commands and help me out a bit.
The script looks like this:
echo "Enter your commit message:"

read commit_msg

git commit -m "$commit_msg"

git remote add origin path/to/repository

git remote -v

git push -u origin master

git add $1

echo ”enter your commit message:”

read commit_msg

git commit -m ”$commit_msg”

git push
I just recently learned about user input in bash scripts and was really excited about the opportunity to be able to use it. Turns out it didn’t take long to try it out! (God I love learning things!)
What the script does is commits the files that have been changed (all of them), adds it to the origin on the GitHub repo that has been specified, prints verbose logging to the screen (so I can tell what I’ve messed up if it happens) and then pushes the changes to the master.
This script doesn’t allow you to specify what files to commit, nor does it allow for branching and tagging … but I don’t need those (yet).
I added this script to 3 of my projects, each of which can be found in the following GitHub Repos:
I had to make the commit.sh executable (with chmod +x commit.sh) but other than that it’s basically plug and play.
Addendum
I made a change to my Kings script tonight (Nov 27) and it wouldn’t get pushed to git. After a bit of Googling and playing around, I determined that the original script would only push changes to an empty repo ... not one with stuff, like I had. Changes made to the post (and the GitHub repo!)
The PIR Sensor Debacle of 2018
Last spring I set up a Raspberry Pi to record humming birds at my hummingbird feeder, compile the recorded h264 files into an mp4 and upload it to YouTube.
I’ve written about that process before here, here, and here.
This post is a bit of documentation to remind myself about how to connect the PIR sensor to the Raspberry Pi so I don’t forget.
When I went to set it up this year, it appeared like the PIR sensor wasn’t working. It would start the video capture, but it wouldn’t end it.
I tried a couple of different things (including the purchase of some new PIR sensors) but none of them seemed to work. I was worried that the heat from the early bit of summer last year had maybe fried my little Pi.
But no, it turns out that the link I was using as the basis for my project had a diagram AND a description about how to connect the PIR.
I had assumed that the diagram was correct and that I didn’t need to read the description, but it turns out I did BECAUSE the diagram had the connections set up in a way that didn’t line up with the PIR sensor(s) I have.

In the Parent Detector PIR sensor the connectors are (1) Power, (2) Ground, (3) Out
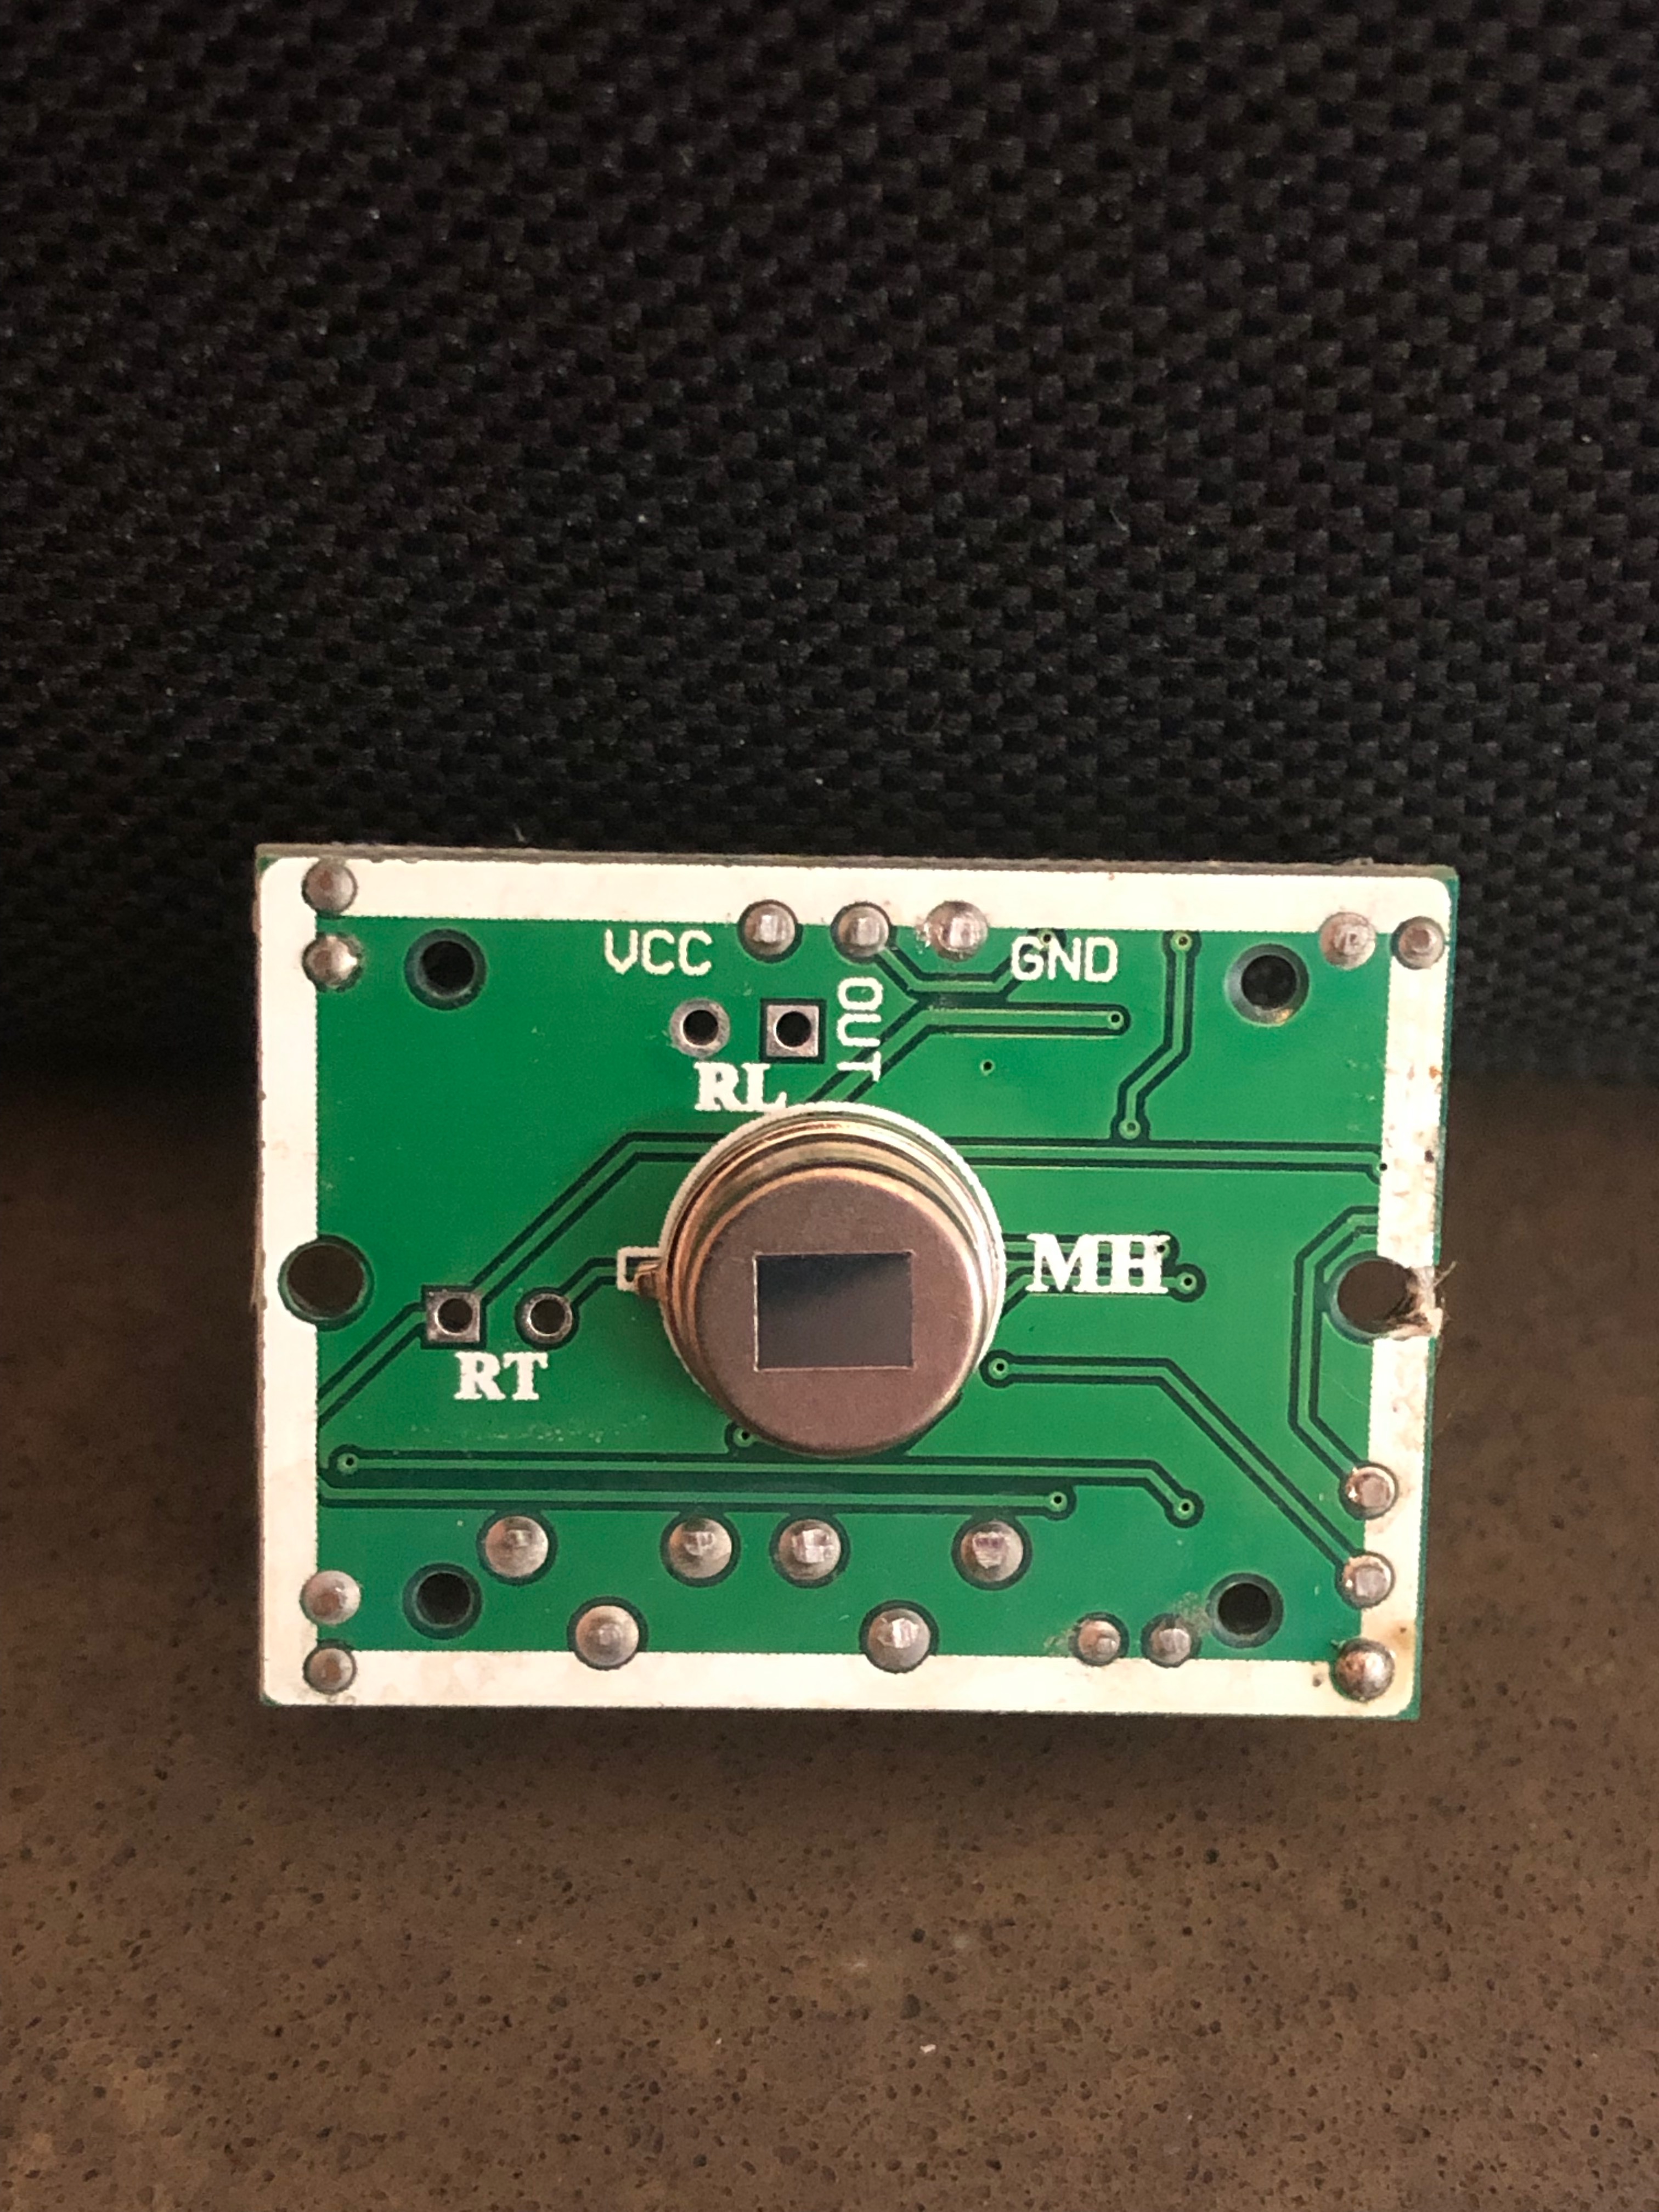
In my PIR sensor the connectors are (1) Power, (2) Out, (3) Ground.
This meant that the power was getting to the PIR sensor, but there was no way to send the trip because the signal was being sent to the Ground.
Anyway, the morale of the story is, pictures are nice, but reading may save you some time (and money) in the long run.
ITFKH!!!
It’s time for Kings Hockey! A couple of years ago Emily and I I decided to be Hockey fans. This hasn’t really meant anything except that we picked a team (the Kings) and ‘rooted’ for them (i.e. talked sh*t* to our hockey friends), looked up their position in the standings, and basically said, “Umm ... yeah, we’re hockey fans.”
When the 2018 baseball season ended, and with the lack of interest in the NFL (or the NBA) Emily and I decided to actually focus on the NHL. Step 1 in becoming a Kings fan is watching the games. To that end we got a subscription to NHL Center Ice and have committed to watching the games.
Step 2 is getting notified of when the games are on. To accomplish this I added the games to our family calendar, and decided to use what I learned writing my ITFDB program and write one for the Kings.
For the Dodgers I had to create a CSV file and read it’s contents. Fortunately, the NHL as a sweet API that I could use. This also gave me an opportunity to use an API for the first time!
The API is relatively straight forward and has some really good documentation so using it wasn’t too challenging.
import requests
from sense_hat import SenseHat
from datetime import datetime
import pytz
from dateutil.relativedelta import relativedelta


def main(team_id):
    sense = SenseHat()

    local_tz = pytz.timezone('America/Los_Angeles')
    utc_now = pytz.utc.localize(datetime.utcnow())
    now = utc_now.astimezone(local_tz)

    url = 'https://statsapi.web.nhl.com/api/v1/schedule?teamId={}'.format(team_id)
    r = requests.get(url)

    total_games = r.json().get('totalGames')

    for i in range(total_games):
        game_time = (r.json().get('dates')[i].get('games')[0].get('gameDate'))
        away_team = (r.json().get('dates')[i].get('games')[0].get('teams').get('away').get('team').get('name'))
        home_team = (r.json().get('dates')[i].get('games')[0].get('teams').get('home').get('team').get('name'))
        away_team_id = (r.json().get('dates')[i].get('games')[0].get('teams').get('away').get('team').get('id'))
        home_team_id = (r.json().get('dates')[i].get('games')[0].get('teams').get('home').get('team').get('id'))
        game_time = datetime.strptime(game_time, '%Y-%m-%dT%H:%M:%SZ').replace(tzinfo=pytz.utc).astimezone(local_tz)
        minute_diff = relativedelta(now, game_time).minutes
        hour_diff = relativedelta(now, game_time).hours
        day_diff = relativedelta(now, game_time).days
        month_diff = relativedelta(now, game_time).months
        game_time_hour = str(game_time.hour)
        game_time_minute = '0'+str(game_time.minute)
        game_time = game_time_hour+":"+game_time_minute[-2:]
        away_record = return_record(away_team_id)
        home_record = return_record(home_team_id)
        if month_diff == 0 and day_diff == 0 and hour_diff == 0 and 0 >= minute_diff >= -10:
            if home_team_id == team_id:
                msg = 'The {} ({}) will be playing the {} ({}) at {}'.format(home_team, home_record, away_team, away_record ,game_time)
            else:
                msg = 'The {} ({}) will be playing at the {} ({}) at {}'.format(home_team, home_record, away_team, away_record ,game_time)
            sense.show_message(msg, scroll_speed=0.05)


def return_record(team_id):
    standings_url = 'https://statsapi.web.nhl.com/api/v1/teams/{}/stats'.format(team_id)
    r = requests.get(standings_url)
    wins = (r.json().get('stats')[0].get('splits')[0].get('stat').get('wins'))
    losses = (r.json().get('stats')[0].get('splits')[0].get('stat').get('losses'))
    otl = (r.json().get('stats')[0].get('splits')[0].get('stat').get('ot'))
    record = str(wins)+'-'+str(losses)+'-'+str(otl)
    return record


if __name__ == '__main__':
    main(26) # This is the code for the LA Kings; the ID can be found here: https://statsapi.web.nhl.com/api/v1/teams/
The part that was the most interesting for me was getting the opponent name and then the record for both the opponent and the Kings. Since this is live data it allows the records to be updated which I couldn’t do (easily) with the Dodgers programs (hey MLB ... anytime you want to have a free API I’m ready!).
Anyway, it was super fun and on November 6 I had the opportunity to actually see it work:
<iframe src="https://www.youtube.com/embed/AzdLSrA8wvU" width="560" height="315" frameborder="0" allowfullscreen="allowfullscreen"></iframe>
I really like doing fun little projects like this.
New Watch
New Watch
The first week
I've been rocking a series 2 Apple Watch for about 18 months. I timed my purchase just right to not get a series 3 when it went on sale (🤦🏻♂️). When the series 4 was released I decided that I wanted to get one, but was a bit too slow (and tired) to stay up and order one at launch.
This meant that I didn't get my new Apple Watch until last Saturday (nearly5 weeks later). I wanted to write down my thoughts on the Watch and what it's meant for me. I won't go into specs and details, just what I've found that I liked and didn't like.
The Good
Holy crap is it fast. I mean, like really fast. I've never had a watch that responded like this (before my series 2 I had a series 0).
It reacts when I want it to, so much so that I'm sometimes not prepared. It reminds me of the transition from Touch ID Gen 1 to Touch ID Gen 2. I really appreciate how fast everything comes up. When I start an activity, it’s there (no more waiting like on Series 2). When I want to pair with my AirPods … it’s there and ready to go.
I also really like how much thinner it is and the increase in size. At first I thought it was ‘monstrous’ but now I’m trying to figure out how I ever lived with 2 fewer millimeters.
I also decided to get the Cellular Version just in case. It was a bit more expensive, and I probably won’t end up using it past the free trial I got, but it’s nice to know that I can have it if I need it. I haven’t had a chance to use it (yet) but hopefully I’ll get a chance here soon.
The Bad
So far, nothing has stuck me as being ‘bad’. It’s the first Apple Watch I’ve had that’s really exceeded my expectations in terms of performance and sheer joy that I get out of using it.
Conclusion
Overall I love the Series 4 Watch. It doesn’t do anything different than the Series 2 that I had (except I can make phone calls without my phone if I need to) but oh my is it fast! If someone is on a Series 2 and is wondering if jumping to the Series 4 is worth it … it totally is.
Moving my Pycharm Directory or How I spent my Saturday after jacking up my PyCharm environment
Every once in a while I get a wild hair and decide that I need to ‘clean up’ my directories. This never ends well and I almost always mess up something, but I still do it.
Why? I’m not sure, except that I forget that I’ll screw it up. 🤦♂️
Anyway, on a Saturday morning when I had nothing but time I decided that I’d move my PyCharm directory from /Users/ryan/PyCharm to /Users/ryan/Documents/PyCharm for no other reason than because.
I proceeded to use the command line to move the folder
mv /Users/ryan/PyCharm/ /Users/ryan/Documents/PyCharm/
Nothing too big, right. Just a simple file movement.
Not so much. I then tried to open a project in PyCharm and it promptly freaked out. Since I use virtual environments for my Python Project AND they tend to have paths that reference where they exist, suddenly ALL of my virtual environments were kind of just gone.
Whoops!
OK. No big deal. I just undid my move
mv /Users/ryan/Documents/PyCharm/ /Users/ryan/PyCharm
That should fix me up, right?
Well, mostly. I had to re-register the virtual environments and reinstall all of the packages in my projects (mostly not a big deal with PyCharm) but holy crap it was scary. I thought I had hosed my entire set of projects (not that I have anything that’s critical … but still).
Anyway, this is mostly a note to myself.
The next time you get a wild hair to move stuff around, just keep it where it is. There’s no reason for it (unless there is).
But seriously, ask yourself first, “If I don’t move this what will happen?” If the answer is anything less than “Something awful” go watch a baseball game, or go to the pool, or write some code. Don’t mess with your environment unless you really want to spend a couple of hours unmasking it up!
Page 9 / 13