CBV - Template View
From Classy Class Based Views the TemplateView will
Render a template. Pass keyword arguments from the URLconf to the context.
It is an extended version of the View CBV with the the ContextMixin and the TemplateResponseMixin added to it.
It has several attributes that can be set
- content_type: will allow you to define the MIME type that the page will return. The default is
DEFAULT\_CONTENT\_TYPEbut can be overridden with this attribute. - extra_context: this can be used as a keyword argument in the
as\_view()but not in the class of the CBV. Adding it there will do nothing - http_method_name: derived from
Viewand has the same definition - response_classes: The response class to be returned by render_to_response method it defaults to a TemplateResponse. See below for further discussion
- template_engine: can be used to specify which template engine to use IF you have configured the use of multiple template engines in your
settings.pyfile. See the Usage section of the Django Documentation on Templates - template_name: this attribute is required IF the method
get\_template\_names()is not used.
More on response_class
This confuses the ever living crap out of me. The best (only) explanation I have found is by GitHub user spapas in his article Django non-HTML responses:
From the previous discussion we can conclude that if your non-HTML response needs a template then you just need to create a subclass of TemplateResponse and assign it to the responseclass attribute (and also change the contenttype attribute). On the other hand, if your non-HTML respond does not need a template to be rendered then you have to override rendertoresponse completely (since the template parameter does not need to be passed now) and either define a subclass of HttpResponse or do the rendering in the rendertoresponse.
Basically, if you ever want to use a non-HTML template you’d set this attribute, but it seems available mostly as a ‘just-in-case’ and not something that’s used every day.
My advise … just leave it as is.
When to use the get method
An answer which makes sense to me that I found on StackOverflow was (slightly modified to make it more understandable)
if you need to have data available every time, use get_context_data(). If you need the data only for a specific request method (eg. in get), then put it in get.
When to use the get_template_name method
This method allows you to easily change a template being used based on values passed through GET.
This can be helpful if you want to have one template for a super user and another template for a basic user. This helps to keep business logic out of the template and in the view where it belongs.
This can also be useful if you want to specify several possible templates to use. A list is passed and Django will work through that list from the first element to the last until it finds a template that exists and render it.
If you don’t specify template_name you have to use this method.
When to use the get_context_data method
See above in the section When to use the get method
Diagram
A visual representation of how TemplateView derives from View 1

Conclusion
If you want to roll your own CBV because you have a super specific use case, starting at the TemplateView is going to be a good place to start. However, you may find that there is already a view that is going to do what you need it to. Writing your own custom implementation of TemplateView may be a waste of time IF you haven’t already verified that what you need isn’t already there.
- Original Source from Classy Class Based Views ↩︎
CBV - View
View is the ancestor of ALL Django CBV. From the great site Classy Class Based Views, they are described as
Intentionally simple parent class for all views. Only implements dispatch-by-method and simple sanity checking.
This is no joke. The View class has almost nothing to it, but it’s a solid foundation for everything else that will be done.
Its implementation has just one attribute http_method_names which is a list that allows you to specify what http verbs are allowed.
Other than that, there’s really not much to it. You just write a simple method, something like this:
def get(self, _):
    return HttpResponse('My Content')
All that gets returned to the page is a simple HTML. You can specify the content_type if you just want to return JSON or plain text but defining the content_type like this:
def get(self, _):
    return HttpResponse('My Content', content_type='text plain')
You can also make the text that is displayed be based on a variable defined in the class.
First, you need to define the variable
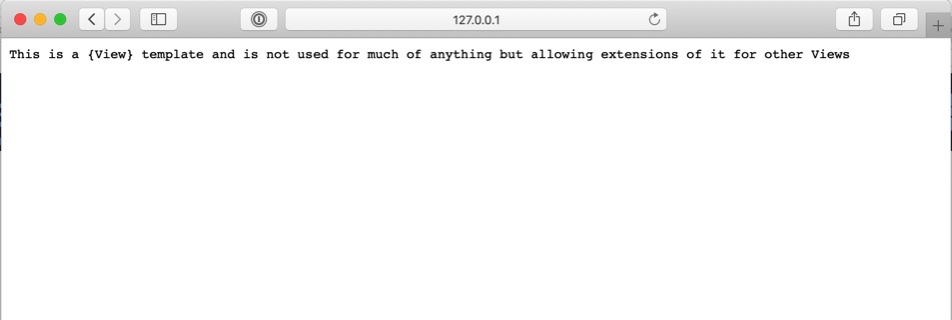
content = 'This is a {View} template and is not used for much of anything but '
             'allowing extensions of it for other Views'
And then you can do something like this:
def get(self, _):
    return HttpResponse(self.content, content_type='text/plain')
Also, as mentioned above you can specify the allowable methods via the attribute http_method_names.
The following HTTP methods are allowed:
- get
- post
- put
- patch
- delete
- head
- options
- trace
By default all are allowed.
If we put all of the pieces together we can see that a really simple View CBV would look something like this:
class myView(View):
    content = 'This is a {View} template and is not used for much of anything but '
             'allowing extensions of it for other Views'
    http_method_names = ['get']

    def get(self, _):
        return HttpResponse(self.content, content_type='text/plain')
This View will return content to the page rendered as plain text. This CBV is also limited to only allowing get requests.
Here’s what it looks like in the browser:
Conclusion
View doesn’t do much, but it’s the case for everything else, so understanding it is going to be important.
Class Based Views
As I’ve written about previously I’m working on a Django app. It’s in a pretty good spot (you should totally check it out over at StadiaTracker.com) and I thought now would be a good time to learn a bit more about some of the ways that I’m rendering the pages.
I’m using Class Based Views (CBV) and I realized that I really didn’t grok how they worked. I wanted to change that.
I’ll be working on a series where I deep dive into the CBV and work them from several angles and try to get them to do all of the things that they are capable of.
The first place I’d suggest anyone start to get a good idea of CBV, and the idea of Mixins would be SpaPas’ GitHub Page where he does a really good job of covering many pieces of the CBV. It’s a great resource!
This is just the intro to this series and my hope is that I’ll publish one of these pieces each week for the next several months as I work my way through all of the various CBV that are available.
My first project after completing the 100 Days of Web in Python
As I mentioned in my last post, after completing the 100 Days of Web in Python I was moving forward with a Django app I wrote.
I pushed up my first version to Heroku on August 24. At that point it would allow users to add a game that they had seen, but when it disaplyed the games it would show a number (the game’s ID) instead of anything useful.
A few nights ago (Aug 28) I committed a version which allows the user to see which game they add, i.e. there are actual human readable details versus just a number!
The page can be found here. It feels really good to have it up in a place where people can actually see it. That being said I discovered a a couple of things on the publish that I’d like to fix.
I have a method that returns details about the game. One problem is that if any of the elements return None then the front page returns a Server 500 error ... this is not good.
It took a bit of googling to see what the issue was. The way I found the answer was to see an idea to turn Debug to True on my ‘prod’ server and see the output. That helped me identify the issue.
To ‘fix’ it in the short term I just deleted all of the data for the games seen in the database.
I’m glad that it happened because it taught me some stuff that I knew I needed to do, but maybe didn’t pay enough attention to ... like writing unit tests.
Based on that experience I wrote out a roadmap of sorts for the updates I want to get into the app:
- Tests for all classes and methods
- Ability to add minor league games
- Create a Stadium Listing View
- More robust search tool that allows a single team to be selected
- Logged in user view for only their games
- Create a List View of games logged per stadium
- Create a List View of attendees (i.e. users) at games logged
- Add more user features:
- Ability to add a picture
- Ability to add Twitter handle
- Ability to add Instagram handle
- Ability to add game notes
- Create a Heroku Pipeline to ensure that pushes to PROD are done through a UAT site
- Create a blog (as a pelican standalone sub domain)
It’s a lot of things but I’ve already done some things that I wanted to:
- Added SSL
- Set up to go to actual domain instead of Heroku subdomain
I’ll write up how I did the set up for the site so I can do it again. It’s not well documented when your registrar is Hover and you’ve got your site on Heroku. Man ... it was an tough.
My Experience with the 100 Days of Web in Python
As soon as I discovered the Talk Python to me Podcast, I discovered the Talk Python to me courses. Through my job I have a basically free subscription to PluralSight so I wasn’t sure that I needed to pay for the courses when I was effectively getting courses in Python for free.
After taking a couple ( well, truth be told, all ) of the Python courses at PluralSight, I decided, what the heck, the courses at Talk Python looked interesting, Michael Kennedy has a good instructor’s voice and is genuinely excited about Python, and if it didn’t work out, it didn’t work out.
I’m so glad I did, and I’m so glad I went through the 100 Days of Web in Python course.
On May 2, 2019 I saw that the course had been released and I tweeted
This x 1000000! Thank you so much \@TalkPython. I can’t wait to get started!
I started on the course on May 4, 2019 and completed it August 11, 2019. Full details on the course are here.
Of the 28 concepts that were reviewed over the course, my favorites things were learning Django and Django Rest Framework and Pelican. Holy crap, those parts were just so much fun for me. Part of my interest in Django and DRF comes from William S Vincent’s books and Podcast Django Chat, but having actual videos to watch to get me through some of the things that have been conceptually tougher for me was a godsend.
The other part that I really liked was actual deployment to a server. I had tried (about 16 months ago) to deploy a Django app to Digital Ocean and it was an unmitigated disaster. No static files no matter what I did. I eventually gave up.
In this course I really learned how to deploy to both Heroku and a Linux box on Digital Ocean, and so now I feel much more confident that the app I’m working on (more on that below) will actually see the light of day on something other than a dev machine!
The one thing that I started to build (and am continuing to work on) is an app with a DRF backend and a Vue.js front end that allows a user to track which Baseball stadia they’ve been to. So far I have an API set up via DRF (hosted at Heroku) and sketches of what to do in Vue.js. There's also a Django front end (but it’s not the solution I really want to use).
Writing code for 100 days is hard. Like really hard. For nearly 20 of those days I was on a family vacation in the Mid Western part of the US, but I made time for both the coding, and my family. My family was super supportive of my goal which was helpful, but the content in the course was really interesting and challenging and made me want to do it every day, which was also super helpful.
On day 85 I got a video from Bob that helped get me through the last 2 weeks. It was encouraging, and helpful which is just what I needed. So thank you Bob.
At the end I also got a nice congratulatory video from Julian, which was surprising to say the least, especially because he called out some of the things that I tweeted that I enjoyed about the class, addressed me by name, and just genuinely made me feel good about my accomplishment!
OK. I just wrapped up the 100 Days of Code with Python and the web. Now what?
I took a week off to recuperate and am now ready to ‘get back to it’.
After all, I’ve got baseball stadia to track in my app!
Talk Python to me Podcast
Why I like the Talk Python Podcast
When I started listening to it
Listening to the back catalog (nearly all of it)
Taking Down the RPi Camera Over My Hummingbird Feeder
As the temperature heats up it’s time to take down my hummingbird feeder. While the winds have cooled down the valley for the last few days, 100+ days are slowly creeping in and I need to take it down before the CPU melts.
When I took it down last year I though, meh, how hard could it be to put back up. And then I put it back up in the Fall last year and had nothing but problems.
This year, I wanted to document the wires and what not so that I can just put it back up once the temps cool down outside.
Anyway, I could describe it or just take some pictures ... so here are some pictures for when I need to set it up again later this year.
Above the feeder:

Wires to the sensor:

Wires to the GPIO pins:

Figuring out how Drafts REALLY works
On my way back from Arizona a few weeks ago I decided to play around with Drafts a bit. Now I use Drafts every day. When it went to a subscription model more than a year ago it was a no brainer for me. This is a seriously powerful app when you need it.
But since my initial workflows and shortcuts I've not really done too much with it. But after listening to some stuff from Tim Nahumck I decided I needed to invest a little time ... and honestly there's no better time than cruising at 25k feet on your way back from Phoenix.
Ok, first of all I never really understood workspaces. I had some set up but I didn't get it. That was the first place I started.
Each workspace can have its own action and keyboard shortcut thing which I didn't realize. This has so much potential. I can create workspaces for all sorts of things and have the keyboard shortcut things I need when I need them! This alone is mind blowing and I'm disappointed I didn't look into this feature sooner.
I have 4 workspaces set up:
- OF Templates
- O3
- Scrum
- post ideas
Initially since I didn't really understand the power of the workspace I had them mostly as filtering tools to be used when trying to find a draft. But now with the custom action and keyboards for each workspace I have them set up to filter down to specific tags AND use their own keyboards.
The OF Template workspace is used to create OmniFocus projects based on Taskpaper markup. There are a ton of different actions that I took from Rose Orchard (of Automators fame) that help to either add items with the correct syntax to a Task Paper markdown file OR turn the whole thing into an OmniFocus project. Simply a life saver for when I really know all of the steps that are going to be involved in a project and I want to write them all down!
The O3 workspace is used for processing the notes from the one-on-one I have with my team. There's really only two actions: Parse O3 notes and Add to O3 notes. How are these different? I have a Siri Shortcut that populates a Draft with a template that collects the name of the person and the date time that the O3 occurred. This is the note that is parsed by the first action. The second action is used when someone does something that I want to remember (either good or bad) so that I can bring it up at a more appropriate time (the best time to tell someone about a behavior is right now, but sometimes circumstances prevent that) so I have this little action.
In both cases they append data to a markdown file in Dropbox (i have one file per person that reports to me). The Shortcut also takes any actions that need to be completed and adds them to OmniFocus for me to review later.
The third workspace is Scrum. This workspace has just one action which is "Parse scrum notes". Again, I have a template that is generated from Siri Shortcuts and dropped into Drafts. During the morning standup meetings I have with my team this Draft will have the things I did yesterday, what I'm working on today, and any roadblocks that I have. It also create a section where I can add actions which when the draft is parsed goes into OmniFocus for me to review later (currently the items get added with a due date of today at 1pm ... but I need to revisit that).
The last workspace is post ideas (which is where I'm writing this from). Its custom keyboard is just a markdown one with quick ways to add markdown syntax and a Preview button so I can see what the markdown will render out as.
It's still a work in progress as this draft will end up in Ulysses so it can get posted to my site, but I've seen that I can even post from Drafts to Wordpress so I'm going to give that a shot later on.
There are several other ideas I have bouncing around in my head about ideas for potential workspaces. My only concern at this point is how many workspaces can I have before there are too many to be used effectively.
So glad I had the time on the flight to take a look at workspaces. A huge productivity boost for me!
Upgrading Python in a Virtual Environment
I have been wanting to use my Heroku account for a while with something a little more interesting than a Jupiter Notebook.
I was hoping to try and do something with Django … but there’s a lot to using Django. I have some interesting things I’m doing on my local machine, but it’s not quite ready yet.
I had googled to find other Python Web frameworks and saw that Bottle was an even more light weight framework than Flask, so I thought, hey, maybe I can do something with that.
I found this tutorial on how to do something relatively simple with Bottle and deploying to Heroku. Just what I wanted!
I got through to the end of the tutorial and deployed to Heroku. The terminal output from the Heroku command indicated that a newer version of Python (3.7.3) was available than the one I was on (3.7.1).
I figured it would be easy enough to upgrade to the newest version of Python on my Mac because I had done it before.
I don’t know why I thought the virtual environment would be different than the local install of Python 3 but it turns out they are more tightly coupled than I thought.
Upgrading to 3.7.3 broke the virtual environment I had in PyCharm. I did a bit a googling to see how to upgrade a virtual environment and found nothing. Like literally nothing.
It was ... disheartening. But after a good night’s sleep I had a thought! What if I just delete the virtual environment directory and then recreated it.
I ran this command to remove the virtual environment:
rm -R venv
Then created a virtual environment in PyCharm and now I have 3.7.3 in my virtual environment.
I had to make some changes to the files for deployment to Heroku, but that’s all covered in the tutorial mentioned above.
Sometimes the answer is to just restart it … and sometimes the answer is delete it and start over.
Update
I was listening to an episode of Python Bytes and heard Michael Kennedy (of Talk Python to Me fame) describing basically the same issue I had. Turns out, he solved it the same way I did. Nice to know i’m In good company.
Creating Hastags for Social Media with a Drafts Action
Creating meaningful, long #hastags can be a pain in the butt.
There you are, writing up a witty tweet or making that perfect caption for your instagram pic and you realize that you have a fantastic idea for a hash tag that is more of a sentence than a single word.
You proceed to write it out and unleash your masterpiece to the world and just as you hit the submit button you notice that you have a typo, or the wrong spelling of a word and #ohcrap you need to delete and retweet!
That lead me to write a Drafts Action to take care of that.
I’ll leave others to write about the virtues of Drafts, but it’s fantastic.
The Action I created has two steps: (1) to run some JavaScript and (2) to copy the contents of the draft to the Clipboard. You can get my action here.
Here’s the JavaScript that I used to take a big long sentence and turn it into a social media worthy hashtag
var contents = draft.content;
var newContents = "#";


editor.setText(newContents+contents.replace(/ /g, "").toLowerCase());
Super simple, but holy crap does it help!
Making it easy to ssh into a remote server: Addendum
I recently got a new raspberry pi (yes, I might have a problem) and wanted to be able to ssh into it without having to remember the IP or password. Luckily I wrote this helpful post several months ago.
While it go me most of the way there, I did run into a slight issue.
First Issue
The issue was that I had a typo for the command to generate a key. I had:
ssh-keyken -t rsa
Which should have been:
ssh-keygen -t rsa
When I copied and pasted the original command the terminal said there was no such command. 🤦♂️
Second Issue
Once that go cleared up I went through the steps and was able to get everything set up. Or so I thought. On attempting to ssh into my new pi I was greeted with a password prompt. WTF?
The first thing I did was to check to see what keys were in my \~/.ssh folder. Sure enough there were a couple of them in there.
ls ~/.ssh
id_rsa             id_rsa.github      id_rsa.github.pub  id_rsa.pub         known_hosts        read_only_key      read_only_key.pub
Next, I interrogated the help command for ssh-copy-id to see what flags were available.
Usage: /usr/bin/ssh-copy-id [-h|-?|-f|-n] [-i [identity_file]] [-p port] [[-o <ssh -o options>] ...] [user@]hostname
    -f: force mode -- copy keys without trying to check if they are already installed
    -n: dry run    -- no keys are actually copied
    -h|-?: print this help
I figured let’s try the -n flag and get the output from that. Doing so gave me
ryan@Ryans-MBP:~/Desktop$ ssh-copy-id -n pi@newpi
/usr/bin/ssh-copy-id: INFO: Source of key(s) to be installed: "/Users/ryan/.ssh/id_rsa.github.pub"
/usr/bin/ssh-copy-id: INFO: attempting to log in with the new key(s), to filter out any that are already installed

/usr/bin/ssh-copy-id: WARNING: All keys were skipped because they already exist on the remote system.
        (if you think this is a mistake, you may want to use -f option)
OK … why is it sending the GitHub key? That’s a different problem for a different time. I see another flag available is the -i which will allow me to specify which key I want to send. Aha!
OK, now all that I need to do is use the following command to test the output:
ssh-copy-id -n -i ~/.ssh/id_rsa.pub pi@newpi
And sure enough it’s sending the correct key
/usr/bin/ssh-copy-id: INFO: Source of key(s) to be installed: "/Users/ryan/.ssh/id_rsa.pub"
/usr/bin/ssh-copy-id: INFO: attempting to log in with the new key(s), to filter out any that are already installed

/usr/bin/ssh-copy-id: WARNING: All keys were skipped because they already exist on the remote system.
        (if you think this is a mistake, you may want to use -f option)
Remove the -n flag to send it for real
ssh-copy-id -i ~/.ssh/id_rsa.pub pi@newpi
And try to ssh in again
ssh pi@newpi
Success!
I wanted to write this up for 2 reasons:
- So I can refer back to it if I ever need to. This blog is mostly for me to write down technical things that I do so I can remember them later on
- This is the first time I’ve run into an issue with a command like tool and simply used the help to figure out how to fix the problem and I wanted to memorialize that. It felt forking awesome to do that.
Footnote: Yes … calling my new raspberry pi newpi in my hosts file is dumb. Yes, when I get my next new Raspberry Pi I will be wondering what to call it. YEs, I am going to try and remember to make the change before it happens so that I don’t end up with the next Pi being called newnewpi and the one after that being newnewnewpi
Page 8 / 13