Contributing to Tryceratops
I read about a project called Tryceratops on Twitter when it was tweeted about by Jeff Triplet
I checked it out and it seemed interesting. I decided to use it on my simplest Django project just to give it a test drive running this command:
tryceratops .
and got this result:
Done processing! 🦖✨
Processed 16 files
Found 0 violations
Failed to process 1 files
Skipped 2340 files
This is nice, but what is the file that failed to process?
This left me with two options:
- Complain that this awesome tool created by someone didn't do the thing I thought it needed to do
OR
- Submit an issue to the project and offer to help.
I went with option 2 😀
My initial commit was made in a pretty naive way. It did the job, but not in the best way for maintainability. I had a really great exchange with the maintainer Guilherme Latrova about the change that was made and he helped to direct me in a different direction.
The biggest thing I learned while working on this project (for Python at least) was the logging library. Specifically I learned how to add:
- a formatter
- a handler
- a logger
For my change, I added a simple format with a verbose handler in a custom logger. It looked something like this:
The formatter:
"simple": {
    "format": "%(message)s",
},
The handler:
"verbose_output": {
    "class": "logging.StreamHandler",
    "level": "DEBUG",
    "formatter": "simple",
    "stream": "ext://sys.stdout",
},
The logger:
"loggers": {
    "tryceratops": {
        "level": "INFO",
        "handlers": [
            "verbose_output",
        ],
    },
},
This allows the verbose flag to output the message to Standard Out and give and INFO level of detail.
Because of what I learned, I've started using the logging library on some of my work projects where I had tried to roll my own logging tool. I should have known there was a logging tool in the Standard Library BEFORE I tried to roll me own 🤦🏻♂️
The other thing I (kind of) learned how to do was to squash my commits. I had never had a need (or desire?) to squash commits before, but the commit message is what Guilherme uses to generate the change log. So, with his guidance and help I tried my best to squash those commits. Although in the end he had to do it (still not entiredly sure what I did wrong) I was exposed to the idea of squashing commits and why they might be done. A win-win!
The best part about this entire experience was getting to work with Guilherme Latrova. He was super helpful and patient and had great advice without telling me what to do. The more I work within the Python ecosystem the more I'm just blown away by just how friendly and helpful everyone is and it's what make me want to do these kinds of projects.
If you haven't had a chance to work on an open source project, I highly recommend it. It's a great chance to learn and to meet new people.
Contributing to django-sql-dashboard
Last Saturday (July 3rd) while on vacation, I dubbed it “Security update Saturday”. I took the opportunity to review all of the GitHub bot alerts about out of date packages, and make the updates I needed to.
This included updated django-sql-dashboard to version 1.0 … which I was really excited about doing. It included two things I was eager to see:
- Implemented a new column cog menu, with options for sorting, counting distinct items and counting by values. #57
- Admin change list view now only shows dashboards the user has permission to edit. Thanks, Atul Varma. #130
I made the updates on my site StadiaTracker.com using my normal workflow:
- Make the change locally on my MacBook Pro
- Run the tests
- Push to UAT
- Push to PROD
The next day, on July 4th, I got the following error message via my error logging:
Internal Server Error: /dashboard/games-seen-in-person/

ProgrammingError at /dashboard/games-seen-in-person/
could not find array type for data type information_schema.sql_identifier
So I copied the url /dashboard/games-seen-in-person/ to see if I could replicate the issue as an authenticated user and sure enough, I got a 500 Server error.
Troubleshooting process
The first thing I did was to fire up the local version and check the url there. Oddly enough, it worked without issue.
OK … well that’s odd. What are the differences between the local version and the uat / prod version?
The local version is running on macOS 10.15.7 while the uat / prod versions are running Ubuntu 18.04. That could be one source of the issue.
The local version is running Postgres 13.2 while the uat / prod versions are running Postgres 10.17
OK, two differences. Since the error is could not find array type for data type information_schema.sql_identifier I’m going to start with taking a look at the differences on the Postgres versions.
First, I looked at the Change Log to see what changed between version 0.16 and version 1.0. Nothing jumped out at me, so I looked at the diff between several files between the two versions looking specifically for information_schema.sql_identifier which didn’t bring up anything.
Next I checked for either information_schema or sql_identifier and found a chance in the views.py file. On line 151 (version 0.16) this change was made:
string_agg(column_name, ', ' order by ordinal_position) as columns
to this:
array_to_json(array_agg(column_name order by ordinal_position)) as columns
Next, I extracted the entire SQL statement from the views.py file to run in Postgres on the UAT server
            with visible_tables as (
              select table_name
                from information_schema.tables
                where table_schema = 'public'
                order by table_name
            ),
            reserved_keywords as (
              select word
                from pg_get_keywords()
                where catcode = 'R'
            )
            select
              information_schema.columns.table_name,
              array_to_json(array_agg(column_name order by ordinal_position)) as columns
            from
              information_schema.columns
            join
              visible_tables on
              information_schema.columns.table_name = visible_tables.table_name
            where
              information_schema.columns.table_schema = 'public'
            group by
              information_schema.columns.table_name
            order by
              information_schema.columns.table_name
Running this generated the same error I was seeing from the logs!
Next, I picked apart the various select statements, testing each one to see what failed, and ended on this one:
select information_schema.columns.table_name,
array_to_json(array_agg(column_name order by ordinal_position)) as columns
from information_schema.columns
Which generated the same error message. Great!
In order to determine how to proceed next I googled sql_identifier to see what it was. Turns out it’s a field type in Postgres! (I’ve been working in MSSQL for more than 10 years and as far as I know, this isn’t a field type over there, so I learned something)
Further, there were changes made to that field type in Postgres 12!
OK, since there were changes made to that afield type in Postgres 12, I’ll probably need to cast the field to another field type that won’t fail.
That led me to try this:
select information_schema.columns.table_name,
array_to_json(array_agg(cast(column_name as text) order by ordinal_position)) as columns
from information_schema.columns
Which returned a value without error!
Submitting the updated code
With the solution in hand, I read the Contribution Guide and submitting my patch. And the most awesome part? Within less than an hour Simon Willison (the project’s maintainer) had replied back and merged by code!
And then, the icing on the cake was getting a shout out in a post that Simon wrote up about the update that I submitted!
Holy smokes that was sooo cool.
I love solving problems, and I love writing code, so this kind of stuff just really makes my day.
Now, I’ve contributed to an open source project (that makes 3 now!) and the issue with the /dashboard/ has been fixed.
All
Publishing content to Pelican site
There are a lot of different ways to get the content for your Pelican site onto the internet. The Docs show an example using rsync.
For automation they talk about the use of either Invoke or Make (although you could also use Just instead of Make which is my preferred command runner.)
I didn't go with any of these options, instead opting to use GitHub Actions instead.
I have two GitHub Actions that will publish updated content. One action publishes to a UAT version of the site, and the other to the Production version of the site.
Why two actions you might ask?
Right now it's so that I can work through making my own theme and deploying it without disrupting the content on my production site. Also, it's a workflow that I'm pretty used to:
- Local Development
- Push to Development Branch on GitHub
- Pull Request into Main on GitHub
It kind of complicates things right now, but I feel waaay more comfortable with having a UAT version of my site that I can just undo if I need to.
Below is the code for the Prod Deployment
1 2 3 4 5 6 7 8 9 10 11 12 13 14 15 16 17 18 19 20 21 22 23 24 25 26 27 28 29 30 31 | |
Let's break it down a bit
Lines 3 - 6 are just indicating when the actually perform the actions in the lines below.
In line 13 I invoke the appleboy/ssh-action@v0.1.2 which allows me to ssh into my server and then run some command line functions.
On line 20 I remove the folder where the code was previously cloned from, and in line 21 I run the git clone command to download the code
Line 23 I activate my virtual environment
Line 25 I copy the code from the cloned repo into the directory of my site
Line 27 I change directory into the source for the site
Line 29 I make any updates to requirements with pip install
Finally, in line 31 I run the command to publish the content (which takes my .md files and turns them into HTML files to be seen on the internet)
Setting up the Server to host my Pelican Site
Creating the user on the server
Each site on my server has it's own user. This is a security consideration, more than anything else. For this site, I used the steps from some of my scripts for setting up a Django site. In particular, I ran the following code from the shell on the server:
adduser --disabled-password --gecos "" ryancheley

adduser ryancheley www-data
The first command above creates the user with no password so that they can't actually log in. It also creates the home directory /home/ryancheley. This is where the site will be server from.
The second commands adds the user to the www-data group. I don't think that's strictly necessary here, but in order to keep this user consistent with the other web site users, I ran it to add it to the group.
Creating the nginx config file
For the most part I cribbed the nginx config files from this blog post.
There were some changes that were required though. As I indicated in part 1, I had several requirements I was trying to fulfill, most notably not breaking historic links.
Here is the config file for my UAT site (the only difference between this and the prod site is the server name on line 3):
1 2 3 4 5 6 7 8 9 10 11 12 13 14 15 16 17 18 19 20 21 22 23 24 25 26 27 28 29 30 31 32 33 34 35 36 37 38 39 40 41 42 43 44 45 46 47 | |
The most interesting part of the code above is the location block from lines 6 - 11.
    location / {
        # Serve a .gz version if it exists
        gzip_static on;
        error_page 404 /404.html;
        rewrite ^/index.php/(.*) /$1  permanent;
    }
Custom 404 Page
error_page 404 /404.html;
This line is what allows me to have a custom 404 error page. If a page is not found nginx will serve up the html page 404.html which is generated by a markdown file in my pages directory and looks like this:
    Title: Not Found
    Status: hidden
    Save_as: 404.html

    The requested item could not be located.
I got this implementation idea from the Pelican docs.
Rewrite rule for index.php in the URL
rewrite ^/index.php/(.*) /$1 permanent;
The rewrite line fixes the index.php challenge I mentioned in the previous post
It took me a really long time to figure this out because the initial config file had a location block that looked like this:
1 2 3 4 5 | |
I didn't recognize the location = / { on line 1 as being different than the location block above starting at line 6. So I added
rewrite ^/index.php/(.*) /$1 permanent;
to that block and it NEVER worked because it never could.
The = in the location block indicates a literal exact match, which the regular expression couldn't do because it's trying to be dynamic, but the = indicates static 🤦🏻♂️
OK, we've got a user, and we've got a configuration file, now all we need is a way to get the files to the server.
I'll go over that in the next post.
Migrating to Pelican from Wordpress
A little back story
In October of 2017 I wrote about how I migrated from SquareSpace to Wordpress. After almost 4 years I’ve decided to migrate again, this time to Pelican. I did a bit of work with Pelican during my 100 Days of Web Code back in 2019.
A good question to ask is, “why migrate to a new platform” The answer, is that while writing my post Debugging Setting up a Django Project I had to go back and make a change. It was the first time I’d ever had to use the WordPress Admin to write anything ... and it was awful.
My writing and posting workflow involves Ulysses where I write everything in MarkDown. Having to use the WYSIWIG interface and the ‘blocks’ in WordPress just broke my brain. That meant what should have been a slight tweak ended up taking me like 45 minutes.
I decided to give Pelican a shot in a local environment to see how it worked. And it turned out to work very well for my brain and my writing style.
Setting it up
I set up a local instance of Pelican using the Quick Start guide in the docs.
Pelican has a CLI utility that converts the xml into Markdown files. This allowed me to export my Wordpress blog content to it’s XML output and save it in the Pelican directory I created.
I then ran the command:
pelican-import --wp-attach -o ./content ./wordpress.xml
This created about 140 .md files
Next, I ran a few Pelican commands to generate the output:
pelican content
and then the local web server:
pelican --listen
I reviewed the page and realized there was a bit of clean up that needed to be done. I had categories of Blog posts that only had 1 article, and were really just a different category that needed to be tagged appropriately. So, I made some updates to the categorization and tagging of the posts.
I also had some broken links I wanted to clean up so I took the opportunity to check the links on all of the pages and make fixes where needed. I used the library LinkChecker which made the process super easy. It is a CLI that generates HTML that you can then review. Pretty neat.
Deploying to a test server
The first thing to do was to update my DNS for a new subdomain to point to my UAT server. I use Hover and so it was pretty easy to add the new entry.
I set uat.ryancheley.com to the IP Address 178.128.188.134
Next, in order to have UAT serve requests for my new site I need to have a configuration file for Nginx. This post gave me what I needed as a starting point for the config file. Specifically it gave me the location blocks I needed:
    location = / {
        # Instead of handling the index, just
        # rewrite / to /index.html
        rewrite ^ /index.html;
    }
location / {
# Serve a .gz version if it exists
gzip_static on;
# Try to serve the clean url version first
try_files $uri.htm $uri.html $uri =404;
}
With that in hand I deployed my pelican site to the server
The first thing I noticed was that the URLs still had index.php in them. This is a hold over from how my WordPress URL schemes were set up initially that I never got around to fixing but it’s always something that’s bothered me.
My blog may not be something that is linked to a ton (or at all?), but I didn’t want to break any links if I didn’t have to, so I decided to investigate Nginx rewrite rules.
I spent a bit of time trying to get my url to from this:
https://www.ryancheley.com/index.php/2017/10/01/migrating-from-square-space-to-word-press/
to this:
https://www.ryancheley.com/migrating-from-square-space-to-word-press/
using rewrite rules.
I gave up after several hours of trying different things. This did lead me to some awesome settings for Pelican that would allow me to retain the legacy Wordpress linking structure, so I updated the settings file to include this line:
ARTICLE_URL = 'index.php/{date:%Y}/{date:%m}/{date:%d}/{slug}/'
ARTICLE_SAVE_AS = 'index.php/{date:%Y}/{date:%m}/{date:%d}/{slug}/index.html'
OK. I still have the index.php issue, but at least my links won’t break.
404 Not Found
I starting testing the links on the site just kind of clicking here and there and discovered a couple of things:
- The menu links didn’t always work
- The 404 page wasn’t styled like I wanted it to me styled
The pelican documentation has an example for creating your own 404 pages which also includes what to update the Nginx config file location block.
And this is what lead me to discover what I had been doing wrong for the rewrites earlier!
There are two location blocks in the example code I took, but I didn’t see how they were different.
The first location block is:
    location = / {
        # Instead of handling the index, just
        # rewrite / to /index.html
        rewrite ^ /index.html;
    }
Per the Nginx documentation the =
If an equal sign is used, this block will be considered a match if the request URI exactly matches the location given.
BUT since I was trying to use a regular expression, it wasn’t matching exactly and so it wasn’t ‘working’
The second location block was not an exact match (notice there is no = in the first line:
location / {
        # Serve a .gz version if it exists
        gzip_static on;
        # Try to serve the clean url version first
        try_files $uri.htm $uri.html $uri =404;
    }
When I added the error page setting for Pelican I also added the URL rewrite rules to remove the index.php and suddenly my dream of having the redirect rules worked!
Additionally, I didn’t need the first location block at all. The final location block looks like this:
    location / {
        # Serve a .gz version if it exists
        gzip_static on;
        # Try to serve the clean url version first
        # try_files $uri.htm $uri.html $uri =404;
        error_page 404 /404.html;
        rewrite ^/index.php/(.*) /$1  permanent;
    }
I was also able to update my Pelican settings to this:
ARTICLE_URL = '{date:%Y}/{date:%m}/{date:%d}/{slug}/'
ARTICLE_SAVE_AS = '{date:%Y}/{date:%m}/{date:%d}/{slug}/index.html'
Victory!
What I hope to gain from moving
In my post outlining the move from SquareSpace to Wordpress I said,
As I wrote earlier my main reason for leaving Square Space was the difficulty I had getting content in. So, now that I’m on a WordPress site, what am I hoping to gain from it?
- Easier to post my writing
- See Item 1
Writing is already really hard for me. I struggle with it and making it difficult to get my stuff out into the world makes it that much harder. My hope is that not only will I write more, but that my writing will get better because I’m writing more.
So, what am I hoping to gain from this move:
- Just as easy to write my posts
- Easier to edit my posts
Writing is still hard for me (nearly 4 years later) and while moving to a new shiny tool won’t make the thinking about writing any easier, maybe it will make the process of writing a little more fun and that may lead to more words!
Addendum
There are already a lot of words here and I have more to say on this. I plan on writing a couple of more posts about the migration:
- Setting up the server to host Pelican
- The writing workflow used
Debugging Setting up a Django Project
Normally when I start a new Django project I’ll use the PyCharm setup wizard, but recently I wanted to try out VS Code for a Django project and was super stumped when I would get a message like this:
ERROR:root:code for hash md5 was not found.
Traceback (most recent call last):
  File "/usr/local/Cellar/python@2/2.7.15_1/Frameworks/Python.framework/Versions/2.7/lib/python2.7/hashlib.py", line 147, in <module>
    globals()[__func_name] = __get_hash(__func_name)
  File "/usr/local/Cellar/python@2/2.7.15_1/Frameworks/Python.framework/Versions/2.7/lib/python2.7/hashlib.py", line 97, in __get_builtin_constructor
    raise ValueError('unsupported hash type ' + name)
ValueError: unsupported hash type md5
ERROR:root:code for hash sha1 was not found.
Traceback (most recent call last):
  File "/usr/local/Cellar/python@2/2.7.15_1/Frameworks/Python.framework/Versions/2.7/lib/python2.7/hashlib.py", line 147, in <module>
    globals()[__func_name] = __get_hash(__func_name)
  File "/usr/local/Cellar/python@2/2.7.15_1/Frameworks/Python.framework/Versions/2.7/lib/python2.7/hashlib.py", line 97, in __get_builtin_constructor
    raise ValueError('unsupported hash type ' + name)
ValueError: unsupported hash type sha1
ERROR:root:code for hash sha224 was not found.
Traceback (most recent call last):
  File "/usr/local/Cellar/python@2/2.7.15_1/Frameworks/Python.framework/Versions/2.7/lib/python2.7/hashlib.py", line 147, in <module>
    globals()[__func_name] = __get_hash(__func_name)
  File "/usr/local/Cellar/python@2/2.7.15_1/Frameworks/Python.framework/Versions/2.7/lib/python2.7/hashlib.py", line 97, in __get_builtin_constructor
    raise ValueError('unsupported hash type ' + name)
ValueError: unsupported hash type sha224
ERROR:root:code for hash sha256 was not found.
Traceback (most recent call last):
  File "/usr/local/Cellar/python@2/2.7.15_1/Frameworks/Python.framework/Versions/2.7/lib/python2.7/hashlib.py", line 147, in <module>
    globals()[__func_name] = __get_hash(__func_name)
  File "/usr/local/Cellar/python@2/2.7.15_1/Frameworks/Python.framework/Versions/2.7/lib/python2.7/hashlib.py", line 97, in __get_builtin_constructor
    raise ValueError('unsupported hash type ' + name)
ValueError: unsupported hash type sha256
ERROR:root:code for hash sha384 was not found.
Traceback (most recent call last):
  File "/usr/local/Cellar/python@2/2.7.15_1/Frameworks/Python.framework/Versions/2.7/lib/python2.7/hashlib.py", line 147, in <module>
    globals()[__func_name] = __get_hash(__func_name)
  File "/usr/local/Cellar/python@2/2.7.15_1/Frameworks/Python.framework/Versions/2.7/lib/python2.7/hashlib.py", line 97, in __get_builtin_constructor
    raise ValueError('unsupported hash type ' + name)
ValueError: unsupported hash type sha384
ERROR:root:code for hash sha512 was not found.
Traceback (most recent call last):
  File "/usr/local/Cellar/python@2/2.7.15_1/Frameworks/Python.framework/Versions/2.7/lib/python2.7/hashlib.py", line 147, in <module>
    globals()[__func_name] = __get_hash(__func_name)
  File "/usr/local/Cellar/python@2/2.7.15_1/Frameworks/Python.framework/Versions/2.7/lib/python2.7/hashlib.py", line 97, in __get_builtin_constructor
    raise ValueError('unsupported hash type ' + name)
ValueError: unsupported hash type sha512
Here are the steps I was using to get started
From a directory I wanted to create the project I would set up my virtual environment
python3 -m venv venv
And then activate it
source venv/bin/activate
Next, I would install Django
pip install django
Next, using the startproject command per the docs I would
django-admin startproject my_great_project .
And get the error message above 🤦🏻♂️
The strangest part about the error message is that it references Python2.7 everywhere … which is odd because I’m in a Python3 virtual environment.
I did a pip list and got:
Package    Version
---------- -------
asgiref    3.3.4
Django     3.2.4
pip        21.1.2
pytz       2021.1
setuptools 49.2.1
sqlparse   0.4.1
OK … so everything is in my virtual environment. Let’s drop into the REPL and see what’s going on

Well, that looks to be OK.
Next, I checked the contents of my directory using tree -L 2
├── manage.py
├── my_great_project
│   ├── __init__.py
│   ├── settings.py
│   ├── urls.py
│   └── wsgi.py
└── venv
    ├── bin
    ├── include
    ├── lib
    └── pyvenv.cfg
Yep … that looks good too.
OK, let’s go look at the installed packages for Python 2.7 then. On macOS they’re installed at
/usr/local/lib/python2.7/site-packages
Looking in there and I see that Django is installed.
OK, let’s use pip to uninstall Django from Python2.7, except that pip gives essentially the same result as running the django-admin command.
OK, let’s just remove it manually. After a bit of googling I found this Stackoverflow answer on how to remove the offending package (which is what I assumed would be the answer, but better to check, right?)
After removing the Django install from Python 2.7 and running django-admin --version I get

So I googled that error message and found another answers on Stackoverflow which lead me to look at the manage.py file. When I cat the file I get:
# manage.py

#!/usr/bin/env python
import os
import sys

...
That first line SHOULD be finding the Python executable in my virtual environment, but it’s not.
Next I googled the error message django-admin code for hash sha384 was not found
Which lead to this Stackoverflow answer. I checked to see if Python2 was installed with brew using
brew leaves | grep python
which returned python@2
Based on the answer above, the solution was to uninstall the Python2 that was installed by brew. Now, although Python2 has retired, I was leery of uninstalling it on my system without first verifying that I could remove the brew version without impacting the system version which is needed by macOS.
Using brew info python@2 I determined where brew installed Python2 and compared it to where Python2 is installed by macOS and they are indeed different
Output of brew info python@2
...
/usr/local/Cellar/python@2/2.7.15_1 (7,515 files, 122.4MB) *
  Built from source on 2018-08-05 at 15:18:23
...
Output of which python
/usr/bin/python
OK, now we can remove the version of Python2 installed by brew
brew uninstall python@2
Now with all of that cleaned up, lets try again. From a clean project directory:
python3 -m venv venv
source venv/bin/activate
pip install django
django-admin --version
The last command returned
zsh: /usr/local/bin/django-admin: bad interpreter: /usr/local/opt/python@2/bin/python2.7: no such file or directory
3.2.4
OK, I can get the version number and it mostly works, but can I create a new project?
django-admin startproject my_great_project .
Which returns
zsh: /usr/local/bin/django-admin: bad interpreter: /usr/local/opt/python@2/bin/python2.7: no such file or directory
BUT, the project was installed
├── db.sqlite3
├── manage.py
├── my_great_project
│   ├── __init__.py
│   ├── __pycache__
│   ├── asgi.py
│   ├── settings.py
│   ├── urls.py
│   └── wsgi.py
└── venv
    ├── bin
    ├── include
    ├── lib
    └── pyvenv.cfg
And I was able to run it
python manage.py runserver

Success! I’ve still got that last bug to deal with, but that’s a story for a different day!
Short Note
My initial fix, and my initial draft for this article, was to use the old adage, turn it off and turn it back on. In this case, the implementation would be the deactivate and then re activate the virtual environment and that’s what I’d been doing.
As I was writing up this article I was hugely influenced by the work of Julie Evans and kept asking, “but why?”. She’s been writing a lot of awesome, amazing things, and has several zines for purchase that I would highly recommend.
She’s also generated a few debugging ‘games’ that are a lot of fun.
Anyway, thanks Julie for pushing me to figure out the why for this issue.
Post Script
I figured out the error message above and figured, well, I might as well update the post! I thought it had to do with zsh, but no, it was just more of the same.
The issue was that Django had been installed in the base Python2 (which I knew). All I had to do was to uninstall it with pip.
pip uninstall django
The trick was that pip wasn't working out for me ... it was generating errors. So I had to run the command
python -m pip uninstall django
I had to run this AFTER I put the Django folder back into /usr/local/lib/python2.7/site-packages (if you'll recall from above, I removed it from the folder)
After that clean up was done, everything worked out as expected! I just had to keep digging!
My First Python Package
A few months ago I was inspired by Simon Willison and his project Datasette and it’s related ecosystem to write a Python Package for it.
I use toggl to track my time at work and I thought this would be a great opportunity use that data with Datasette and see if I couldn’t answer some interesting questions, or at the very least, do some neat data discovery.
The purpose of this package is to:
Create a SQLite database containing data from your toggl account
I followed the tutorial for committing a package to PyPi and did the first few pushes manually. Then, using a GitHub action from one of Simon’s Datasette projects, I was able to automate it when I make a release on GitHub!
Since the initial commit on March 7 (my birthday BTW) I’ve had 10 releases, with the most recent one coming yesterday which removed an issue with one of the tables reporting back an API key which, if published on the internet could be a bad thing ... so hooray for security enhancements!
Anyway, it was a fun project, and got me more interested in authoring Python packages. I’m hoping to do a few more related to Datasette (although I’m not sure what to write honestly!).
Be sure to check out the package on PyPi.org and the source code on GitHub.
How does my Django site connect to the internet anyway?
I created a Django site to troll my cousin Barry who is a big San Diego Padres fan. Their Shortstop is a guy called Fernando Tatis Jr. and he’s really good. Like really good. He’s also young, and arrogant, and is everything an old dude like me doesn’t like about the ‘new generation’ of ball players that are changing the way the game is played.
In all honesty though, it’s fun to watch him play (anyone but the Dodgers).
The thing about him though, is that while he’s really good at the plate, he’s less good at playing defense. He currently leads the league in errors. Not just for all shortstops, but for ALL players!
Anyway, back to the point. I made this Django site call Does Tatis Jr Have an Error Today?It is a simple site that only does one thing ... tells you if Tatis Jr has made an error today. If he hasn’t, then it says No, and if he has, then it says Yes.
It’s a dumb site that doesn’t do anything else. At all.
But, what it did do was lead me down a path to answer the question, “How does my site connect to the internet anyway?”
Seems like a simple enough question to answer, and it is, but it wasn’t really what I thought when I started.
How it works
I use a MacBook Pro to work on the code. I then deploy it to a Digital Ocean server using GitHub Actions. But they say, a picture is worth a thousand words, so here's a chart of the workflow:

This shows the development cycle, but that doesn’t answer the question, how does the site connect to the internet!
How is it that when I go to the site, I see anything? I thought I understood it, and when I tried to actually draw it out, turns out I didn't!
After a bit of Googling, I found this and it helped me to create this:
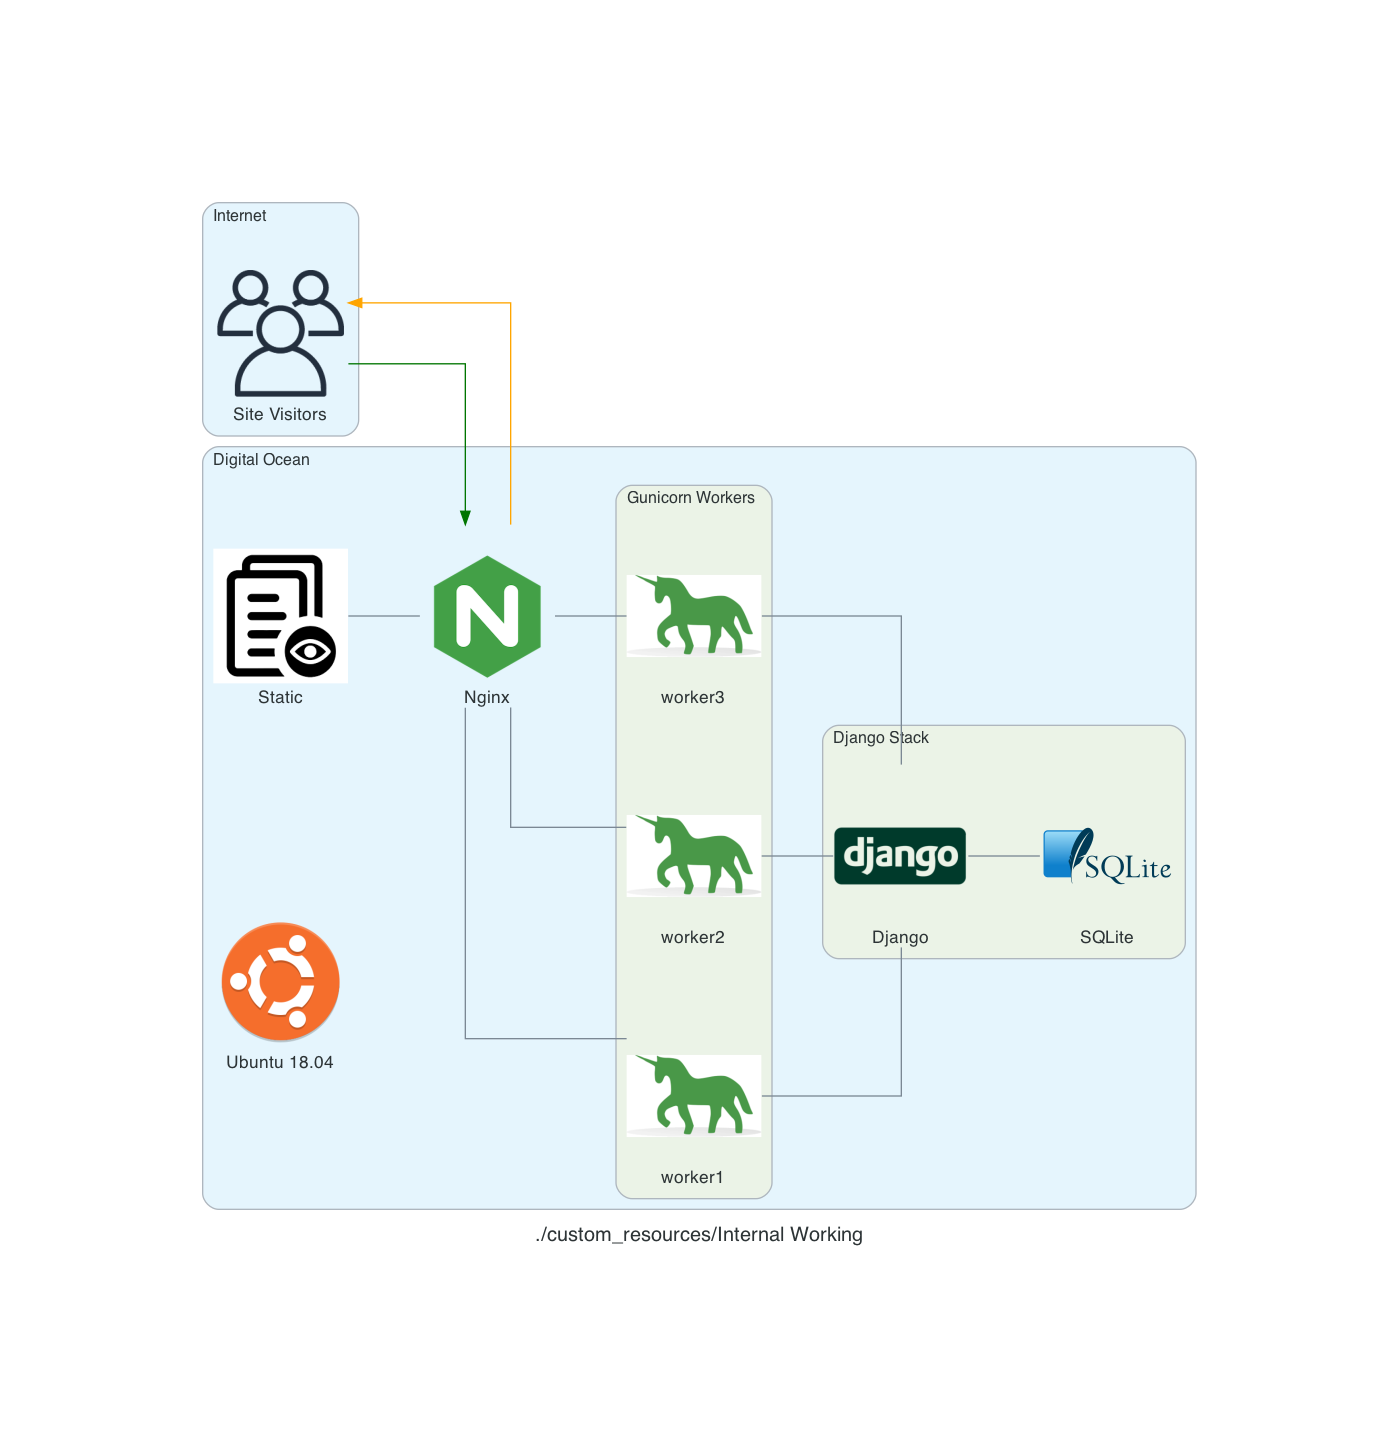
My site runs on an Ubuntu 18.04 server using Nginx as proxy server. Nginx determines if the request is for a static asset (a css file for example) or dynamic one (something served up by the Django App, like answering if Tatis Jr. has an error today).
If the request is static, then Nginx just gets the static data and server it. If it’s dynamic data it hands off the request to Gunicorn which then interacts with the Django App.
So, what actually handles the HTTP request? From the serverfault.com answer above:
[T]he simple answer is Gunicorn. The complete answer is both Nginx and Gunicorn handle the request. Basically, Nginx will receive the request and if it's a dynamic request (generally based on URL patterns) then it will give that request to Gunicorn, which will process it, and then return a response to Nginx which then forwards the response back to the original client.
In my head, I thought that Nginx was ONLY there to handle the static requests (and it is) but I wasn’t clean on how dynamic requests were handled ... but drawing this out really made me stop and ask, “Wait, how DOES that actually work?”
Now I know, and hopefully you do to!
Notes:
These diagrams are generated using the amazing library Diagrams. The code used to generate them is here.
Enhancements: Using GitHub Actions to Deploy
Integrating a version control system into your development cycle is just kind of one of those things that you do, right? I use GutHub for my version control, and it’s GitHub Actions to help with my deployment process.
There are 3 yaml files I have to get my local code deployed to my production server:
- django.yaml
- dev.yaml
- prod.yaml
Each one serving it’s own purpose
django.yaml
The django.yaml file is used to run my tests and other actions on a GitHub runner. It does this in 9 distinct steps and one Postgres service.
The steps are:
- Set up Python 3.8 - setting up Python 3.8 on the docker image provided by GitHub
- psycopg2 prerequisites - setting up
psycopg2to use the Postgres service created - graphviz prerequisites - setting up the requirements for graphviz which creates an image of the relationships between the various models
- Install dependencies - installs all of my Python package requirements via pip
- Run migrations - runs the migrations for the Django App
- Load Fixtures - loads data into the database
- Lint - runs
blackon my code - Flake8 - runs
flake8on my code - Run Tests - runs all of the tests to ensure they pass
name: Django CI

on:
  push:
    branches-ignore:
      - main
      - dev

jobs:

  build:
    runs-on: ubuntu-18.04
    services:
      postgres:
        image: postgres:12.2
        env:
          POSTGRES_USER: postgres
          POSTGRES_PASSWORD: postgres
          POSTGRES_DB: github_actions
        ports:
          - 5432:5432
        # needed because the postgres container does not provide a healthcheck
        options: --health-cmd pg_isready --health-interval 10s --health-timeout 5s --health-retries 5

    steps:
    - uses: actions/checkout@v1
    - name: Set up Python 3.8
      uses: actions/setup-python@v1
      with:
        python-version: 3.8
    - uses: actions/cache@v1
      with:
        path: ~/.cache/pip
        key: ${{ runner.os }}-pip-${{ hashFiles('**/requirements.txt') }}
        restore-keys: |
          ${{ runner.os }}-pip-
    - name: psycopg2 prerequisites
      run: sudo apt-get install python-dev libpq-dev
    - name: graphviz prerequisites
      run: sudo apt-get install graphviz libgraphviz-dev pkg-config
    - name: Install dependencies
      run: |
        python -m pip install --upgrade pip
        pip install psycopg2
        pip install -r requirements/local.txt
    - name: Run migrations
      run: python manage.py migrate
    - name: Load Fixtures
      run: |
        python manage.py loaddata fixtures/User.json
        python manage.py loaddata fixtures/Sport.json
        python manage.py loaddata fixtures/League.json
        python manage.py loaddata fixtures/Conference.json
        python manage.py loaddata fixtures/Division.json
        python manage.py loaddata fixtures/Venue.json
        python manage.py loaddata fixtures/Team.json
    - name: Lint
      run: black . --check
    - name: Flake8
      uses: cclauss/GitHub-Action-for-Flake8@v0.5.0
    - name: Run tests
      run: coverage run -m pytest
dev.yaml
The code here does essentially they same thing that is done in the deploy.sh in my earlier post Automating the Deployment except that it pulls code from my dev branch on GitHub onto the server. The other difference is that this is on my UAT server, not my production server, so if something goes off the rails, I don’t hose production.
name: Dev CI

on:
  pull_request:
    branches:
      - dev

jobs:
  deploy:
    runs-on: ubuntu-18.04
    steps:
      - name: deploy code
        uses: appleboy/ssh-action@v0.1.2
        with:
          host: ${{ secrets.SSH_HOST_TEST }}
          key: ${{ secrets.SSH_KEY_TEST }}
          username: ${{ secrets.SSH_USERNAME }}

          script: |
            rm -rf StadiaTracker
            git clone --branch dev git@github.com:ryancheley/StadiaTracker.git

            source /home/stadiatracker/venv/bin/activate

            cd /home/stadiatracker/

            rm -rf /home/stadiatracker/StadiaTracker

            cp -r /root/StadiaTracker/ /home/stadiatracker/StadiaTracker

            cp /home/stadiatracker/.env /home/stadiatracker/StadiaTracker/StadiaTracker/.env

            pip -q install -r /home/stadiatracker/StadiaTracker/requirements.txt

            python /home/stadiatracker/StadiaTracker/manage.py migrate

            mkdir /home/stadiatracker/StadiaTracker/static
            mkdir /home/stadiatracker/StadiaTracker/staticfiles

            python /home/stadiatracker/StadiaTracker/manage.py collectstatic --noinput -v0

            systemctl daemon-reload
            systemctl restart stadiatracker
prod.yaml
Again, the code here does essentially they same thing that is done in the deploy.sh in my earlier post Automating the Deployment except that it pulls code from my main branch on GitHub onto the server.
name: Prod CI

on:
  pull_request:
    branches:
      - main

jobs:
  deploy:
    runs-on: ubuntu-18.04
    steps:
      - name: deploy code
        uses: appleboy/ssh-action@v0.1.2
        with:
          host: ${{ secrets.SSH_HOST }}
          key: ${{ secrets.SSH_KEY }}
          username: ${{ secrets.SSH_USERNAME }}

          script: |
            rm -rf StadiaTracker
            git clone git@github.com:ryancheley/StadiaTracker.git

            source /home/stadiatracker/venv/bin/activate

            cd /home/stadiatracker/

            rm -rf /home/stadiatracker/StadiaTracker

            cp -r /root/StadiaTracker/ /home/stadiatracker/StadiaTracker

            cp /home/stadiatracker/.env /home/stadiatracker/StadiaTracker/StadiaTracker/.env

            pip -q install -r /home/stadiatracker/StadiaTracker/requirements.txt

            python /home/stadiatracker/StadiaTracker/manage.py migrate

            mkdir /home/stadiatracker/StadiaTracker/static
            mkdir /home/stadiatracker/StadiaTracker/staticfiles

            python /home/stadiatracker/StadiaTracker/manage.py collectstatic --noinput -v0

            systemctl daemon-reload
            systemctl restart stadiatracker
The general workflow is:
- Create a branch on my local computer with
git switch -c branch_name - Push the code changes to GitHub which kicks off the
django.yamlworkflow. - If everything passes then I do a pull request from
branch_nameintodev. - This kicks off the
dev.yamlworkflow which will update UAT - I check UAT to make sure that everything works like I expect it to (it almost always does … and when it doesn’t it’s because I’ve mucked around with a server configuration which is the problem, not my code)
- I do a pull request from
devtomainwhich updates my production server
My next enhancement is to kick off the dev.yaml process if the tests from django.yaml all pass, i.e. do an auto merge from branch_name to dev, but I haven’t done that yet.
Setting up multiple Django Sites on a Digital Ocean server
If you want to have more than 1 Django site on a single server, you can. It’s not too hard, and using the Digital Ocean tutorial as a starting point, you can get there.
Using this tutorial as a start, we set up so that there are multiple Django sites being served by gunicorn and nginx.
Creating systemd Socket and Service Files for Gunicorn
The first thing to do is to set up 2 Django sites on your server. You’ll want to follow the tutorial referenced above and just repeat for each.
Start by creating and opening two systemd socket file for Gunicorn with sudo privileges:
Site 1
sudo vim /etc/systemd/system/site1.socket
Site 2
sudo vim /etc/systemd/system/site2.socket
The contents of the files will look like this:
[Unit]
Description=siteX socket

[Socket]
ListenStream=/run/siteX.sock

[Install]
WantedBy=sockets.target
Where siteX is the site you want to server from that socket
Next, create and open a systemd service file for Gunicorn with sudo privileges in your text editor. The service filename should match the socket filename with the exception of the extension
sudo vim /etc/systemd/system/siteX.service
The contents of the file will look like this:
[Unit]
Description=gunicorn daemon
Requires=siteX.socket
After=network.target

[Service]
User=sammy
Group=www-data
WorkingDirectory=path/to/directory
ExecStart=path/to/gunicorn/directory
         --access-logfile -
         --workers 3
         --bind unix:/run/gunicorn.sock
         myproject.wsgi:application

[Install]
WantedBy=multi-user.target
Again siteX is the socket you want to serve
Follow tutorial for testing Gunicorn
Nginx
server {
    listen 80;
    server_name server_domain_or_IP;

    location = /favicon.ico { access_log off; log_not_found off; }
    location /static/ {
        root /path/to/project;
    }

    location / {
        include proxy_params;
        proxy_pass http://unix:/run/siteX.sock;
    }
}
Again siteX is the socket you want to serve
Next, link to enabled sites
Test Nginx
Open firewall
Should now be able to see sites at domain names
Page 10 / 24